48 Gaining Access – Password Cracking
Justin La Zare
This lab should familiarize students with generating password hashes and techniques for cracking them. It should also demonstrate brute force and dictionary attacks.
Learning Objectives
- 1. Generate password hashes
- 2. Identify different hash types
- 3. Perform a brute force attack using John the Ripper
- 4. Perform a dictionary attack using Hashcat
Prerequisites
Deliverables
- Screenshot of the hashes file
- Screenshot of John the Ripper brute force attack
- Screenshot of Hashcat finished dictionary attack
- Screenshot of Hashcat showing the cracked hashes
Resources
- 1. Jain, Rakesh. “How to create SHA512/SHA256/MD5 password hashes on command line.” Medium. Accessed May 29, 2024. https://rakeshjain-devops.medium.com/how-to-create-sha512-sha256-md5-password-hashes-on-command-line-2223db20c08c
- 2. m5kro. “Hashcat vs John the Ripper (JTR).” Medium. Accessed May 29, 2024. https://medium.com/cyberscribers-exploring-cybersecurity/hashcat-vs-john-the-ripper-jtr-f207c34c5b1c
- 3. “John the Ripper user community resources.” openwall [wiki]. Accessed May 29, 2024. https://openwall.info/wiki/john
- 4. “Hashcat Advanced Password Recovery.” hashcat [hashcat wiki]. Accessed May 29, 2024. https://hashcat.net/wiki/doku.php?id=hashcat.
Contributors and Testers
- Dante Rocca, Cybersecurity Student, ERAU-Prescott
- Jacob M. Christensen, Cybersecurity Student, ERAU-Prescott
Phase I – Password Hash Generation with mkpasswd
Before we can crack password hashes, we are going to need password hashes. This lab will walk you through generating password hashes utilizing native Linux tools.
- Turn on the Kali VM
- Open the terminal and run this command to navigate to the Desktop
> cd ~/Desktop
- We are going to generate a couple of passwords: one that is easily susceptible to a brute force attack and two that will require a dictionary/wordlist attack
- We will choose a very low-complexity password to generate a password susceptible to a brute-force attack. Lower complexity means a smaller password with a smaller character set. In this case, we will generate a hash for the password “abc123,” which is short (6 characters) and only features lowercase letters and numbers
> mkpasswd -m md5 abc123 | tee -a hashes
- Notice above how we use the tee command; this will output the hash to stdout (the terminal) so we can see the hash we generated, but it will also append the hash to the end of a file called “hashes” on the desktop (if that file does not exist, it will create it)
- Next, we will generate two passwords susceptible to a dictionary/wordlist attack and add them to the “hashes” file
> mkpasswd -m md5 Cybergenius28 | tee -a hashes
> mkpasswd -m md5 t0byD0g\$ | tee -a hashes
NOTE: The “\” is not part of the password. The “$” indicates to the shell that we want to access a user or environment variable. This indicates that we are not trying to access a variable called “Skywalker1” (from the first password) or 12345 (from the second password), but we are trying to use the “$” sign as a character. The “\” is used to escape the variable declaration.
- We should now have the following file
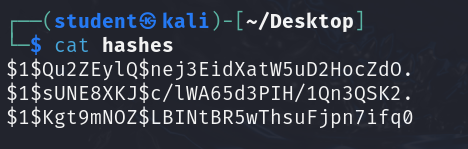
Figure 1 – Verify the contents of the hashes file NOTE: The hashes you generate may be different than the hashes displayed. This is because these are salted hashes. The random bit of characters $1$ABCDEFGH$xxxxxx… are mixed in with the password to generate the hash. This is so people with the same password do not have identical password hashes, especially thwarting attackers who use rainbow tables.
Phase II – Brute Force Attack with John the Ripper
John the Ripper is a mostly CPU-based password cracker. This is a good tool for “quick-and-dirty” applications. It supports various hash types and features support for automatic hash type detection. We will use this tool to perform a brute-force attack, though it can do a wide variety of attacks. A proper brute force attack is guaranteed to crack a password (assuming an exhaustive character set); however, depending on a password’s complexity and length, we could be talking about time on the scale of the lifetime of the universe to crack some passwords.
- To perform a brute-force attack using John the Ripper, run the following command on the “hashes” file from the previous phase
> john ~/Desktop/hashes –incremental
- After running the command, you should see that John the Ripper could quickly crack the “abc123” password

Figure 2 – Brute-force attack with John the Ripper - Let it run for a few minutes. Hit the spacebar to see the progress at any time. You should see something similar to this

Figure 3 – Checking the status of the brute-force attack - John may finish in 5 minutes, 5 days, or 5 millennia, and you will see all the plaintext passwords that John cracked outputted onto the terminal. However, we will not wait; press q to end the process
- If you want to return to the password hashes you already cracked or lost the terminal where you cracked the password, John the Ripper caches them. To view the cracked passwords again, you can run the following command
> john ~/Desktop/hashes –show
Phase III – Dictionary Attack with Hashcat
Hashcat is a mostly GPU-based password cracker. This is the go-to for computationally intensive and more advanced password cracking. It also supports various hash types and features basic automatic hash type detection. We will use this tool to perform a dictionary attack, though it can also perform a wide variety of attacks.
A dictionary, or wordlist, attack is an alternate means of cracking passwords and is much faster than brute force. However, it is not guaranteed to work. It takes a preset list of passwords (called a dictionary or wordlist), runs them through a hashing algorithm, and checks whether that hash matches any of the hashes we are trying to crack. If the hashes match, we know what the original input was. While this isn’t guaranteed to work, it is a good way to rule out common passwords and is typically faster than brute force.
There are many different ‘wordlists,’ so knowing the most about your target will help you determine which wordlist is the most appropriate. Do they know a foreign language? Are they movie buffs? Sports buffs? What are their likely hobbies? You can download and use many repositories of various wordlists, such as the ones found in SecLists (https://github.com/danielmiessler/SecLists/tree/master/Passwords/).
- A dictionary or wordlist attack in hashcat typically looks like the following
> hashcat -m <hash type> -a 0 <hash or hashes file> <wordlist>
- Notice that we need to figure out what the hash type is, and we need find a wordlist to use
- Though we created the hashes earlier, if we stumble across a password dump, we might not know what kinds of hashes we are looking at. Let’s use the tool hash-identifier to determine what hash type we need to attack
> hash-identifier
- This tool takes in a hash and tries to identify what type of hash it is. Plugging in one of the hashes from our “hashes” file, we can see it detected this as an “MD5 (Unix)” hash

Figure 4 – Identifying a hash type with hash-identifier NOTE: hash-identifier is a good first step in some cases, but it will not be able to identify all hashes you throw at it. If this does not work, it might make sense to go online and research the characteristics of the hashes you are trying to crack. For instance, some might have an identifiable prefix like “$6” (sha512crypt) or “$y” (yescrypt). Searching “$6 hash” or “$y hash” online will confirm this.
- Now that we know the hash type is “MD5 (Unix)”, we can run the following command
> hashcat -h
- This will print out a very, very long help menu. This help menu not only contains different flags that can modify the behavior of hashcat, but it also contains many informational tables about different hash types, attack types, and more. We will look for the number corresponding to the hash type we identified earlier by scrolling until we find the hash type table
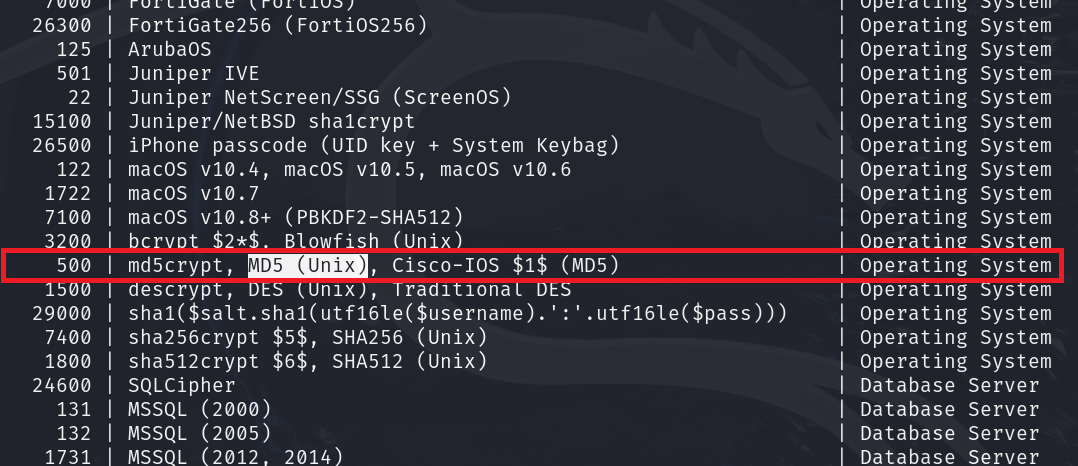
Figure 5 – Finding the hash type in the hashcat table - Now that we have the hash type, we need a wordlist to complete the dictionary attack
- Kali VMs come pre-equipped with rockyou.txt, a wordlist of 14 million+ unique passwords from the data breach of the popular social media platform RockYou in 2009. Though this list is from 2009, people still come up with passwords much the same, making this list relevant today. To access this wordlist, however, we will need to uncompress it
- Run the following command to uncompress rockyou.txt.gz using gunzip
> sudo gzip -d /usr/share/wordlists/rockyou.txt.gz
NOTE: “/usr/share/wordlists” contains many wordlists that might be more applicable in other use cases. Feel free to explore.
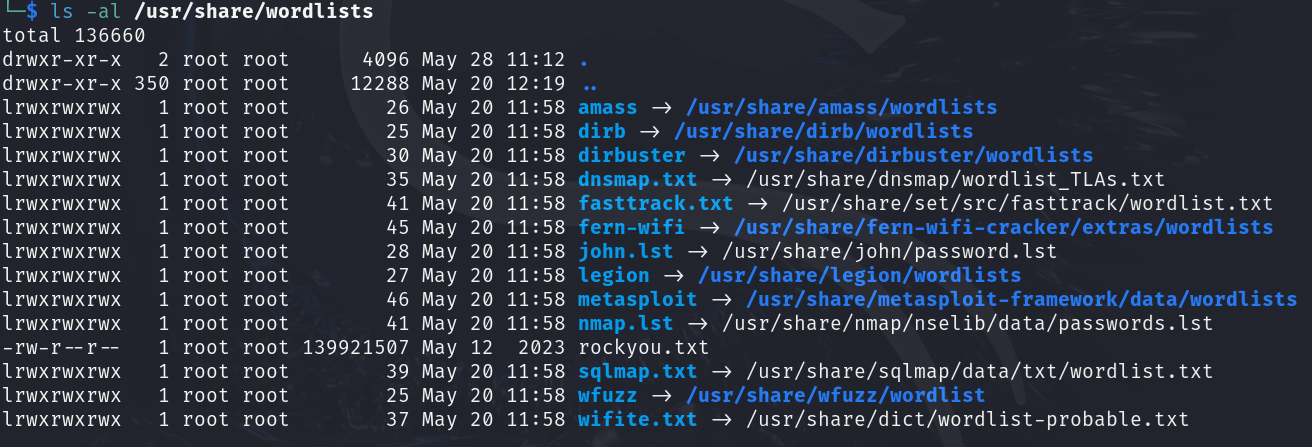
Figure 6 – Looking at wordlists built into Kali - Now, we have all the information we need to run the dictionary attack using hashcat. Plugging in the following information, we can execute the attack using the following command
> hashcat -m 500 -a 0 ~/Desktop/hashes /usr/share/wordlists/rockyou.txt
NOTE: If you run into the “Not enough allocatable device memory for this attack” error, shut down the Kali VM and allocate more RAM. If the attack will take too long, try increasing the number of vCPUs the VM has. Since we are in a VM, we can tack on “-w 3” or “-w 4” to increase the attack’s CPU utilization/workload. We recommend sticking to workload levels 1-2 on a host machine because it can start eating away at resources that let us use our mouse or display pictures on the screen.
- Pressing s, we can see the dictionary attack’s current execution status. This status contains tons of information, such as the type of hash we are attacking, the estimated completion time, the number of hashes it was able to recover, etc
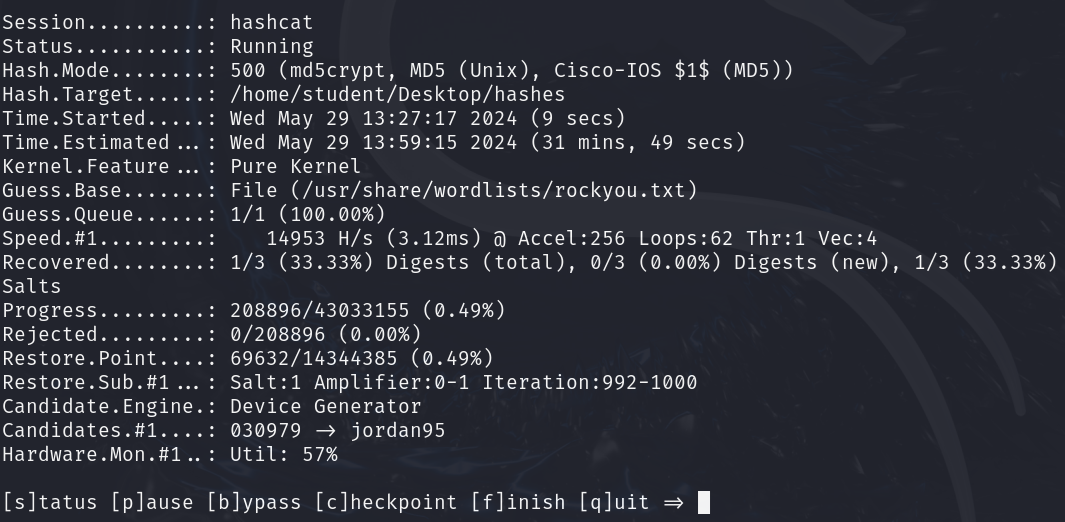
Figure 7 – Hashcat dictionary attack in progress - Once the attack is finished, we will see “Cracked” or “Exhausted” as the status. “Cracked” means that it was able to crack all the hashes. “Exhausted” means it went through the entire wordlist and could not crack all the hashes. Below, we managed to crack all of the hashes we provided
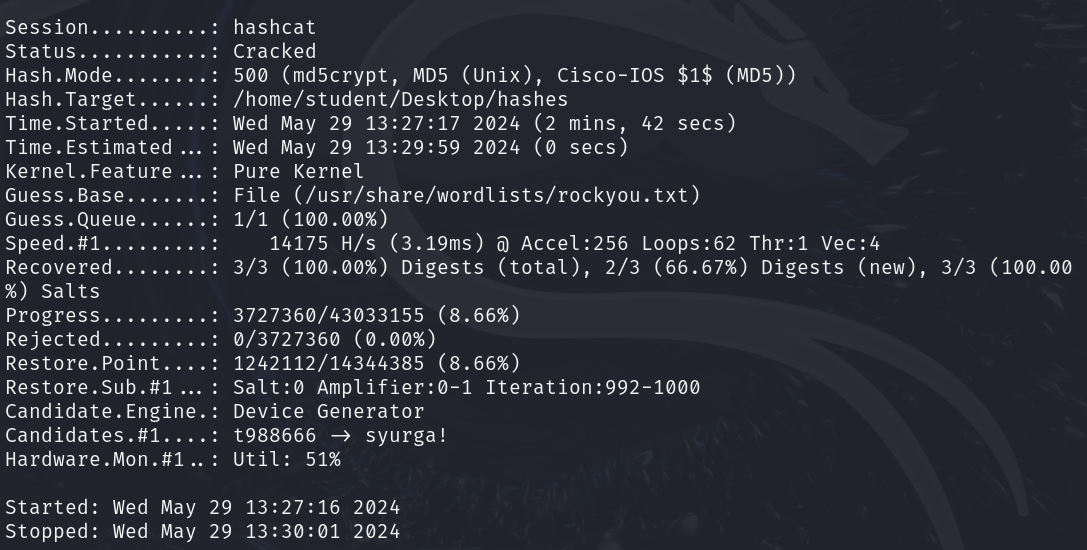
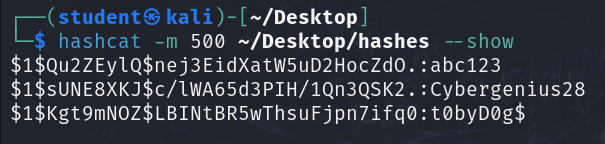
Figure 8 – Finished dictionary attack - Although hashcat outputs passwords when discovered, If we miss it, we have too many status updates, etc., run the below command on the “hashes” file to see all the hashes and their corresponding plaintext values
> hashcat -m 500 ~/Desktop/hashes –show
End of Lab
Deliverables
4 screenshots are needed to earn credit for this exercise:
- Screenshot of the hashes file
- Screenshot of John the Ripper brute force attack
- Screenshot of Hashcat finished dictionary attack
- Screenshot of Hashcat showing the cracked hashes
Homework
Assignment 1 – John the Ripper Dictionary Attack
Utilize John the Ripper’s built-in help menu and perform a dictionary attack using rockyou.txt on the hashes from the exercise.
RECOMMENDED GRADING CRITERIA
- A document containing the following information
- The John the Ripper dictionary attack command
- Screenshot of the finished attack
- A paragraph or two discussing other kinds of attacks that John the Ripper can perform (other than dictionary or brute force attacks)
Assignment 2 – Hashcat Mask Attack
Utilize Hashcat’s online wiki and perform a mask attack on the following hashes. Here is a link to get started: https://hashcat.net/wiki/doku.php?id=mask_attack
- 29f373d1fdfddaf4b7150b7970760583f59f4adb
- 10 digits
- $1$YUR1TMSw$uKeaGaBNcNz2dUiicfNw21
- Begins with the word “Laser”
- Followed by an uppercase letter and 3 lowercase letters
- Ends with 1 digit
RECOMMENDED GRADING CRITERIA
- A document containing the following information
- The two masks utilized to crack the hashes
- The two passwords and corresponding hashes
- Screenshots of the finished attacks (showing “Cracked” status)
- A brief description discussing the relationship between password complexity and cracking times
