41 Network Monitoring – Honeypots
Jacob Christensen; Arjun Nath; and Isha Patel
Note: This lab is typically performed after the Zenmap Basics lab, but it can also be completed as a standalone.
Honeypots are useful tools for network defense. They allow attackers to navigate a dummy infrastructure so investigators can monitor attacker activities to identify their tactics, techniques, and procedures (TTP). Honeypots need careful configuration otherwise they become a pivot point for attackers to use to gain access to the enterprise architecture.
Learning Objectives
- Learn how to configure a simple HTTP honeypot on an enterprise network
- Learn how to use Zenmap to verify services are running
Prerequisites
Deliverables
- Screenshot of Zenmap scan showing port 80 is active
- Screenshot of Intrusion Detection report on Pentbox
- Screenshot of the GNS3 Working Environment
Resources
Contributors
- Kyle Wheaton, Cybersecurity Student, ERAU-Prescott
Phase I – Building the Network Topology
The following steps outline the process for creating a baseline network to complete this chapter. It makes assumptions about the learner’s knowledge from completing previous labs.
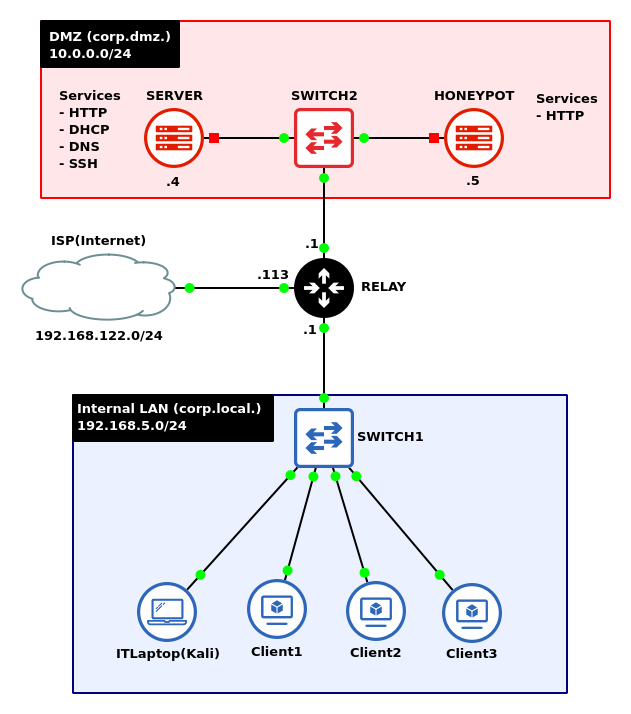
By the end of this lab, your network should look like the following:
- Start GNS3
- (Optional) Load the lab (Network Monitoring – Zenmap Basics) and save it as a new project
- Modify/create the DMZ subnet, it must contain:
- An Ethernet switch
- Two (2) Ubuntu Servers
- Honeypot – 10.0.0.5
- Services server – 10.0.0.4
- Create the internal LAN. All devices should receive DHCP from the Services server. Ensure the following devices are included:
- Switch
- Kali Linux
- Three (3) light PCs that have browsers
- A Mikrotik router. For ease of use, the following connections should be made:
- ether 1 -NAT Node (ISP)
- ether 2 – Internal LAN
- ether 3 – DMZ
Phase II – Setting up a Simple HTTP Honeypot
- Using Zenmap on the IT laptop, perform a Regular scan on the honeypot server (10.0.0.5) to verify that no standard ports are currently open
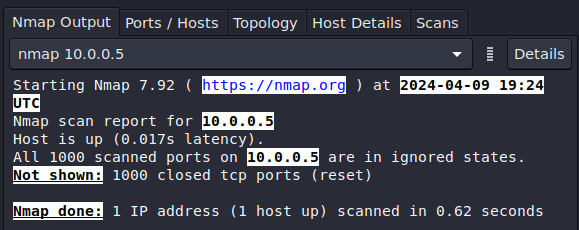
Figure 2 – First Zenmap Scan - If any ports are open, identify and terminate the service and re-scan the server
- Install the Pentbox software suite
- Login to the honeypot server
- Download the Ruby scripting language
> sudo apt install ruby -y
- Download Pentbox from the official GitHub repository
> cd ~
> git clone https://github.com/technicaldada/pentbox
- Decompress the tarball
> tar -zxvf ~/pentbox/pentbox.tar.gz
NOTE: “Tarballs” in Linux are files that are archived with the Tar utility and compressed with GNU Zip. They can quickly be identified with the [.]tar[.]gz extension.
- Run the pentbox program
> ~/pentbox-1.8/pentbox.rb
- Setup the Honeypot
- In Pentbox’s main menu, you should see some options to select via the number associated with it
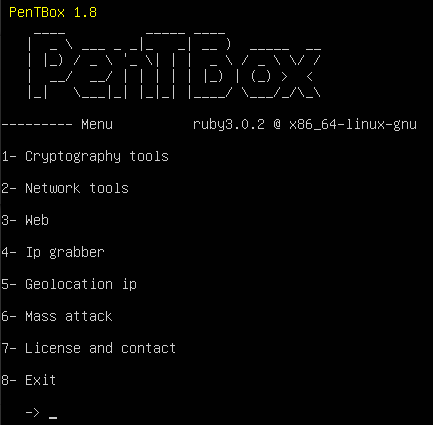
Figure 3 – Pentbox main menu - Select Network tools (2)
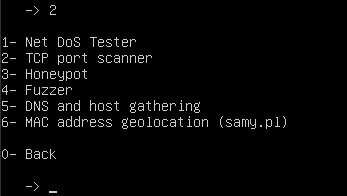
Figure 4 – Pentbox Network Tools - Select Honeypot (3)
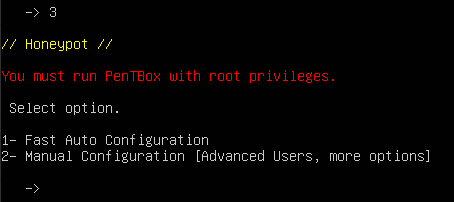
Figure 5 – Pentbox honeypot menu - Select Fast Auto Configuration (1)

Figure 6 – Pentbox honeypot activation NOTE: Now that the honeypot is running, we can see which port it is operating on (80), the date it was started (April 4, 2024), and the time, based on the current system locale settings (7:45:24 PM).
- In Pentbox’s main menu, you should see some options to select via the number associated with it
- On the IT laptop, re-scan the honeypot server to verify that port 80 is now open
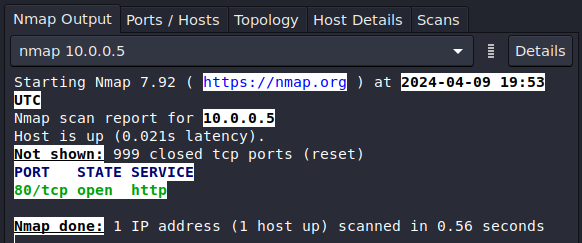
Figure 7 – Second Zenmap scan - Test the honeypot
- In the IT laptop, open a Firefox browser and try to connect to the honeypot server
http://10.0.0.5:80
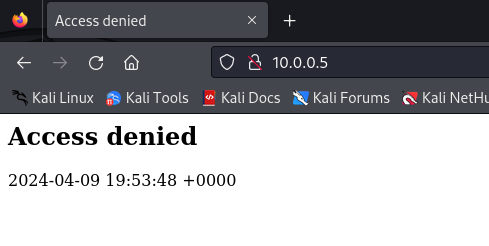
Figure 8 – Connection to honeypot over HTTP - Switch back to the honeypot terminal to view the live intrusion detection report
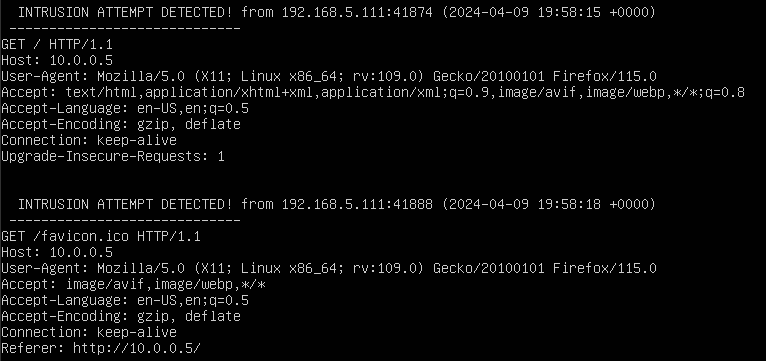
Figure 9 – Pentbox Intrusion Detection Log NOTE: From here, we can see a wealth of information about the potential attacker, including that it was a Linux machine with the IP address 192.168.5.111, using a Firefox browser, that attempted to connect to our server at 7:58:15 PM. If this was not a recognized device, we could blacklist that IP (or MAC) address from our network to prevent connections in the future.
- In the IT laptop, open a Firefox browser and try to connect to the honeypot server
End of Lab
Deliverables
3 Screenshots are required to earn credit for this exercise:
- Screenshot of Zenmap scan showing port 80 is active
- Screenshot of Intrusion Detection report on Pentbox
- Screenshot of the GNS3 Working Environment
Homeworks
- Use the honeypot manual configuration to open the other common ports used by websites (ports 443, 8080, 8443)
- From the attacking machine, try to access the webpage in a similar way as before
- Monitor the results on Pentbox
- RECOMMENDED GRADING CRITERIA
- Screenshot of Zenmap scan showing ports 80, 443, 8080, 8443 are active
- Screenshot of Intrusion Detection reports for the same ports on Pentbox
- Screenshot of the GNS3 Working Environment
Assignment 2 – Setup honeypots on other commonly attacked ports
- Use the honeypot manual configuration to open other commonly used ports used by hackers (ports 20, 21, 22, 23)
- From the attacking machine, use Linux to try to FTP, SSH, and Telnet into the honeypot
- Monitor the results on Pentbox
- RECOMMENDED GRADING CRITERIA
- Screenshot of Zenmap scan showing ports 20, 21, 22, and 23 are active
- Screenshot of Intrusion Detection reports for the same ports on Pentbox
- Screenshot of the GNS3 Working Environment