43 System Hardening – SSH Public Key Authentication with Linux
Jacob Christensen; Isha Patel; and Arjun Nath
NOTE: This lab builds upon the labs in Chapters 40 and 41.
In the modern day, one of the most common forms of authentication we encounter are Single Sign-On (SSO) passwords. You may recognize this as a password you type to access a store’s website or the credentials you enter to log on to a video game service. While it is the most commonly used form of authentication, it is not the only option. In this chapter, we will be exploring a more secure alternative through asymmetric encryption. Asymmetric encryption utilizes two keys: a public key (which is typically freely available and has no cost to security if exposed) and a private key (which must never be shared under any circumstances). The basic idea is that anything encrypted with one key can only be decrypted with the other. In this chapter, we will be implementing Public Key Authentication to further harden our Linux servers on our network.
Learning Objectives
- Learn how to implement Public Key Authentication for remote server administration
- Learn how to harden SSH against common cyber attacks
Prerequisites
Deliverables
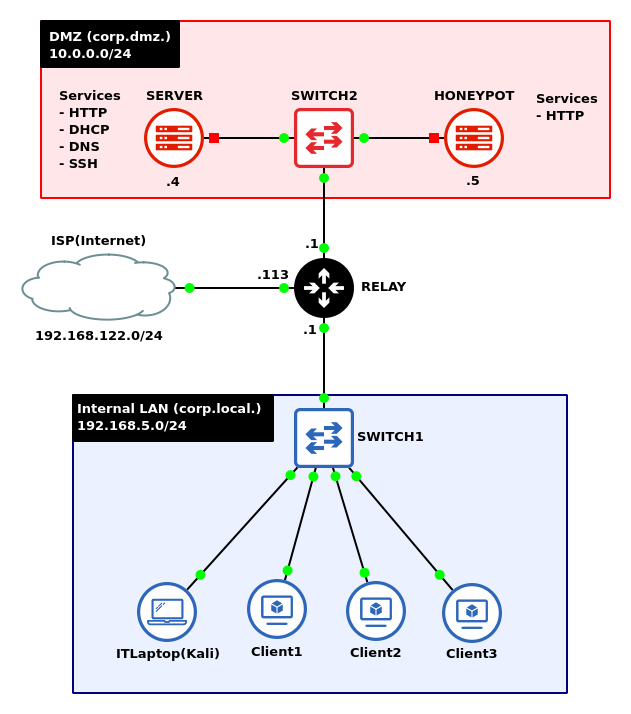
- Screenshot of GNS3 Network
- Screenshot of cat ~/.ssh/authorized_keys command
- Screenshot of a successful connection to ssh with public key authentication
- Screenshot of Ubuntu Desktop being refused connection due to no public key
Resources
Contributors
- Kyle Wheaton, Cybersecurity Student, ERAU-Prescott
- Dante Rocca, Cybersecurity Student, ERAU-Prescott
- Jungsoo Noh, Cybersecurity Student, ERAU-Prescott
Phase I – Building the Network Topology
The following steps outline the process for creating a baseline network to complete this chapter. It makes assumptions about the learner’s knowledge from completing previous labs.
By the end of this lab, your network should look like the following:
- Start GNS3
- Create a new project and name it
NOTE: The lab takes heavy influence from the chapter Network Monitoring – Honeypots. It is recommended to save that file as a new project and make adjustments as necessary.
- Create a new project and name it
Phase II – Configuring Public Key Authentication
To begin implementing a Public Key Authentication system, we first need to generate a public key pair. We’ll give the DMZ server the public key. This key will act as the authenticator of anyone who attempts to log in holding the private key. We provide the private key to the Kali machine, and later try to launch an SSH session from the Kali machine to the DMZ server
- In the corp.local subnet, start the IT laptop (Kali) and login
- Ensure that SSH is enabled and active
> systemctl enable ssh.service
> systemctl restart ssh.service
- Generate a new RSA public/private key pair
> ssh-keygen -t rsa -b 3072
Command Explanation ssh-keygen Name of program -t rsa Specifies the “T”ype of key to create (RSA key) -b 3072 Specifies the number of bits in the key generator (3072 bits) - Press enter when prompted where to save the key to place it in its default location: ~/.ssh/id_rsa
- You may enter a password to further protect your private key, but you can also press enter again twice to skip this
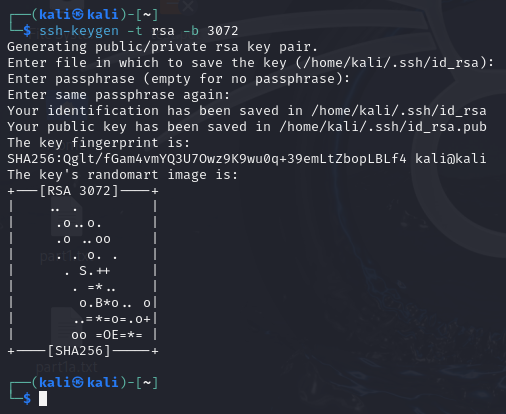
Figure 2 – Terminal Command Execution - Verify that the both the private (id_rsa) and public (id_rsa[.]pub) have been generated by looking at the saved location
> ls -l ~/.ssh/id_rsa*
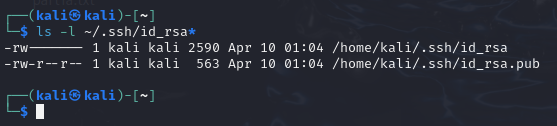
Figure 3 – Terminal Command Execution
- In the corp.dmz subnet, start the primary server and login
- Enable The SSH service
> systemctl enable ssh
> systemctl start ssh
- Enable The SSH service
- Transfer the public key to the DMZ server (server.corp.dmz), which will be authorized for remote logins
- On the Kali machine, securely move the key using SSH
> ssh-copy-id username@10.0.0.4
NOTE: Remember that your server’s username may vary.
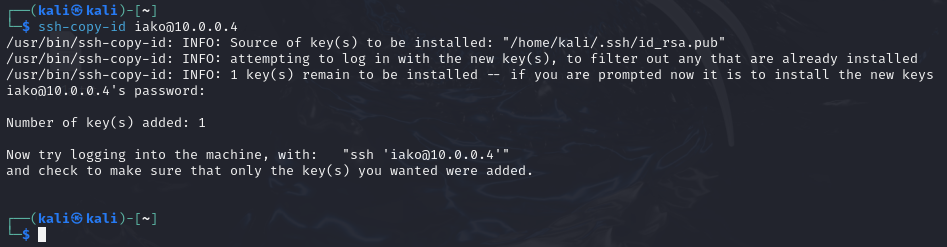
Figure 4 – Terminal Command Execution - On the server, verify that it was transferred successfully
> cat ~/.ssh/authorized_keys

Figure 5 – Terminal Command Execution
- On the Kali machine, securely move the key using SSH
- Test to see if it worked by starting a new SSH session from the Kali box to the server
> ssh username@10.0.0.4
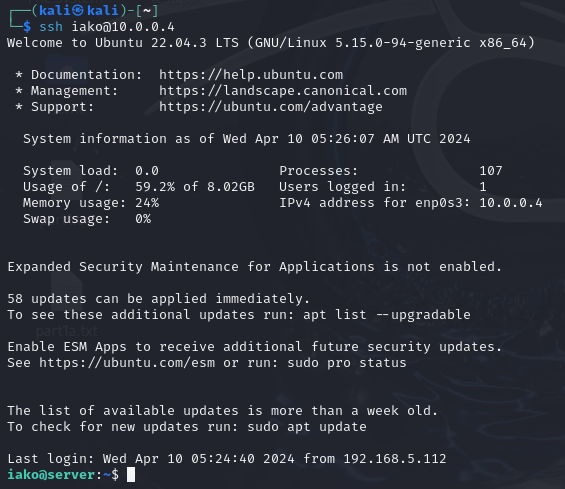
Figure 6 – Public Key Authenticated SSH Session NOTE: We successfully logged into the machine without needing a password! However, if you decide to further secure your RSA keys with a passphrase during the ssh-keygen command, you will be prompted to enter that passphrase when using SSH. It should be noted that this is locally processed and not transmitted over the network.
Phase III – Further SSH Hardening
While we have successfully implemented this form of authentication over SSH, simply leaving it in place would be unwise from a security perspective. We can implement a few additional changes to the SSH service running on the DMZ to enhance the setup’s security.
- Login to the DMZ primary server
- Modify the configuration file for the server-side SSH daemon with the following changes
> vi /etc/ssh/sshd_config
- Change AddressFamily from any to inet to only listen for IPv4 connections
- Set ListenAddress to 10.0.0.4
- Add an AllowUsers directive followed by the primary account’s username
- Change ClientAliveCountMax from 3 to 2 to reduce the amount of time before idle client sessions are disconnected
- Change ClientAliveInterval from 0 to 15 to set a timer on SSH Keep Alive messages
- Set PasswordAuthentication to no to disable passwords/passphrases
- Set PermitRootLogin to no to disable the root user from being accessed via SSH
- Change Port from 22 to any other nonstandard port number to obfuscate SSH services
- Set PubkeyAuthentication to yes to allow for public key authentication
- Use this image for configuration reference
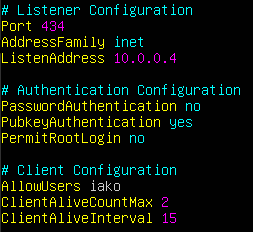
Figure 7 – SSHD configuration
- Restart the SSH daemon
> systemctl restart ssh
- From the admin laptop, test the new SSH service
- Try to login to root on the DMZ server via SSH
> ssh root@10.0.0.4 -p 434
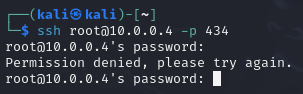
Figure 8 – Terminal Command Execution NOTE: This example changed the default port to 434, be sure to adjust this as necessary.
- Try to login into the primary user
> ssh username@10.0.0.4 -p 434
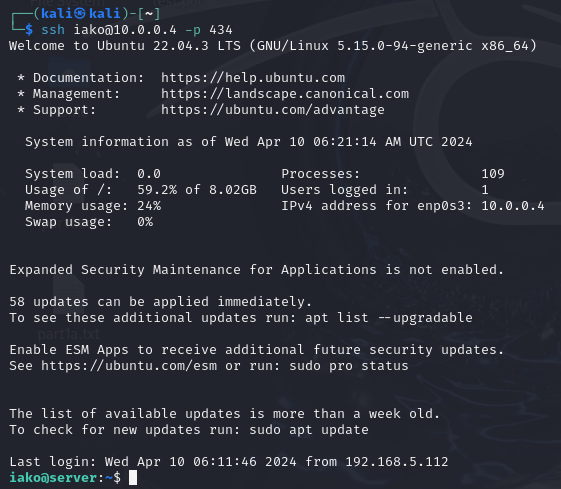
Figure 9 – Terminal Command Execution
- Try to login to root on the DMZ server via SSH
End of Lab
Deliverables
4 Screenshots are needed to earn credit for this exercise:
- Screenshot of GNS3 Network
- Screenshot of cat ~/.ssh/authorized_keys command
- Screenshot of a successful connection to ssh with public key authentication
- Screenshot of Ubuntu Desktop being refused connection due to no public key
Homeworks
Assignment 1 – Add another public key to the server
- Ensure/add a client Linux-based machine to your corps.local. network
- Create a new public key (RSA) and copy it to the server
- Ensure the key works for connecting the new VM to the network
Assignment 2 – Add an Elliptic Curve Digital Signature Algorithm key pair to the network
- Ensure/add a client Linux-based machine to your corps.local. network
- Create a new public key (ECDSA) and copy it to the server
- Ensure the key works for connecting the new VM to the network
GRADING REQUIREMENTS: Same as Deliverables with appropriate encryption methods