The ‘Cheat Sheet’
Mathew J. Heath Van Horn, PhD
This cheat sheet is an oft-requested piece of material. It contains commands frequently referenced by students who do not want to find the material elsewhere. It is argued that when students create their own cheat sheets, their learning is greatly enhanced, but we provide this one as an example.
Setting up the environment
These tips are for when you are setting up the environment for the umpteenth time and need that one command you can’t remember.
MikroTik Equipment
MikroTik equipment uses open-source software to manage the hardware. Many of the commands are the same because they rely on the hardware to implement the command according to whether it is a switch or a router. Here are some of the common ones. For more information, visit the MikroTik CLI documentation at https://help.mikrotik.com/docs/spaces/ROS/pages/328134/Command+Line+Interface
- Rename the device – convenient when you have multiple Putty sessions going
system identity set name=ThisNewName
- Add an IP address to an interface( IP address add address=###.###.###.###/CIDR interface=<ethernet port name>
ip address add address=192.168.1.1/24 interface=eth1
- To perform a traceroute
tool traceroute 192.168.1.1
- DHCP
- to view the DHCP clients (running a DHCP client at the same time as a DHCP server will prevent DHCP from working properly and will throw weird errors)
ip dhcp-client print
- To remove a DHCP client from an interface
ip dhcp-client remove 0
- DHCP relay
> ip dhcp-relay add name=Red-Relay interface=ether1 dhcp-server=150.30.30.5 local-address=100.10.10.1 disabled=no
- to view the DHCP clients (running a DHCP client at the same time as a DHCP server will prevent DHCP from working properly and will throw weird errors)
VPCS
The GNS3 VPCS is not designed to be much more than a generic device that holds a MAC address and IP address and responds to pings.
- To save the VPCs settings so they remain after reboot, type the following:
save
- qTo display the current VPCS configuration type
show
- Get an IP address via DHCP, type the following command:
ip dhcp
- Assigning a static IP address (ip ###.###.###.###/CIDR or netmask ip ###.###.###.### 255.255.255.0
- CIDR (ip ###.###.###.###/CIDR)
ip 192.168.1.1/24
- netmask (ip ###.###.###.### 255.255.XXX.XXX)
ip 192.168.1.1 255.255.255.0
- CIDR (ip ###.###.###.###/CIDR)
- Assigning a static IP address with a gateway
- CIDR (ip ###.###.###.###/CIDR ###.###.###.###)
ip 192.168.1.1/24 192.168.1.254
- netmask (ip ###.###.###.### 255.255.XXX.XXX ###.###.###.###)
ip 192.168.1.1 255.255.255.0 192.168.1.254
- CIDR (ip ###.###.###.###/CIDR ###.###.###.###)
Using Vi in Linux distributions
Vi (short for ‘Visual Editor’) is a text editor for Unix-based operating systems. It is installed on most Linux distributions and doesn’t require installation, such as Nano, VIM, gedit, etc. It is good to be familiar with this since installing other editors could get you flagged when you are poking around a target system.
– Press i to enter Insert (editor) mode.
– Press Esc to return to Command mode.
– Type :wq in Command mode to save (write) and exit back to the terminal.
– Type :q! in Command mode to exit without saving.
– In Command mode, type dG to delete all the lines after the cursor
Linux Commands
This is not a comprehensive list of Linux commands. It is simply a list of commands that Dr. HVH frequently looks up or is asked about by students.
- Changing the hostname of a Linux box – This makes things easier when you have multiple instances of Linux VMs running, and you’re tabbing between them (Reboot required)
> sudo hostnamectl hostname ThisIsTheNewHostnameOfYourChoice
- Checking to see if a program is installed
> apt list –installed [the program name]
- How to set a static IP
- look up the file name
> ls /etc/netplan/
- Open the yaml file (in this case the file name was 50-cloud-init)
> sudo vi /etc/netplan/50-cloud-init
- Adjust the yaml file as needed. Here is an example
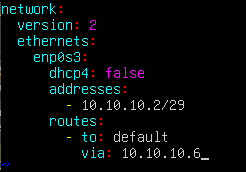
Static IP Figure 1 - Apply the netplan
> sudo netplan try
- look up the file name
- Adjusting the DHCP settings
- Open the configuration file
> sudo vi /etc/kea/kea-dhcp4.conf
- enable the service on boot
sudo systemctl enable kea-dhcp4-server
- start the service (substitute ‘restart’ as necessary)
> sudo systemctl start kea-dhcp4-server
- Check the status
> sudo systemctl status kea-dhcp4-server
- Open the configuration file
