9 Build a Simple Local Area Network with DHCP running on Tiny Core Linux
Mathew J. Heath Van Horn, PhD
A Local Area Network (LAN) has many definitions depending on who you speak to. They can be defined by geography, function, or electrical connections. In this book, we typically use the term “LAN” to specify a few end devices connected to the same switch. This is a gross oversimplification of LANs, but simplification is helpful when exploring larger concepts. Consider how we use logs to represent exponential equations or ask veterans in the audience to stand for recognition. Both actions are simplifications of greater meaning.
In this lab, we show you how to make a fundamental LAN with DHCP that won’t stress your host machine’s resources.
Learning Concepts
- Create a functional LAN with:
- 1 switch
- 2 PCs
- 1 DHCP server
Prerequisites
- Chapter 2 – Setup a GNS3 environment
- Chapter 5 – Install Tiny Core Linux
- Chapter 6 – Adding a VM to GNS3
Deliverables
- None – this is a preparatory lab for other labs
resources
Contributors and Testers
- TBD
Phase I – Inital Setup
Initial setup involves creating a workspace, segmenting it, and then labeling its components.
By the end of this chapter, your network should look like the following:

- Ensure you have completed the prerequisites before starting the lab
- Open Oracle VirtualBox Manager
- Make a full clone of the TinyCoreLinux VM
- Right-click on the machine and select Clone
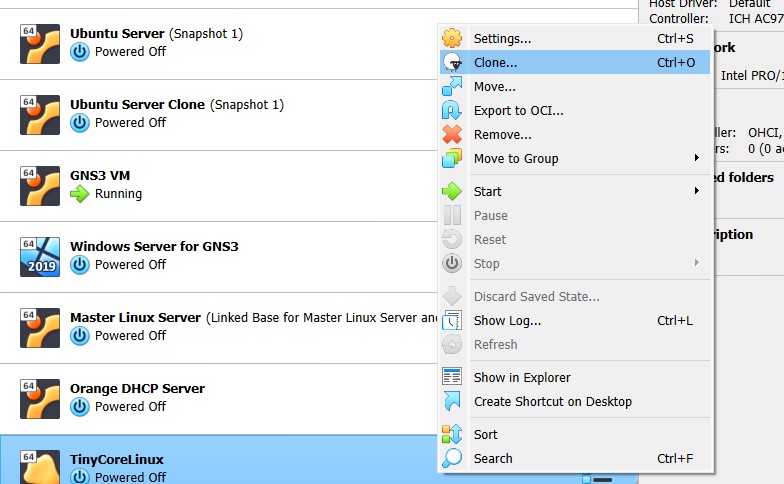
Figure 1 – Cloning a VM - Rename it to “TC-red” and select the option to generate new MAC addresses, then click Next
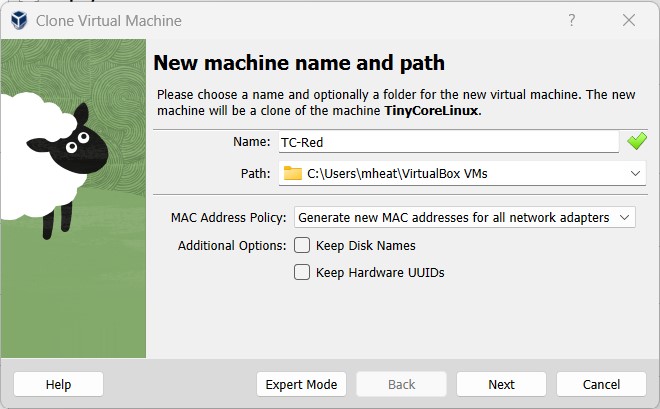
Figure 2 – Renaming and resetting MACs - Select Full Clone, then click Finish
- Right-click on the machine and select Clone
- Right-click on the TC-red VM and click on settings
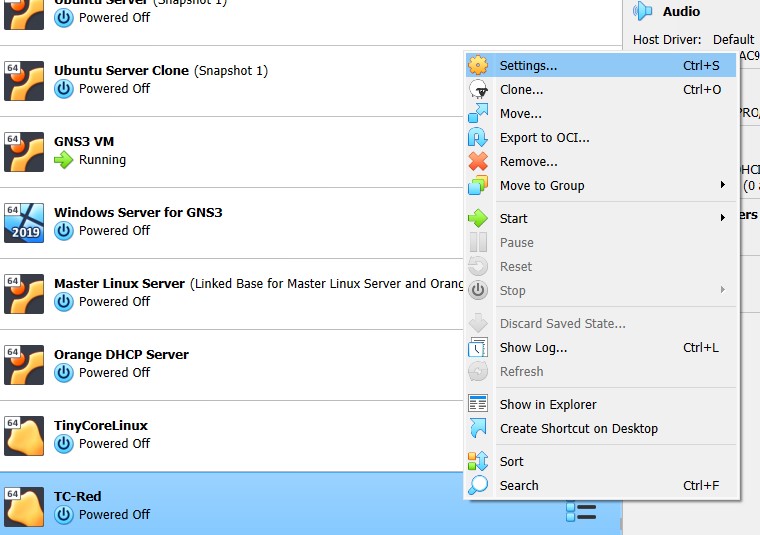
Figure 3 – Adjust settings for TC-Red - Navigate to “Network” and change the network adapter 1 settings to Generic Driver and UDPTunnel, then click OK
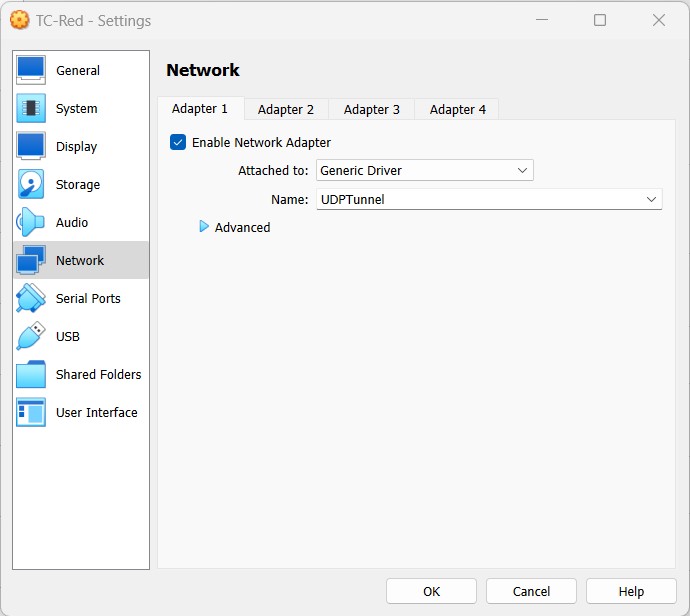
Figure 4 – Adjust NIC to generic - Start GNS3 and start a new blank project. Name it anything you like, but for this example, we are calling it Simple LAN
- Add the TC-red VM to the GNS3 appliances – Change its symbol to a Red Server
- In the GNS3 toolbar ribbon, click on the Draw a Rectangle tool and click the workspace to place a rectangle
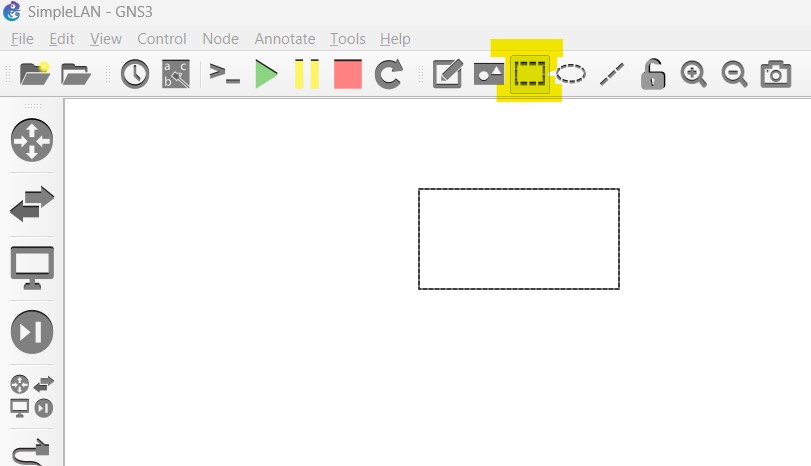
Figure 5 – Drawing a rectangle - You can use the mouse to resize the rectangle at any time
- Change the properties of the rectangle by right-clicking on the edge and selecting Style
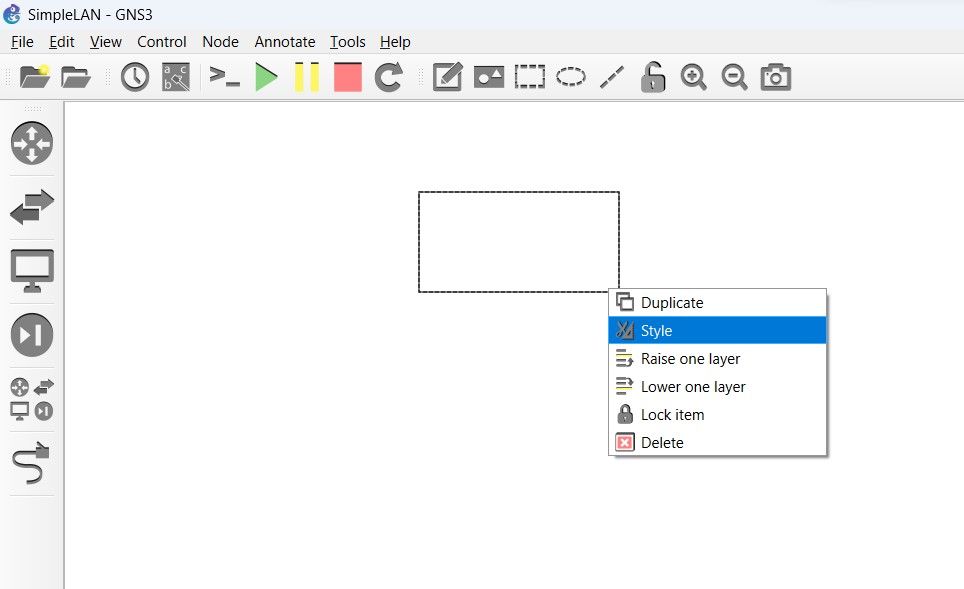
Figure 6 – Changing rectangle style - Some people use a fill color, and some don’t
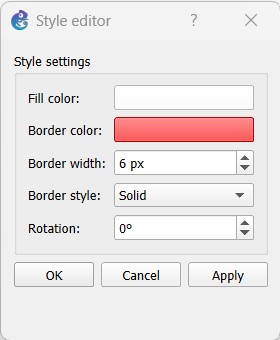
Figure 7 – Changing rectangle color - Change the border color to a primary color (we are using red)
- Change the Border width to 6 px
- Click apply, then click ok
- Some people use a fill color, and some don’t
- GNS3 uses layers for its graphics. Generally, the shapes are at a higher layer than the connectors. This means that anything you put into the box risks not being seen. So you can change the box’s layer now or at any time by right-clicking on the shape and selecting Lower one layer
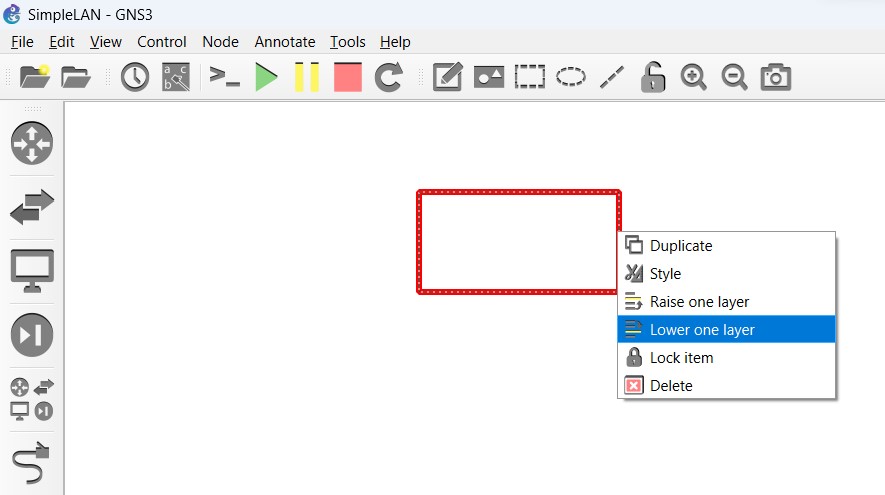
Figure 8 – Send the rectangle back a layer - Place the following inside the red rectangle
- Ethernet Switch
- Two (2) VPCS
- TC-red VM
- Connect the devices to the switch
- Use the note tool – next to the shape tool – to add a new note of “Red Network 192.168.1.0/24”
- Use the note tool to add a new note of “.250” next to the TC-Red VM
Figure 9 – Add a note - Start all devices
Phase II – Configure DHCP on TC-red VM
Tiny Core Linux comes with a DHCP service. However, we will have to type quite a bit to make it work. When you are finished with this lab, you may want to use these instructions to create a default TC-DHCP VM that you can clone whenever you need a lightweight DHCP server.
NOTE: Most errors encountered by testers were due to typos. Be careful, and everything should work fine.
- Navigate to the TC-Red VM and open a terminal
Figure 10 – Open a terminal - Configure the ethernet interface with a static IP address
- Open a new configuration file by typing
> sudo vi /opt/eth0.sh
- You will see a lot of tildes (~) which means a blank document
- Press i to activate insert, and type the following in the file
# fast storage device may need a delay on boot for the settings to take
# adjust the following sleep statement if needed
sleep .2#kill the dhcp client for eth0
sleep 1
if [ -f /var/run/udhcpc.eth0.pid ]; then rm /var/run/udhcpc.eth0.pid;
sleep 0.1
fi#configure the interface eth0
ifconfig eth0 192.168.1.250 netmask 255.255.255.0 broadcast 192.168.1.255 up#start the DHCP server process once the interface is ready with the IP add
sleep .1
sudo udhcpd /etc/udhcpd.conf &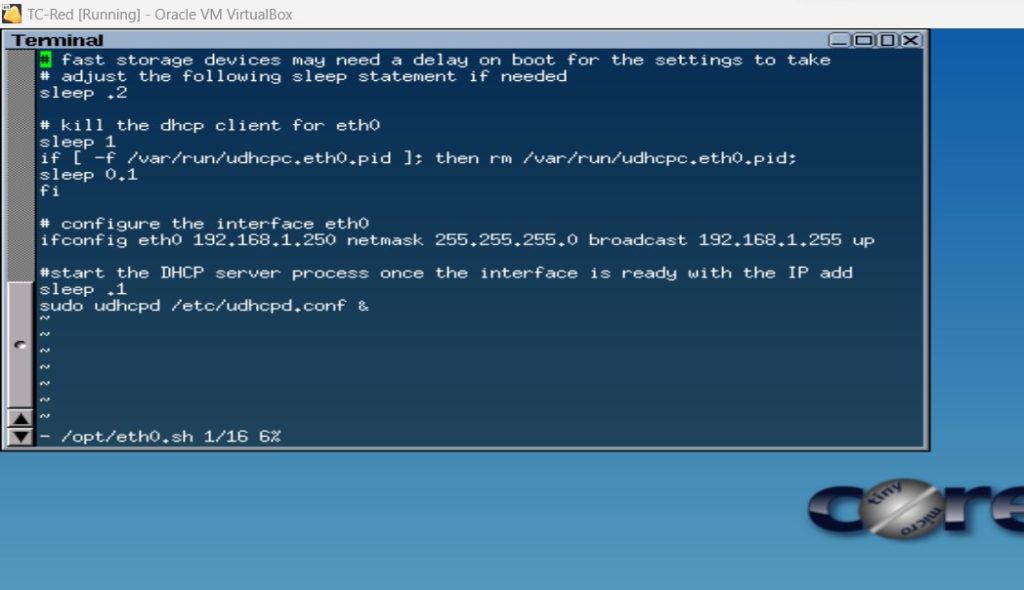
Figure 11 – Create a settings file for the NIC - Press esc to exit the edit mode
- Press the full colon : followed by wq (this means write out – old school ‘save file’ – and quit)
:wq
- Now type in the command line
> sudo chmod 777 /opt/eth0.sh
- Followed by
> sudo /opt/eth0.sh
- You can check if interface eth0 is configured by typing
> ifconfig
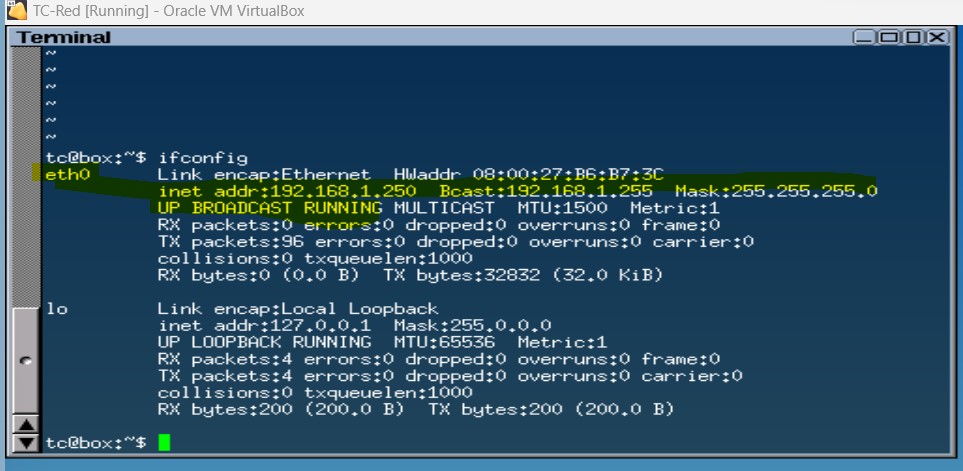
Figure 12 – Verify the NIC configurations are correct
- Open a new configuration file by typing
- Create a DHCP configuration file
- Type
> sudo vi /etc/udhcpd.conf
- In this new file, press i to insert and type the following
start 192.168.1.100
end 192.168.1.200
interface eth0
option subnet 255.255.255.0
option router 192.168.1.250
option lease 43200
option dns 192.168.1.250
option domain localNOTE: These settings mean the following
Statement Setting Meaning Start 192.168.1.100 This is the first possible IP address that can be given out to end devices asking for an IP address Stop 192.168.1.200 This is the last possible IP address that can be given out to end devices asking for an IP address interface eth0 This is the network interface that will be looking for DHCP requests option subnet 255.255.255.0 The IPv4 subnet mask used for this network (192.168.1.0) option router 192.168.1.250 This is the IP address of the gateway router to leave the local LAN option lease 43200 The amount of seconds between lease refresh – this is 12 hours option dns 192.168.1.250 DNS should use this gateway router option domain local DNS requests will resolve locally first before using the gateway 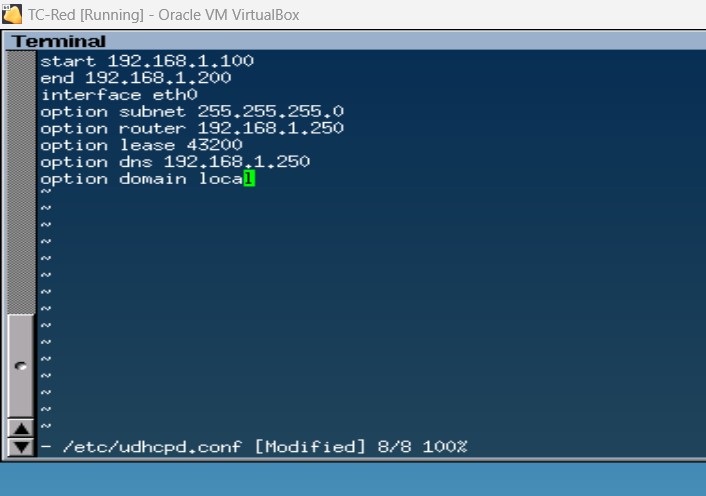
Figure 13 – Configure DHCP - When finished typing, press escape, followed by
:wq
- Then start the DHCP Daemon by typing
sudo udhcpd /etc/udhcpd.conf
- Verify if the DHCP process is running by typing the following
sudo netstat -anp
- You should see a listening line like this: udp 0 0 0.0.0.0:67 0.0.0.0:* 1413/udhcpd
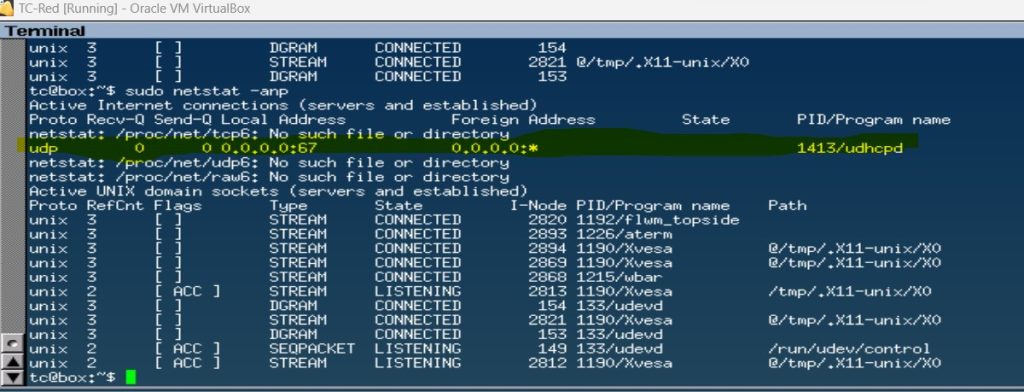
Figure 14 – Perform a netstat check
- Type
- Remember, Tiny Core Linux has limited persistence, so we have to add our DHCP configuration file to the list
- Gain change permissions to the bootlocal file by typing
sudo chown root:staff /opt/bootlocal.sh
sudo chmod 775 /opt/bootlocal.sh - Now add the persistence by typing the following
sudo echo ‘etc/udhcpd.conf’ >> /opt/.filetool.lst
sudo echo ‘opt/eth0.sh’ >> /opt/.filetool.lst
sudo echo ‘opt/eth0.sh &’ >> /opt/bootlocal.sh
filetool.sh -b - You should get a confirmation like in
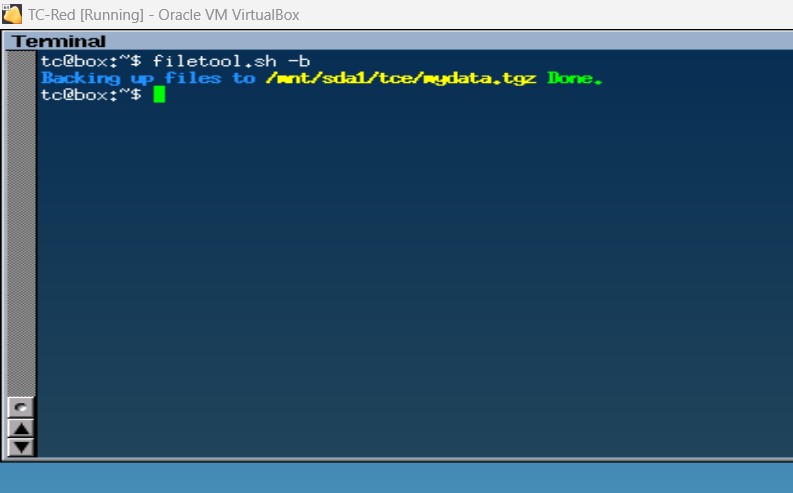
Figure 15 – Add persistence - Now reboot TC-red to verify the settings were retained by typing the following at the command line
- Static IP is configured
ifconfig
Figure 12 – Verify the NIC configurations are correct -
-
- DHCP server is running
sudo netstat -anp
Figure 14 – Perform a netstat check
- DHCP server is running
-
-
- Static IP is configured
- Gain change permissions to the bootlocal file by typing
Phase III – Verify hosts are getting IP addresses
We can never be certain that our VPCS are getting IP addresses until we try it.
- Navigate to the GNS3 workspace
- Right-click on a VPCS console and type
ip dhcp
- You should get a response of an IP address between 192.168.1.100 – 192.168.1.200
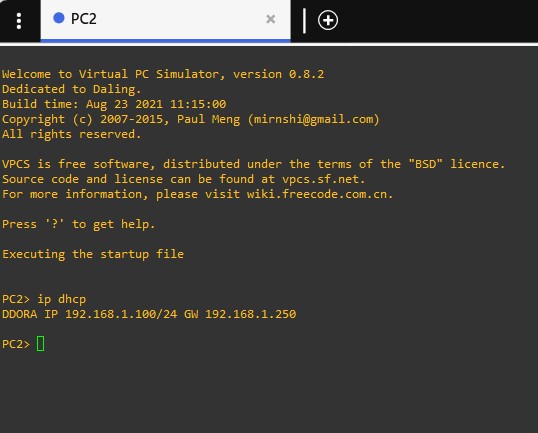
Figure 16 – Ensure devices are getting DHCP - Note the IP address and use the GNS3 note tool to add the IP address to the Workspace
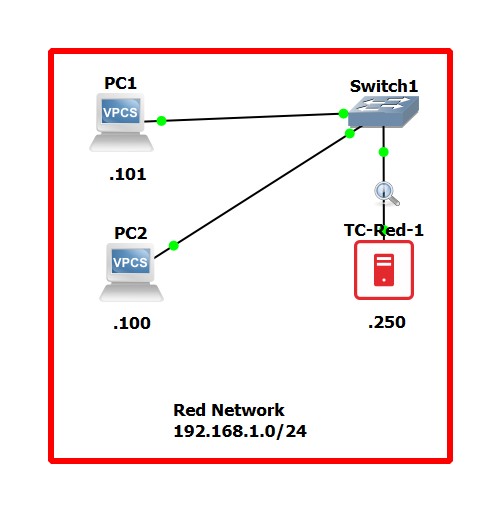
Figure 17 – Add a note to the workspace
NOTE: Most errors encountered by testers were due to typos. Be careful, and everything should work fine.
Final Note – you can change the DHCP configuration any time by modifying IP addresses. For instance if our network was 20.20.0.0/16 and we knew our gateway router was 20.20.20.254, we would change are settings to the following:
| Purpose | Lab IP Address | Possible Modification |
| Network ID | 192.168.1.0 | 20.20.0.0 |
| subnet mask | 255.255.255.0 | 255.255.0.0 |
| Static IP (this DHCP Server) | 192.168.1.250 | 20.20.20.1 |
| Option Router (gateway or next-hop) | 192.168.1.250 | 20.20.20.254 |
| start – the first available IP address for DHCP | 192.168.1.100 | 20.20.20.50 |
| stop – the last available IP address for DHCP | 192.168.1.200 | 20.20.20.99 |
| Option DNS (the gateway if DNS cannot be resolved locally) | 192.168.1.250 | 20.20.20.254 |
| lease time (in seconds) | 43200 ( =12 hours) | 21600 (= 6 hours) |
End of Lab

