35 System Hardening – Windows Firewall
Mathew J. Heath Van Horn, PhD and Raechel Ferguson
Windows firewall is a powerful tool for creating firewall rules for an individual computer or an entire network. This activity aims to enable students to see how Active Directory (AD) can utilize group policies and Windows Defender Firewall to create firewall rules for devices connected to the AD server. In addition, this lab also teaches students the differences between inbound and outbound rules and how to create group policies that apply to devices. Finally, this lab will enable learners to see how communications between devices are altered due to the firewall rules created.
Learning Objectives
- Successfully deploy a server firewall to control communications between devices
- Observe how group policies can be applied to devices connected to the server
- Observe how firewall rules alter the communication abilities of devices
Prerequisites
Deliverables
- Labeled GNS3 workspace
- Router configurations
- Blocked pings from Client 3 to the Webserver
- Blocked pings from the Webserver to Client 2
Resources
- 1. MSFT WebCast. “Basic Configuration Tasks in Windows Server 2019.” YouTube, January 25, 2019. https://www.youtube.com/watch?v=1nxYJSV7-u8&list=PLUZTRmXEpBy32NP6z_qvVBOTWUzdTZVHt&index=4.
- 2. MSFT WebCast. “How to Join Windows Server 2019 to an Existing Active Directory Domain.” YouTube, February 1, 2019. https://www.youtube.com/watch?v=BEyNwwjo0u4.
- 3. MSFT WebCast. “How to Join Windows Server 2019 to an Existing Active Directory Domain.” YouTube, February 1, 2019. https://www.youtube.com/watch?v=BEyNwwjo0u4.
- 4. Tony Teaches Tech. “How to Block Ping Requests (on Windows, Linux, MAC).” YouTube, January 11, 2022. https://www.youtube.com/watch?v=52T2f8NfN0Y.
Contributors and Testers
- Kyle Wheaton, Cybersecurity Student, ERAU-Prescott
Phase I – Workspace Configuration
- In VirtualBox, ensure you have a Windows 11 desktop VM and a Windows server VM, and check each VM’s network settings
- Attached to: Generic Driver
- The Cable Connected option is checked
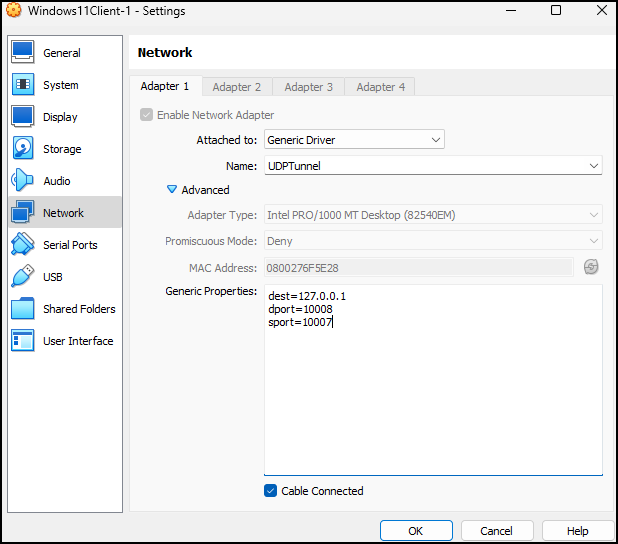
Figure 2 – VM network settings
- Start GNS3 and create a new project
- Import the Windows 11 desktop with an experimental feature
- In GNS3 navigate to the top menu and select edit, preferences like normal
- In the VirtualBox VMs menu, select New and then choose the Windows 11 VM. However, make sure the “Use as a linked base VM (experimental)” box is checked

Figure 3 – Use as a linked base
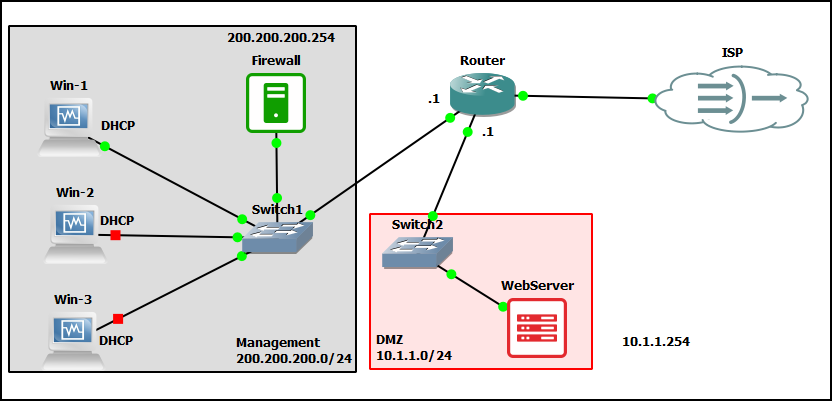
- Create the physical Management network space shown above
- Add a switch
- Add 3 Windows 11 Clients
- Add a Windows Server and name it “Firewall”
- Connect all the devices to the switch
- Turn on the Firewall server and one of the client machines connected to switch 1.
NOTE: Turning on the two additional machines consumes a significant amount of your host computer’s memory and power, so limit the total number of machines running to three.
Phase II – Server and client configuration
- Log in to the server named “Firewall”
- Click on Local Server
- Left-click on the ethernet option in the middle of the screen or the blue address to its right
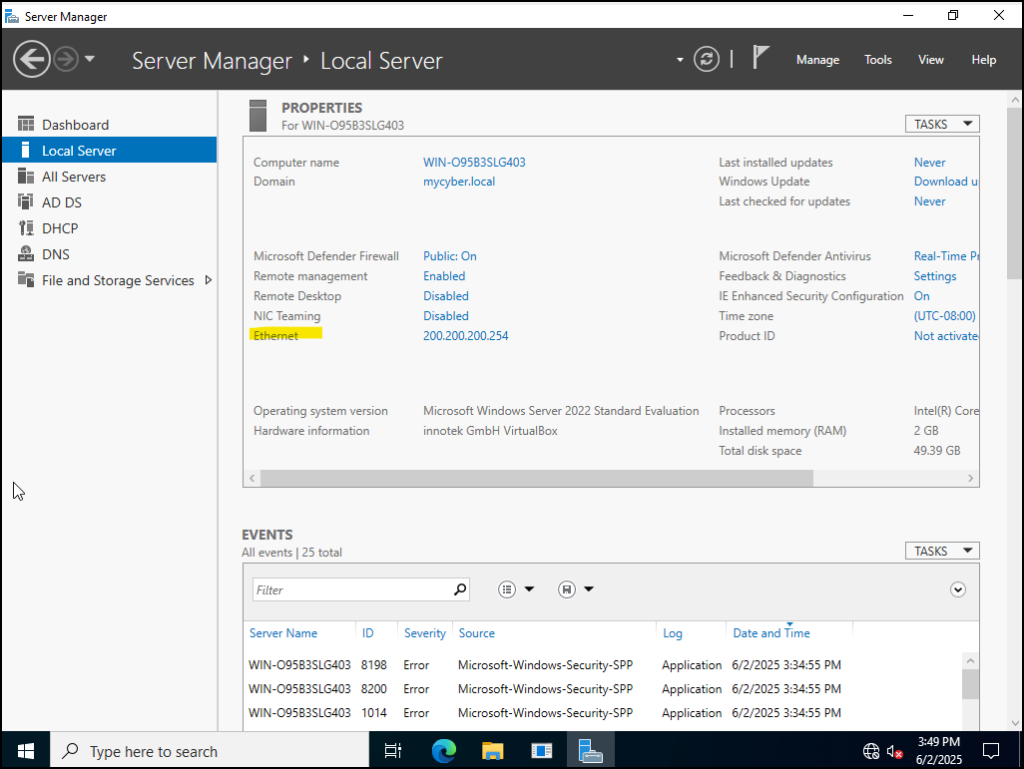
Figure 4 – Left click on ethernet - Right-click on the ethernet icon and select properties

Figure 5 – Ethernet properties - In the new window, uncheck the IPv6 option
- Then click on the IPv4 option and click on the properties button
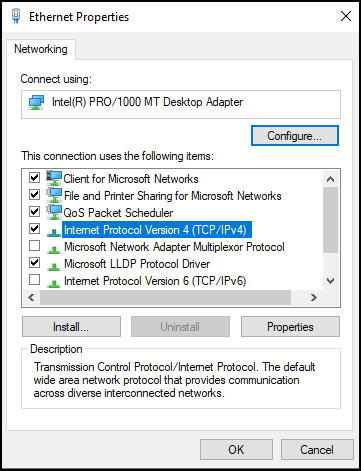
Figure 6 – IPv4 Properties - On the IPv4 Properties screen,
- Click on Use the following IP address, enter “200.200.200.254” as the IP address, enter “255.255.255.0” as the subnet mask, and then enter “200.200.200.1” as the Default gateway
- In the Preferred DNS server box, enter an IP address of “200.200.200.254,” leave the alternate DNS box empty
- Click ok
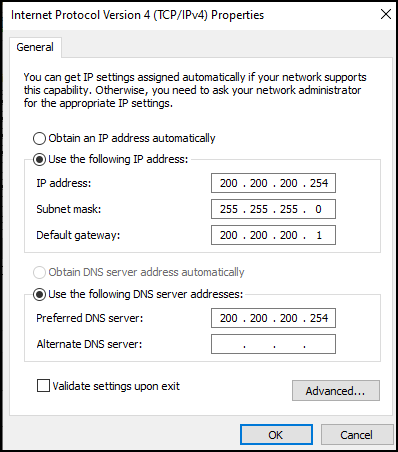
Figure 7 – Set the IP address
- Click on close
- Right-click on the ethernet icon and select properties
- Close the network connections window
- Add the client machine to the server domain
- Log into the client machine
- Click on the magnifying glass icon in the lower left-hand corner
- Enter the word cmd and press enter to access the command line
- Once the command line has popped up, enter the command:
ncpa.cpl
You should see the following window pop up
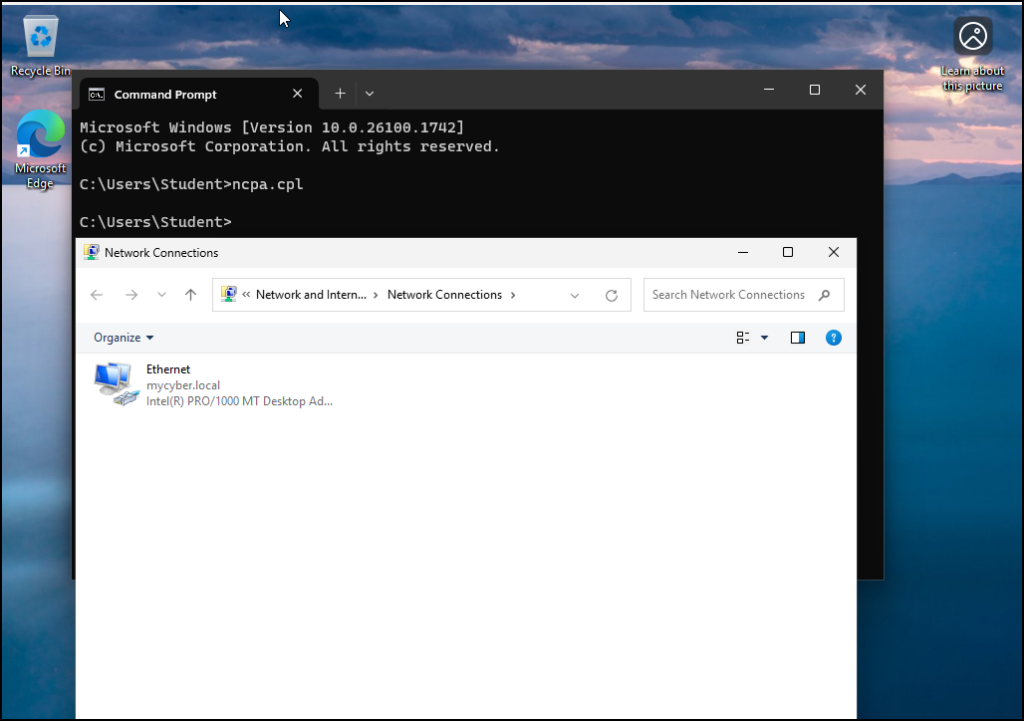
Figure 8 – Client network settings - As we did for the Server Firewall earlier, Right-click on one of the ethernet options and select Properties
- In the new window, uncheck the IPv6 option
- Click on the IPv4 option and select the properties button
- Make sure the option “Obtain an IP address automatically” is selected
- Make sure the option “Obtain DNS server address automatically” is selected
- Click on OK
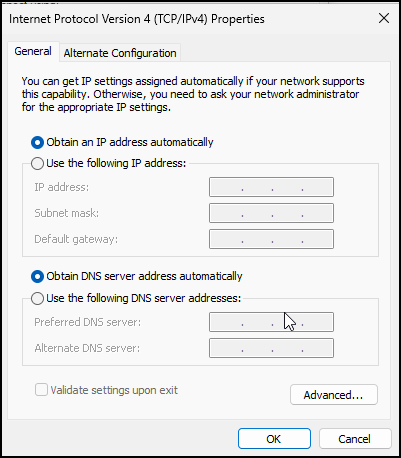
Figure 9 – Client IPv4 network settings
- Click on close
- Close the network connections window
- In the CLI, type the following to make sure your VM has an IP address
ipconfig

Figure 10 – Check for IP address - Change the PC name
- Click on the magnifying glass icon in the lower left-hand corner and type Control Panel to open the Control Panel
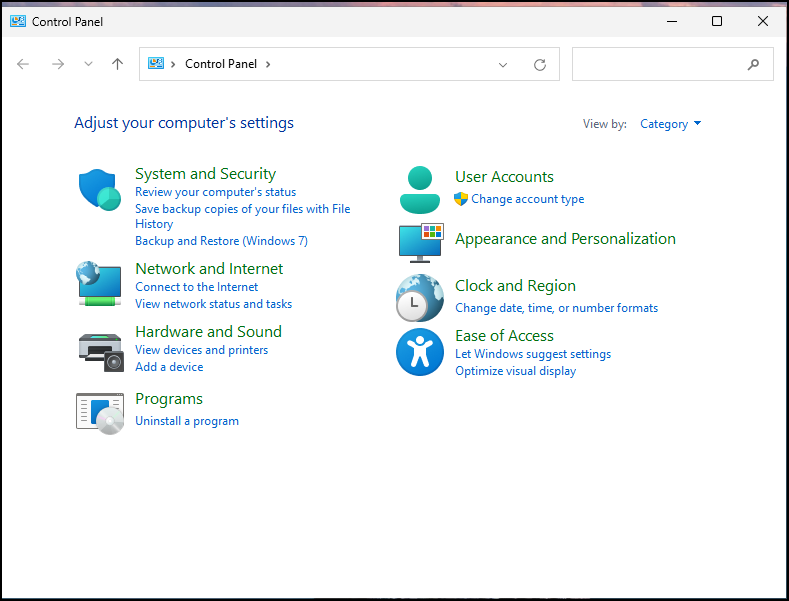
Figure 11 – Control panel - Click System and Security, then click on System
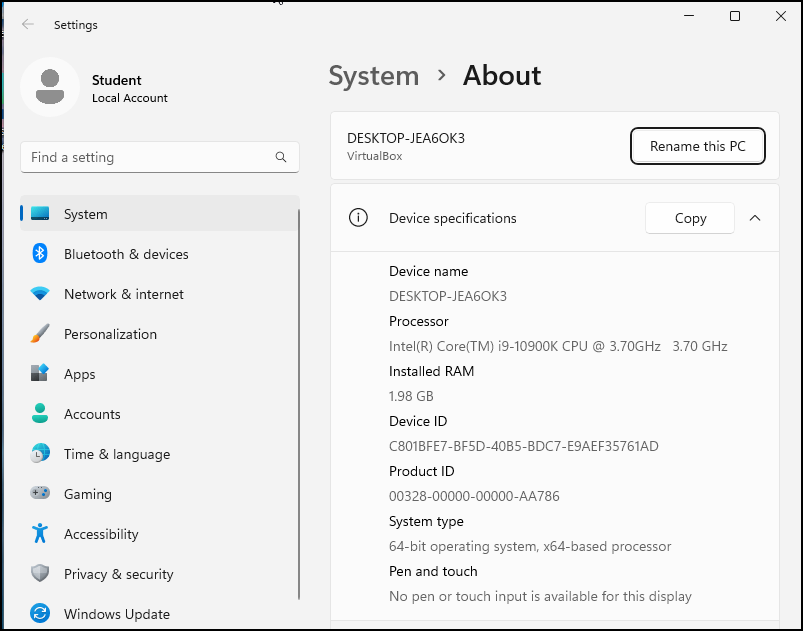
Figure 12 – Renaming a PC - Click on Rename this PC and reset the name to “Client-1”
- Reboot the VM
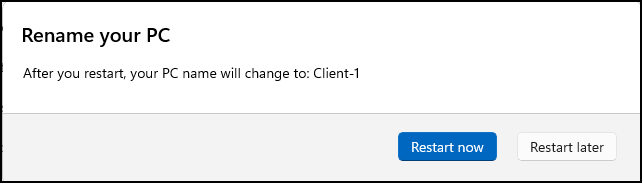
Figure 13 – Restart now
- Click on the magnifying glass icon in the lower left-hand corner and type Control Panel to open the Control Panel
- Join the client to the domain
- Verify that we have a network administrator on the server
- On the Firewall Server, under tools, open the Active Directory Users and Computers menu
- Verify that Ian Worthington is listed as a user. If not, revisit the instructions for setting up a Windows server
- Right-click on Ian Worthington and select Add to a Group
- In the Enter the object names to select textbox, type “Domain Admins” then click Check Names, then click OK
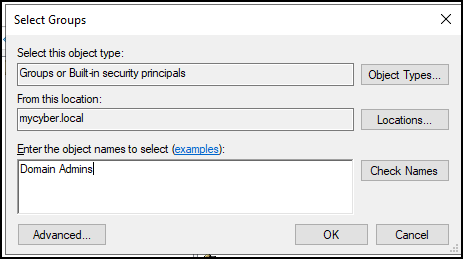
Figure 14 – Type in Domain Admins
- Navigate to client Win-1
- Type “Control Panel” in the search box to open the Control Panel
- Click on System and Security
- Click on System
- Scroll down until you see Domain or Workgroup and click on that
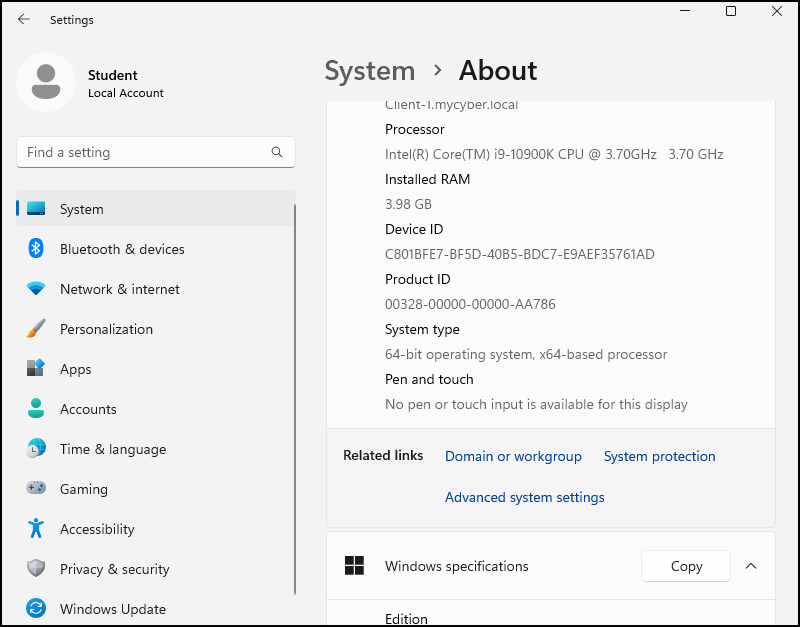
Figure 15 – Domain or workgroups - On the system properties window, click on Change
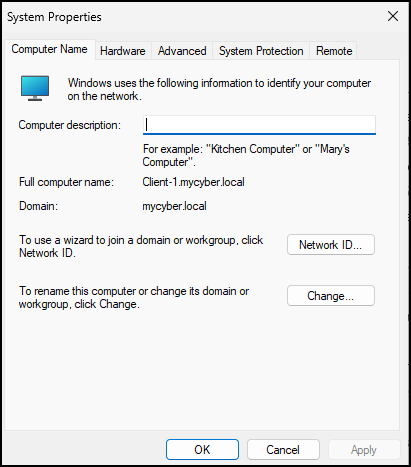
Figure 16 – System properties - In the “Member of” section, click on Domain and type mycyber.local and press OK
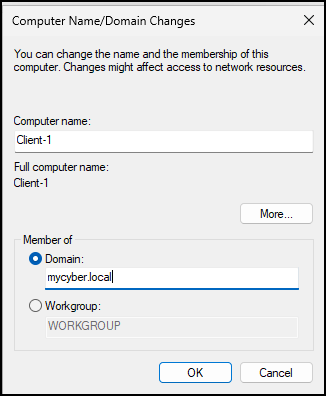
Figure 17 – Domain changes - Verify the domain add with the credentials of Ian Worthington
- USERNAME: ian.worthington
- PASSWORD: Security1
- A positive informational window will pop up and you can press OK

Figure 18 – Positive information window - Repeat pressing OK/Accept/Agree until all windows are closed. Then, restart the client machine
- Navigate back to the firewall server
- Under Tools, open Active Directory Users and Computers
- Click on computers in the left pane, and you should see that Client-1 is now part of mycyber.local domain
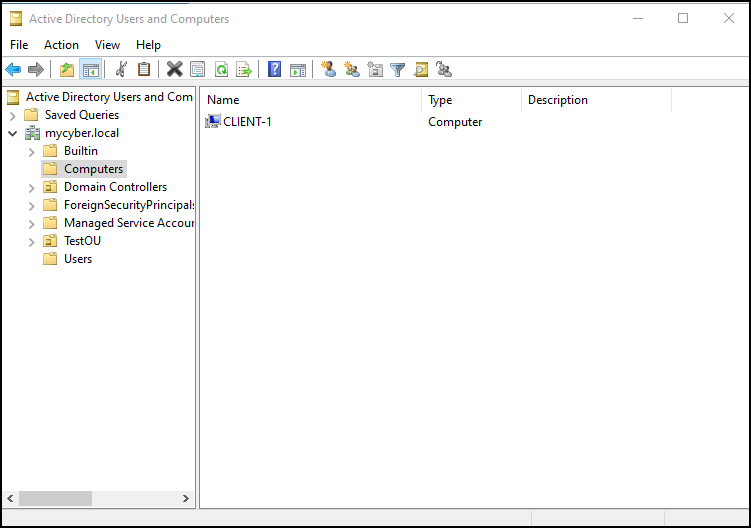
Figure 19 – Now listed as part of the mycyber.local domain
- Verify that we have a network administrator on the server
- Repeat the process above for the other two clients
- If you have limited resources, you can add them 1 at a time. There is no need to have all three clients running
Phase III – Add the router
In this phase, we are going to set up the rest of the network, the edge router, the DMZ, and the ISP.
- Insert a Net Cloud into the network and change the name to ISP
- Create the DMZ by adding a switch and an Ubuntu Server (Renamed to Webserver)
- Insert a Mikrotik router into the network and make the following connections
- ether1 – ISP
- ether2 – DMZ switch
- ether3 – Management switch
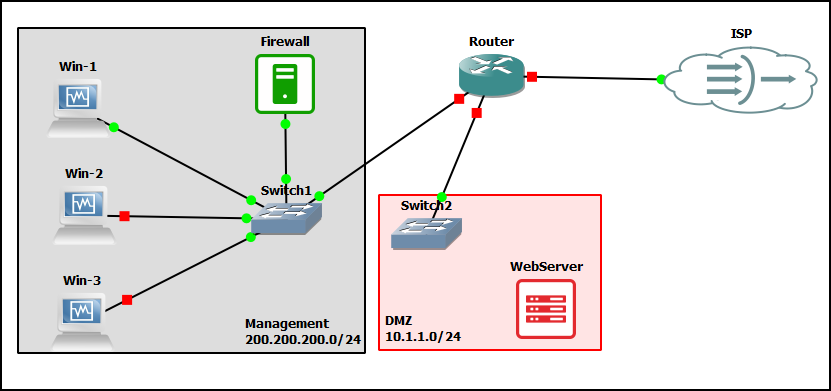
Figure 20 – Adding the rest of the network
- Start the router and configure it
- Assign the IP address 10.1.1.1/24 to ether 2
> ip address add address=10.1.1.1/24 interface=ether2
- Assign the IP address 200.200.200.1 to ether 3
> ip address add address=200.200.200.1/24 interface=ether3
- Run the following command to see that all interfaces have an IP address
> ip address print
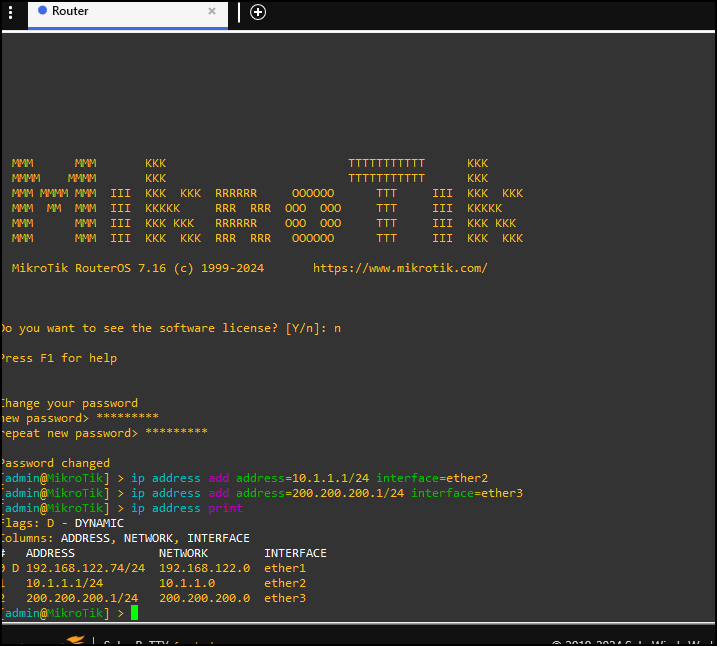
Figure 21 – The IP addresses are assigned Notice that ether1 picked up an IP address from the NAT cloud
- Assign the IP address 10.1.1.1/24 to ether 2
Phase III – Set-up firewall rules in active directory
- Configure firewall profiles
- Navigate to the Firewall Server, click on server manager and then local server
- Click on the Tools in the upper right-hand corner. From tools, click on Active Directory Users and Computers
- In the left pane, right-click on mycyber.local, click new and then click Organizational Unit.
- Add the name of your chosen OU (EagleOU in the example)
- Uncheck the “Protect container from accidental deletion”
- Click OK
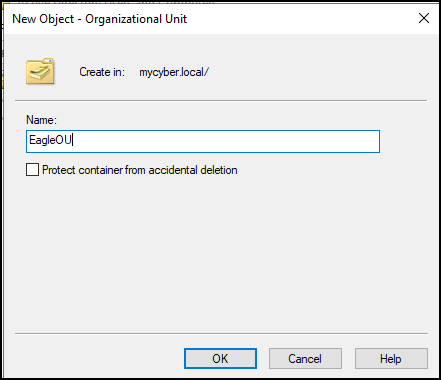
Figure 22 – Creating EagleOU
- Move the clients to the new Organizational Unit
- In the left pane, left-click on Computers under the mycyber.local
- Drag and drop all the clients in the right pane to EagleOU. If you get a popup, just select yes
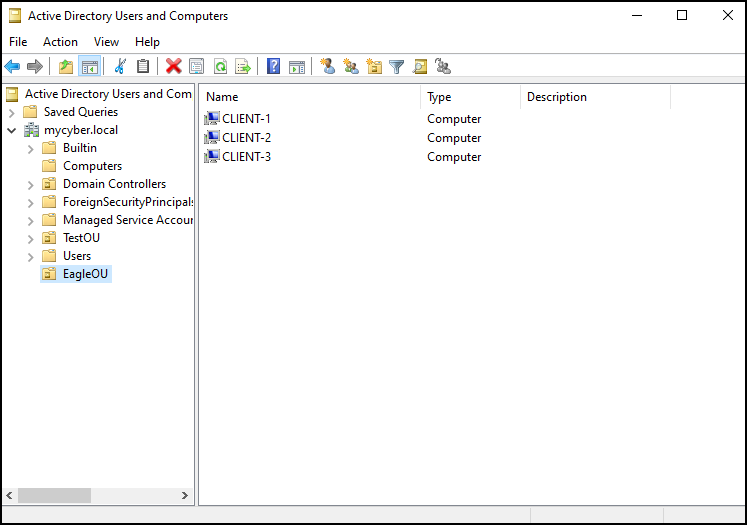
Figure 23 – Clients are in the EagleOU
- Adjust Active Directory Group Policy
- Go back into the tools tab and click on Group Policy Management
- In the left pane, expand Forest, Domains, and mycyber.local so you can see EagleOU
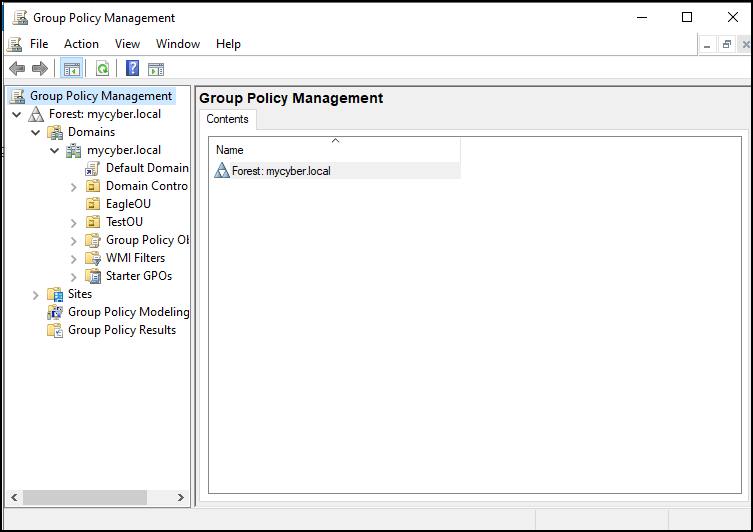
Figure 24 – Group policy with expanded forest - Make the left pane larger (if needed) to see the names of all the folders
- Expand Group Policy Objects to see the objects already created
- Right-click Group Policy Objects, select the new option to create a new object. Name this object Firewall Rules 1 for easy identification and click ok
- Select the Firewall Rules 1 object, right-click on it, and select the Edit option to open the Group Policy Management Editor
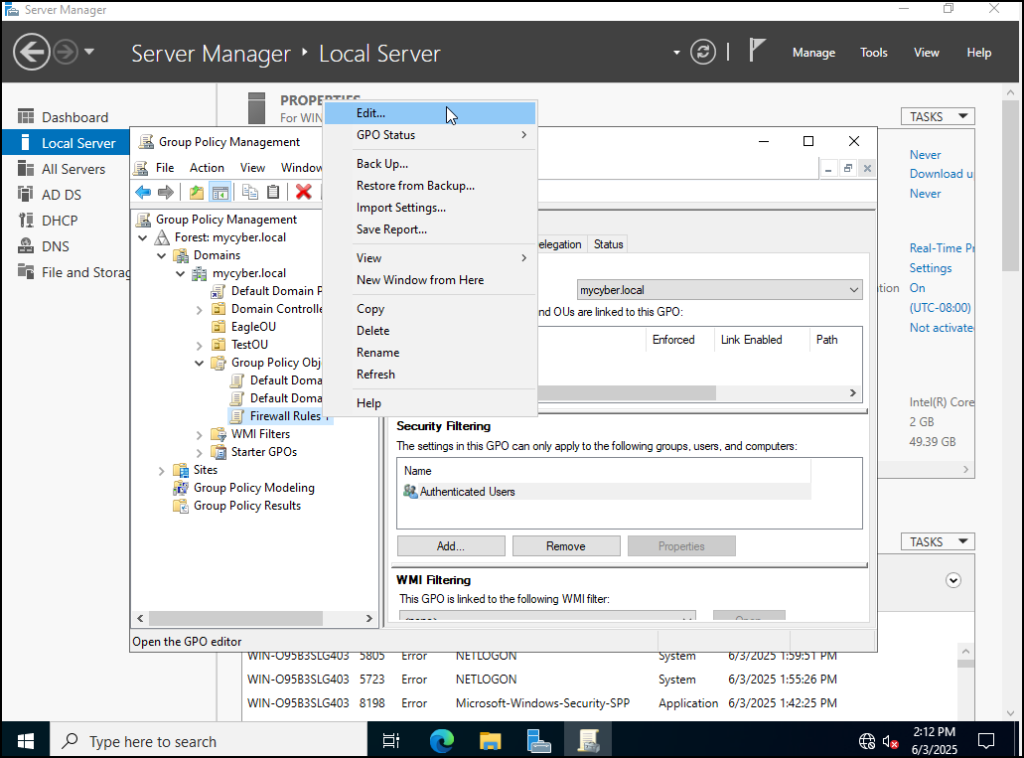
Figure 25 – Group policy object Firewall Rules 1 created - Under Computer Configuration, expand Policies and then expand Windows Settings and then Security Settings and then Windows Defender Firewall with Advanced Security
- Click on the Windows Defender with Advanced Security – LDAP… option
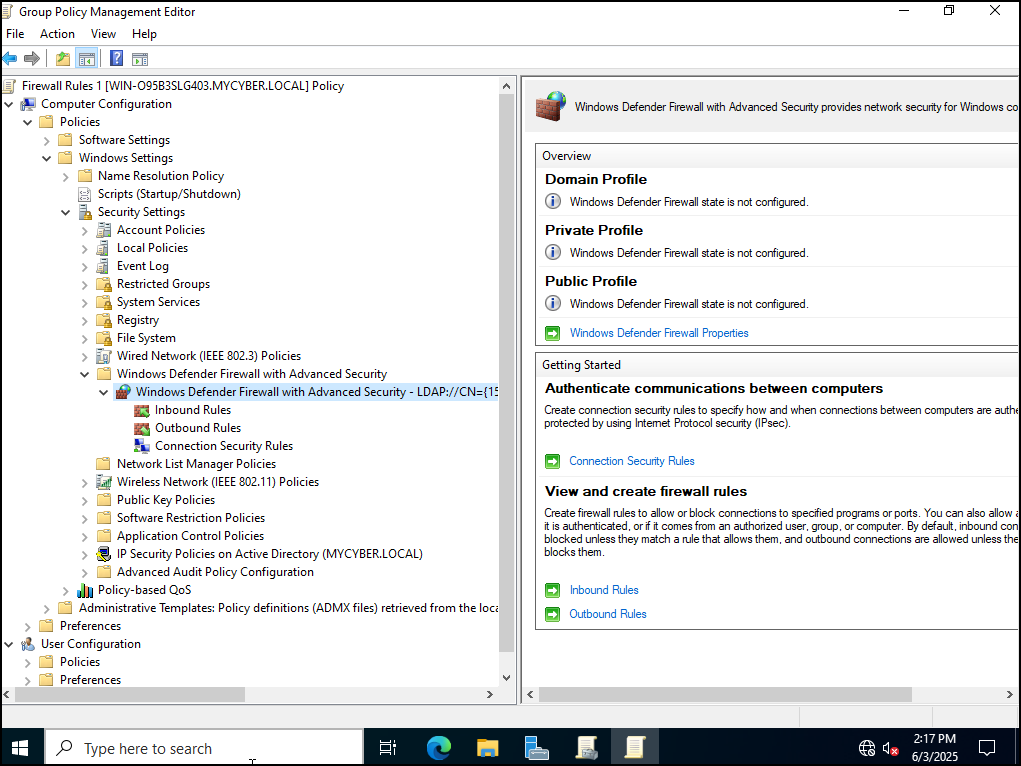
Figure 26 – Windows Defender Firewall with Advanced Security - In the right pane, select the blue text that states Windows Defender Firewall Properties to open the properties window
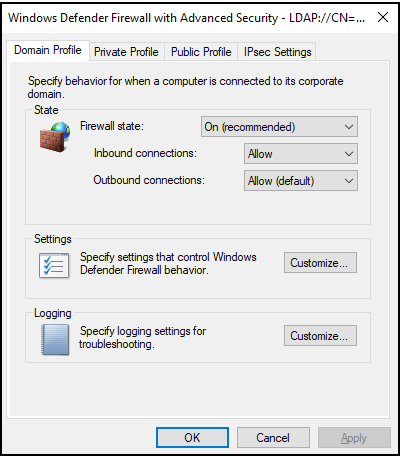
Figure 27 – Allowing inbound and outbound traffic - In the Domain Profile tab,
- Set the firewall state to ON (recommended)
- Set the Inbound Connections to Allow
- Set the Outbound Connections to Allow (Default)
- Set the same options in the Private and Public tabs and hit Apply and OK to close the window
- Close the Group Policy Management Editor window and return to the Group Policy Management window
- Highlight the EagleOU, then right-click on it, and select Link an Existing GPO
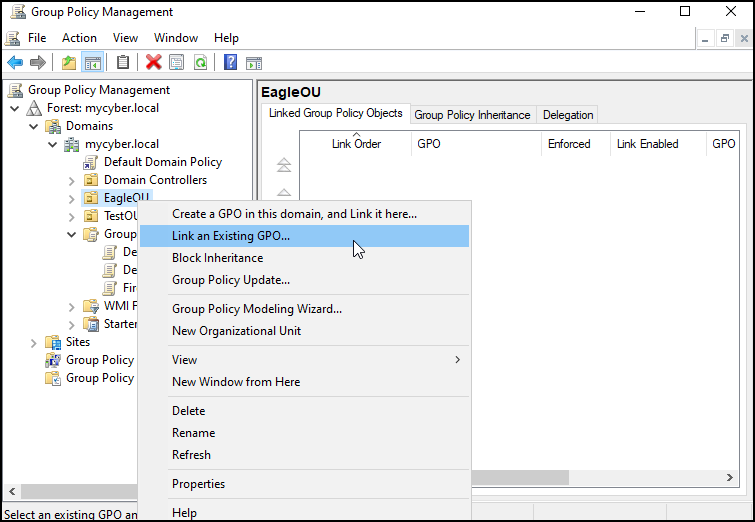
Figure 28 – Link an existing GPO - Select the Firewall Rules GPO that you created and click OK
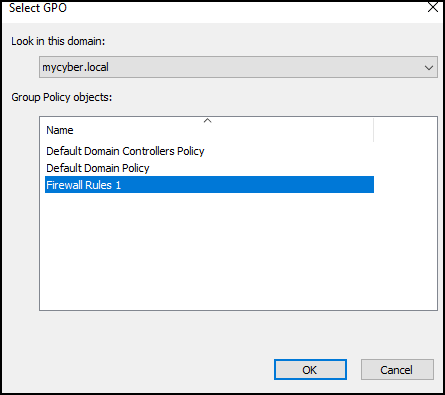
Figure 29 – Select Firewall Rules 1 - Navigate to each of the client machines
- Open the cli by typing “cmd” in the search window
- Update the group policy by entering the following command:
gpupdate /force
- Connect the Webserver in the DMZ
- In GNS3 connect the web server to the switch and start it
- Configure the Webserver to have the IP address of “10.1.1.254” with a subnet mask of “255.255.255.0” and a default gateway of “10.1.1.1”
Pretty sure this can be a VPCS instead of a server, but not positive yet. – HVH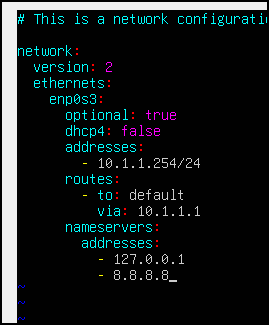
Figure 30 – Webserver IP address configuration - Leave DNS as the option that the machine supplied or 8.8.8.8
- Try pinging the Webserver from the Win-1 client PC. The pings should go through since there is no firewall rule blocking the connection
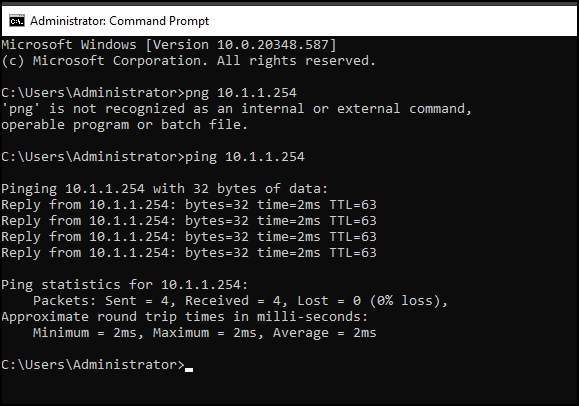
Figure 31 – Successful ping from Firewall server to Webserver - Try pinging Win-1 client PC from the Webserver. The pings should go through since we set up the Group Policy to allow all inbound packets on the client firewall
NOTE: Allowing all inbound packets is a horrible idea in a production environment!!!!
Phase IV – Configure firewall rules to block outbound and inbound pings
- Navigate back to the Firewall Server VM
- Right-click on Tools in the local server page and select Group Policy Management
- Expand Group Policy Objects and right-click on it, select the new option to create a new object. Name this object Firewall Rules 2 for easy identification and click ok
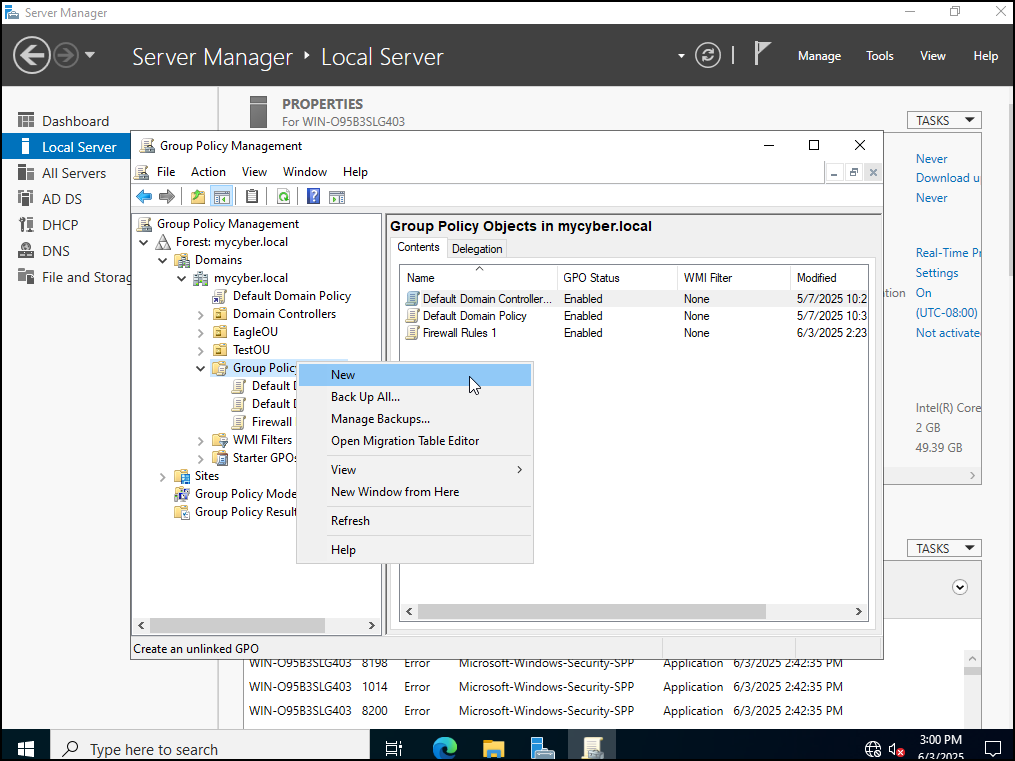
Figure 32 – New group policy for Firewall 2 rules - Select the newly created object and right-click on it and select the Edit option
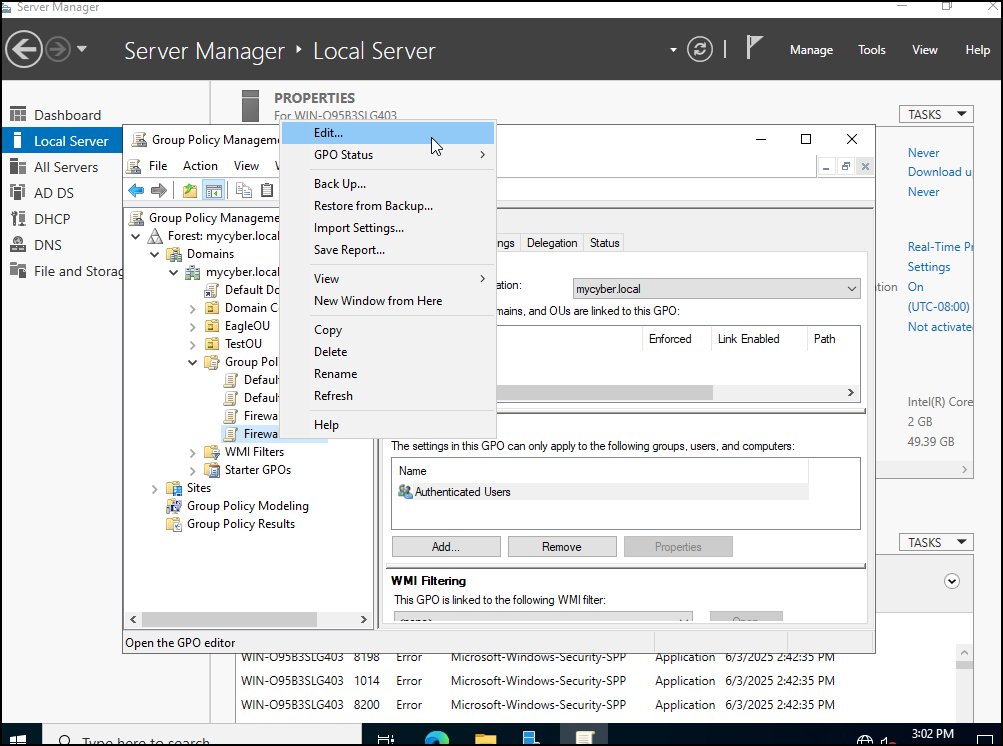
Figure 33 – Edit the rules for Firewall rules 2 - Expand Computer Configuration, Policies, Windows Settings, Security Settings, Windows Defender Firewall with Advanced Security, then select the Windows Defender Firewall with Advanced Security option
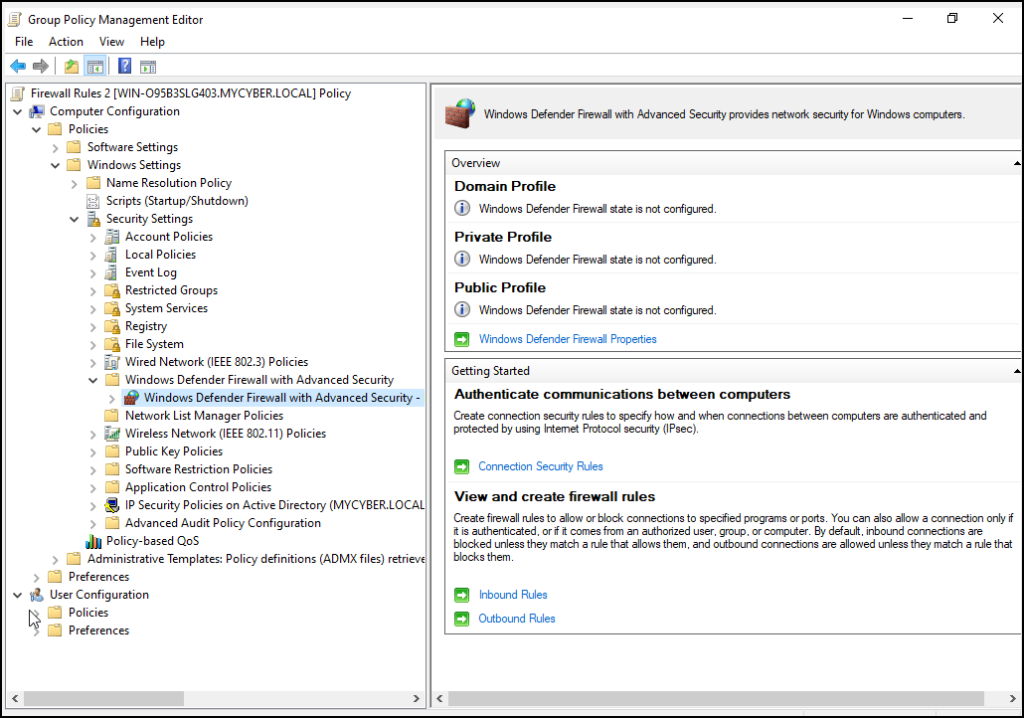
Figure 34 – editing Windows Defender Firewall Rules - Select the blue text that states Inbound Rules
- In the left pane, right-click on Inbound Rules and select New Rule
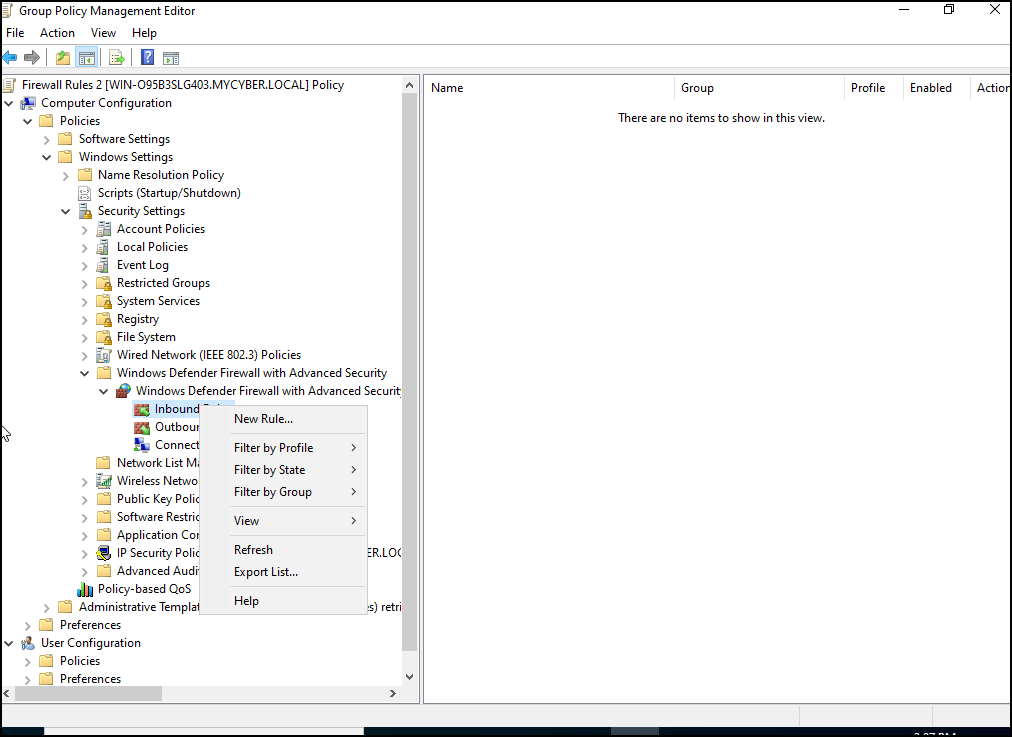
Figure 35 – Create a new inbound rule - Select the Custom option
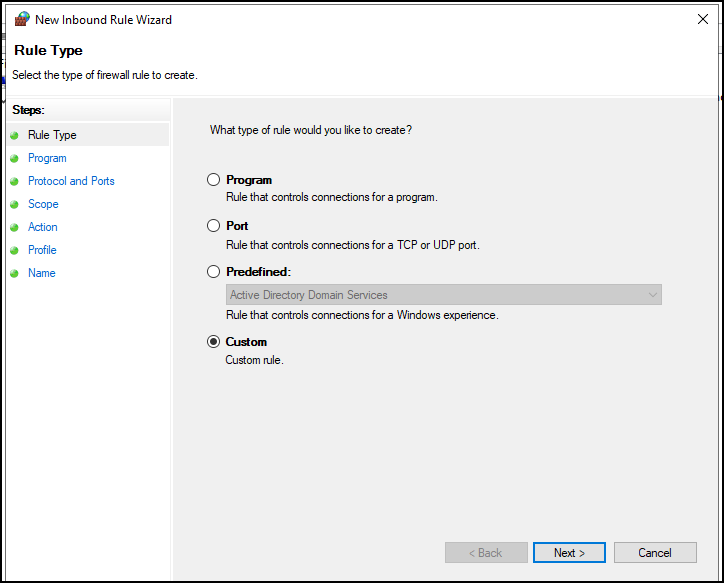
Figure 36 – Create a custom rule - Click next
- Leave “All programs selected” and then click next again
- In the Protocol and Ports screen
- Protocol type: ICMPv4
- Then click on the customize option towards the bottom
- Click specific ICMP types option and then tick the Echo Requests option
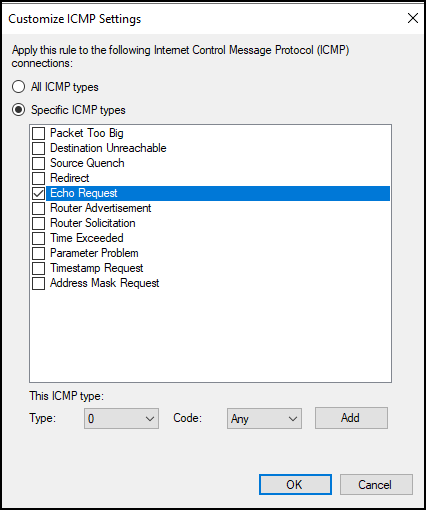
Figure 37 – Select echo requests - Click ok
- Click next
- In the scope screen
- Local IP address option – leave the “Any IP address” option selected
- Remote IP address, click “These IP addresses:”
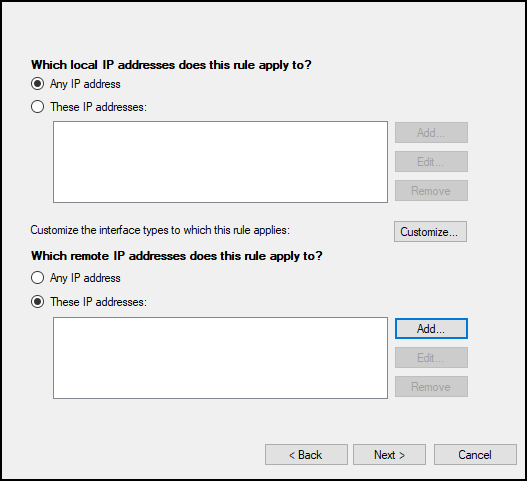
Figure 38 – Select how this rule is applied - Click on add
- Enter the DMZ subnet (10.1.1.0/24) and press OK.
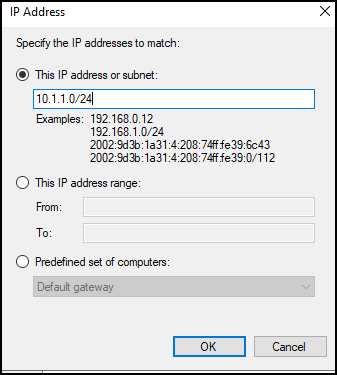
Figure 39 – Specify the IP addresses to apply the rule - Click next
- In the action screen, click Block the connection and then click on next
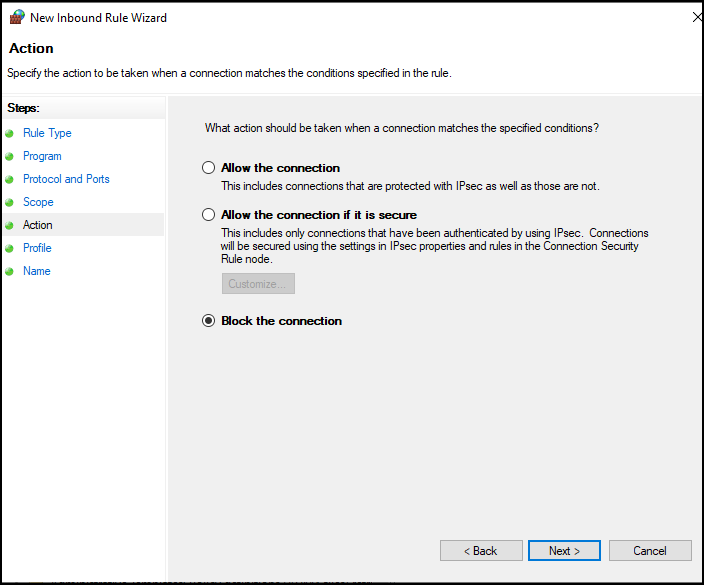
Figure 40 – Block the connection - In the profile screen, ensure that only the Domain option is checked, and then click next
- Name the rule something along the lines of “Block Pings from the DMZ”, then click on the finish option
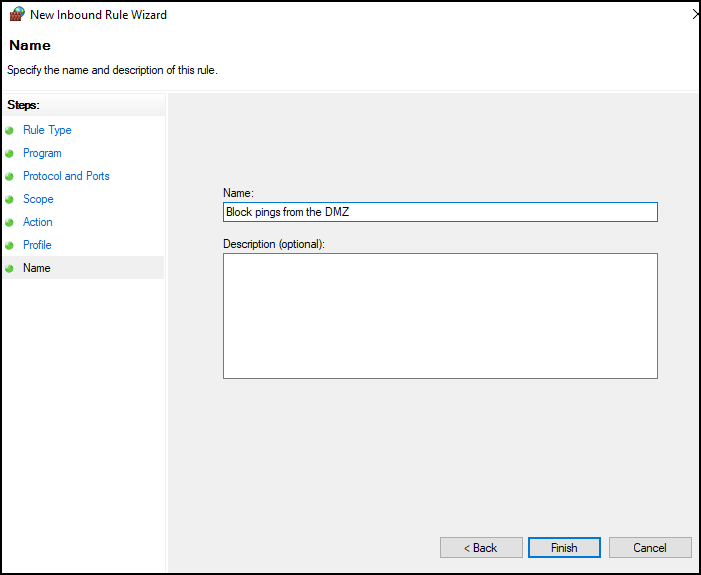
Figure 41 – Block pings from the DMZ
- Expand Computer Configuration, Policies, Windows Settings, Security Settings, Windows Defender Firewall with Advanced Security, then select the Windows Defender Firewall with Advanced Security option
- Return to the Group Policy Management window
- Highlight the EagleOU, then right-click on it, and select Link an Existing GPO
- Select the Firewall Rules 2 and press OK
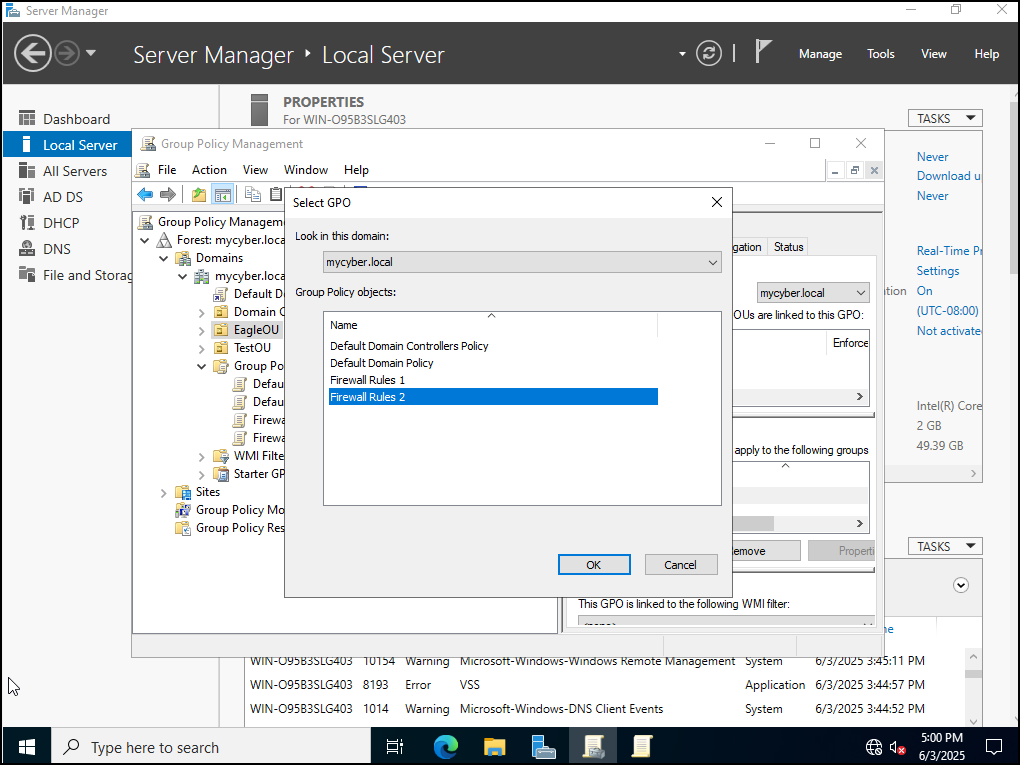
Figure 42 – Adding Firewall 2 to EagleOU - Navigate to each of the client machines and update their group policy by entering the following command:
gpupdate /force
- Try to ping the client machines from the Web Server at 10.1.1.254; the pings are now blocked due to the newly created firewall rules
- Expand Group Policy Objects and right-click on it, select the new option to create a new object. Name this object Firewall Rules 2 for easy identification and click ok
- Block outbound pings
- Navigate to the Firewall server
- Highlight the local server, right-click on the tools option, and then select the Expand Group Policy Objects option
- Click to highlight EagleOU, then right-click on Firewall Rules 2 and select the edit option
- Expand Computer Configuration, Policies, Windows Settings, Security Settings, and then Windows Defender Firewall with Advanced Security
- Select Windows Defender Firewall with Advanced Security option
- Select the blue text that states Outbound Rules
- In the left pane, highlight outbound rules, right-click on it and select New Rule
- Select the Custom option and click next
- Ensure “all programs” is selected, then click next again
- In the Protocol and Ports screen
- Select ICMPv4 from the protocol type drop down
- Click on the customize option towards the bottom
- Click specific ICMP types option
- Tick the Echo Requests option
- Click ok
- Click next
- In the scope screen
- Click the remote IP address, these IP addresses, and then add
- Enter the IP address of 10.1.1.254 and click ok
- Click next
- In the action screen click Block the connection and then click on next
- In the profile screen ensure only the Domain option is checked (uncheck Private and Public) and then click next
- Name the rule something along the lines of “Block pings from webserver”
- Click on the finish option
- In your client machines update the group policy by using the following command:
gpupdate /force
- Try and ping 10.1.1.254 from the client machines, the pings are now blocked due to the newly created firewall rules
- The above two rules show how a firewall can block pings from coming in, and it can block users within a domain from pinging a client on another domain and IP range.
End of Lab
Deliverables
4 Screenshots are needed to receive credit for this exercise:
- Labeled GNS3 workspace
- Router configurations
- Blocked pings from Client 3 to the Webserver
- Blocked pings from the Webserver to Client 2
Homeworks
- Assignment 1 – Firewall rules
- Configure your environment like the following:
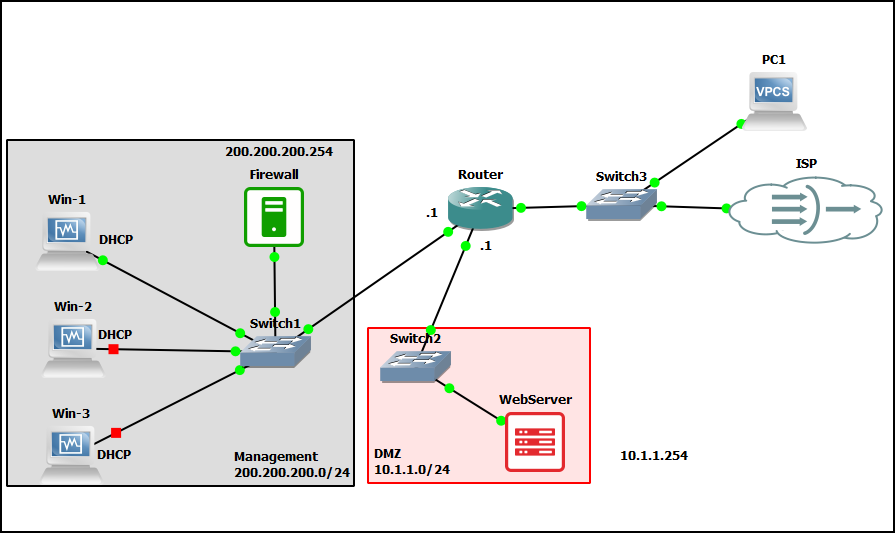
Figure 43 – Homework - Adjust the existing firewall rules
- The new PC from the internet can ping the Webserver and vice-versa
- The new PC cannot ping the Firewall and vice-versa
- Configure your environment like the following:
- RECOMMENDED GRADING CRITERIA – screenshots of:
- GNS3 Lab environment
- Successful pings of Webserver
- Unsuccessful pings of Firewall
- New/adjusted Firewall rules
- Assignment 2 – Allow internet pinging. As it stands, we can’t troubleshoot internet connectivity by using ping. Sure there are other ways, but the boss wants this option. Adjust/create firewall rules that allow clients and the webserver to ping Google (8.8.8.8 and 8.8.4.4)
- RECOMMENDED GRADING CRITERIA – screenshots of:
- GNS3 Lab environment
- Successful pings of Google from clients
- Successful pings of Google from Webserver
- New/adjusted Firewall rules
- RECOMMENDED GRADING CRITERIA – screenshots of:

Figure 00 – Contact us via prmaster@erau.edu
