54 Covering Tracks – Hiding Programs and Files
Mathew J. Heath Van Horn, PhD
Part of maintaining access is covering your tracks. One easy way to cover your tracks is by hiding files and programs. This feature is available in most operating systems to prevent users from deleting critical files. Attackers also use various techniques to hide malware, backdoors, or data exfiltration repositories for later exfiltration.
Additionally, steganography can be used both to cover tracks and to send infected files.
Learning Objectives
- Create and view hidden files on Windows and Linux
- Utilize steganography to hide a file
Prerequisites
- Create a Windows Server alternatively, use a Windows machine
- Create a Kali Linux VM alternatively, use any Linux machine
Deliverables
- Screenshot of ls -a command showing a hidden file
- Screenshot of file properties window in Windows showing a hidden file
- Screenshot of hide programs and features enabled in Windows
- Screenshot of OpenStego extraction success window
Resources
- Ojash Yadav – “How to Hide Apps on Windows” – https://www.maketecheasier.com/hide-apps-windows/
- “How to Show Hidden Files in Linux” – https://phoenixnap.com/kb/show-hidden-files-linux
- Network Chuck – https://youtu.be/VcqtWsbSbgU?si=mBgDRliNoo-3V0se
Contributors and Testers
- Justin La Zare, Cybersecurity Student, ERAU-Prescott
- Dante Rocca, Cybersecurity Student, ERAU-Prescott
- Alec Parish, Cybersecurity Student, ERAU-Prescott
NOTE: These labs in this section of the book roughly follow the pen testing process. However, in this chapter, there is no need to use the baseline environment. You can perform these labs directly on the VMs you built for the baseline environment. Also, if you use Windows or Linux as your daily driver, you can complete these labs directly on the appropriate operating system. Just keep track of what you do so you can return your daily driver back to its original functionality.
Phase I – Hidden Files in Linux
In Linux, creating hidden files is crucial for concealing them from users. Fortunately, creating hidden files is easy in Linux. Unfortunately for security, viewing hidden files in Linux is quite easy.
- Start the Kali VM. Open the terminal in any directory and create a text file with a message in it. For our example, the file will be called hiddenMessage.txt
- Use ls to show the file you created in the directory
- Hidden files in Linux are created by adding a period to the front of the file name. To do this in the terminal, type the following command
> mv hiddenMessage.txt .hiddenMessage.txt
- Now use ls again to make sure the file is hidden
- To view the hidden file, use the following command
> ls -a
Phase II – Hidden Files in Windows – Hidden File Attribute
Similar to hiding files on Linux, hiding files and viewing hidden files is easy on Windows.
- Launch a Windows machine (virtual or physical)
- Create a new text file on the desktop by right-clicking on the wallpaper and selecting -> new -> text document. Name it whatever you would like
- Right-click the newly made file and select Properties
- In the attributes section under the general tab, check Hidden

Figure 1 – Screenshot of File Properties window - Click Apply and then OK. You should see the file disappear from the Desktop
- To view the hidden file, open File Explorer. Go to the Desktop in File Explorer
- Click the View bar at the top. Check the box that says Hidden items

Figure 2 – Screenshot of file explorer view bar - The hidden file should reappear on the desktop and in the File Explorer window
Phase III – Hiding Programs in Windows – Obfuscation
You can use different mechanisms in Windows to obfuscate that a file even exists. Finding the file again isn’t that difficult, but it is unlikely that anyone will resort to this.
- Launch a Windows machine (virtual or physical)
- Create a new folder on the desktop by right-clicking on the wallpaper and selecting New -> Folder. Name it whatever you would like
- Alt-codes are a way to access unique ASCII characters or symbols without having to click “insert symbol”. This works with your 9-key pad when NumLock is on. For instance, the English Pound (£) is created by holding down the Alt Key and pressing 0163 on the number pad. (you can Google “alt-codes” and “ASCII”)
- There are non-printable (e.g., invisible) alt-codes. So we are going to rename our file to <Alt> 255, which means ‘non-breaking space’
- Right-click on the file and select rename
- Delete all the text, including the file extension
- Now type <alt> 255 and press enter
- You can see that there appears to be a file with no readable filename
Figure 3 – a file named <alt> 255
- However, we can still see that the file exists on our desktop, so we need to fix that
- Right-click on the file and select Properties
- Now select Customize
- Select “change icon”
- Now select one of the blank icons and select ok
- Select Apply and OK
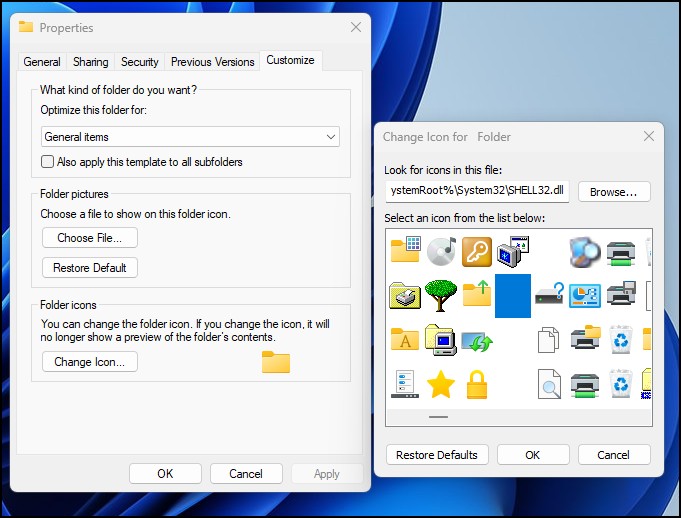
Figure 4 – changed the folder icon to a blank icon. - You should see that the new icon made the folder appear to disappear
- To get it back, left-click on the wallpaper and drag it to capture the entire screen. This action should illuminate the file

Figure 5 – highlighting the hidden folder on the desktop
- Right-click on the file and select Properties
- You can even rename the file extension of a file so that the computer doesn’t know what to do
- Open file explorer
- Click on view -> options
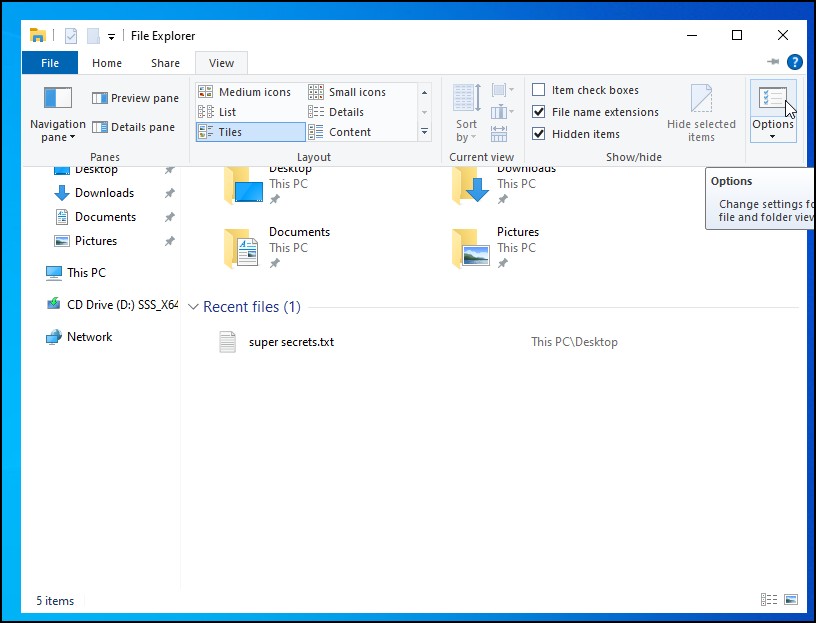
Figure 6 – file explorer options - enable “show hidden files, folders, and drives”
- disable “Hide extensions for known file types”
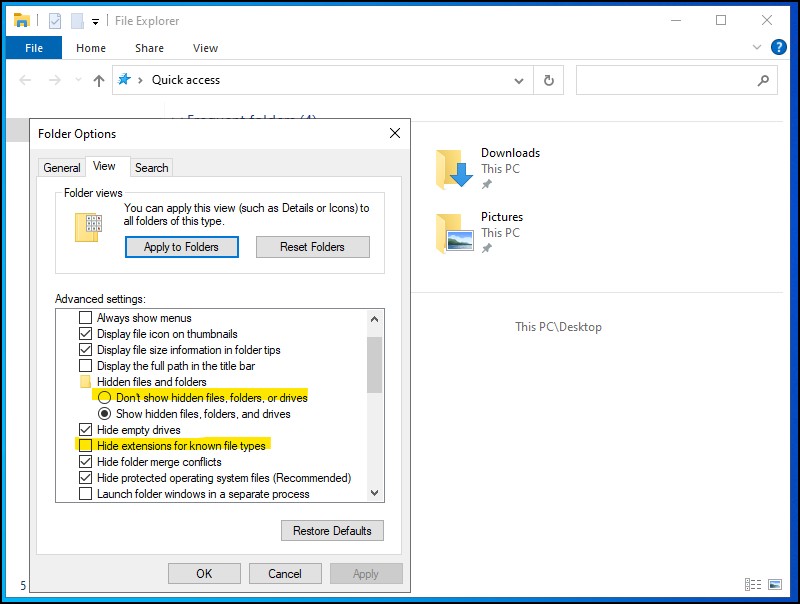
Figure 7 – change default view options
- Create a new Text Document on the desktop and fill it with some text. We called our file ‘super secrets’
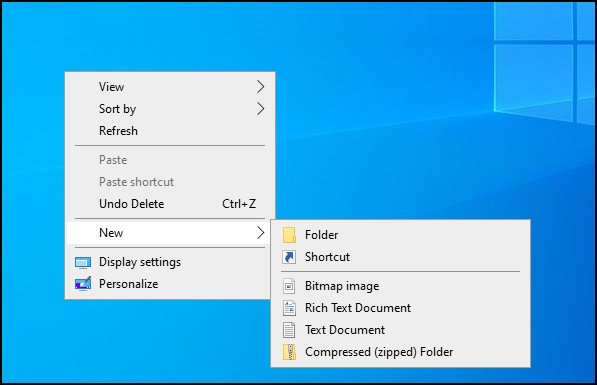
Figure 8 – create a new text document on the background 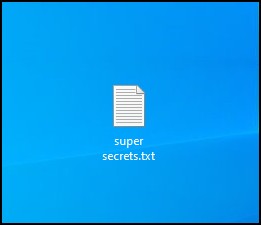
Figure 9 – a new text file named ‘super secrets.txt’ - Right-click on the file and change the extension to jpg
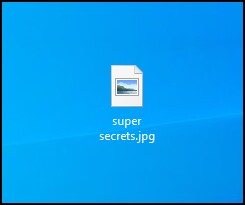
Figure 10 – changed the file extension to jpg, so now it appears as an image file - Double-click on the file, and Windows will try to open it in Paint and give an error
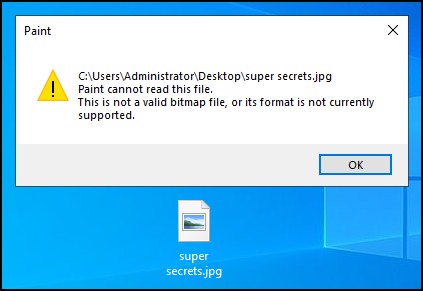
Figure 11 – the file cannot be opened in Paint - The casual user won’t be able to open the file through double-clicking, but you can right-click on the file and open it with the correct app, and it will open just fine
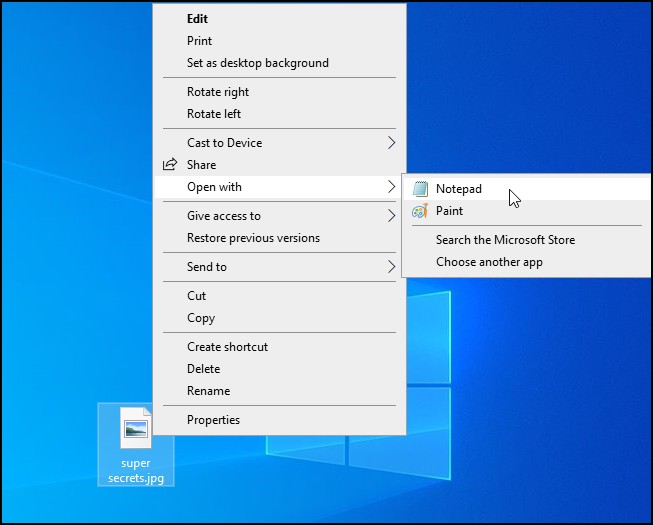
Figure 12 – open the file using the correct app
Phase IV – Hiding files in Windows – Alternate Data Streams
Windows systems use the NTFS (New Technology File System) file system to organize the software files. It was an improvement over FAT (File Allocation Table) in that it allowed file management on large drives and introduced some limited security options. The NTFS uses several hidden files to store metadata about files on the drive. We can use this metadata to hide files from the casual user by using alternate data streams. This allows you to store data inside another file without changing the filesize or the data content.
- Launch a Windows machine (virtual or physical)
- Create two files on the desktop:
- secret.txt
- innocent.txt

Figure 13 – create two text files
- Populate these text files with some random text, copy a news article, write your favorite poem, whatever. Just add some text you want to keep secret
- Please right-click on the secret.txt file and note its properties
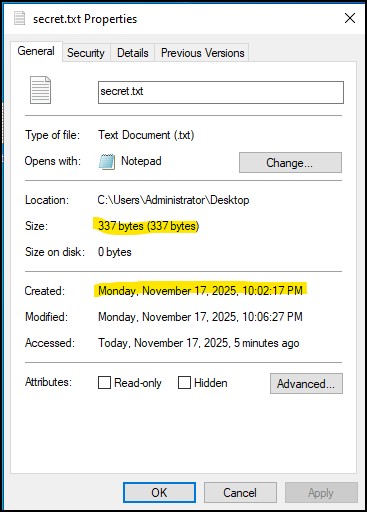
Figure 14 – inspecting the properties of secret.txt file - Open the Windows command line by typing “CMD” at the Start button
- Navigate to the desktop where our files are stored. In this example we are at C:\users\Adminstrator\Desktop>
- Now hide the secret file in the innocent file by typing
type secret.txt > innocent.txt:secret.txt
- Now you can right-click the secret.txt file and delete it. Don’t worry, the data is still there, because it is saved inside the innocent.txt file
- Now you can double-click the innocent.txt file and still see the orginal text in that document
- You can also right-click the file and look at its properties; they haven’t changed. Yes, the modified properties have changed, but you need some eagle eyes to see that
- To read the hidden file, you type the following command
notepad innocent.txt:secret.txt
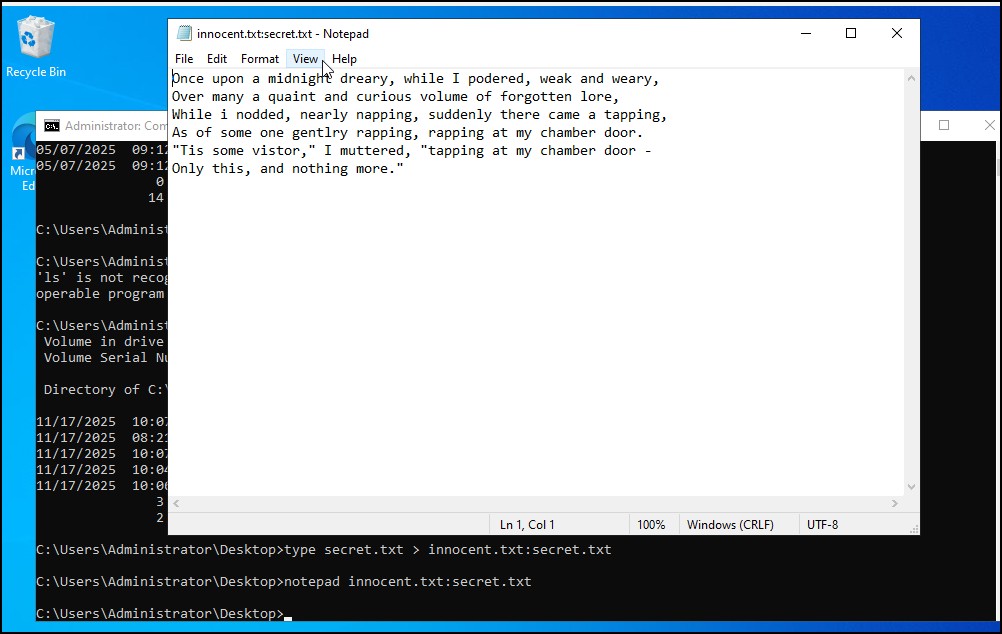
Figure 15 – reading the secret file inside the innocent file - Hiding this information doesn’t have to be text files; you can use any file extension, and it will work because of NTFS
Phase V – Hiding Programs in Windows
- Launch a Windows machine (virtual or physical)
- Right-click the Windows start icon and then click Run. In the textbox that pops up, type the following
> gpedit.msc
- Hit enter, and in the left pane of the Local Group Policy Editor window that opens, click the Administrative Templates tab under the User Configuration tab
- In the right pane, double-click Control Panel
- In the right pane, double-click Programs
- Right-click the Hide “Programs and Features” page. Select edit

Figure 3 – Screenshot of the Hide Programs and Features page in Local Group Policy Editor - Click the Enabled radio button and then click Apply and OK. This will prevent users from accessing the programs and features page. This will prevent users from accessing the programs and features page to view and uninstall programs

Figure 4 – Screenshot of Hide Programs and Features Enabled
Phase VI – Steganography
- Switch to the Kali VM. Start by creating a text file that you want to hide. Then, download any image file to hide the message in
- Click the Kali logo at the top left and search for OpenStego. Open the program
NOTE: If you do not see OpenStego, follow the steps to install the program.
- Navigate to https://www.openstego.com in the Kali VM
- Click “Download” at the top of the page
- Download the latest release; the file should end with the .deb extension
- Run the following command on the downloaded file to install OpenStego.
> sudo dpkg -i <filename>.deb
- Click the three dots next to the Message file input. Locate the text file you made and select it
- Click the three dots next to the Cover file input. Locate the image you downloaded and select it
- Click the three dots next to the Output file input to select where to save the stego file. If you don’t specify a path and type a name, it will be sent to the current user’s home directory

Figure 5 – Screenshot of Hiding Data using OpenStego - Click Hide data
- Now that we’ve hidden the message, we can try to extract it. First, delete your message file
- Now go back to OpenStego and then click the Extract data tab
- Click the three dots near the Input stego file input and select your stego file
- Click the three dots near the Output folder for message file input and select where you want the message to be sent

Figure 6 – Screenshot of Extracting Data using OpenStego - Click the Extract data button
- Go to where you saved the message and check to make sure your message is still the same
Phase VII – How to find hidden files
Finding hidden files is more of a computer forensics topic and is beyond the scope of this book. However, you can use the techniques below to find the files we hid earlier.
- In Windows Powershell use the following script to find hidden files
Get-ChildItem -Force | Where-Object { $_.Attributes -match “Hidden” } | Select-Object FullName, Attributes
- In Linux use the following script to find hidden files
find . -maxdepth 1 -type f -name “.*” -or -type d -name “.*”
- To find alternate data streams in Windows, type the following:
dir /r
and you will see the alternate data stream
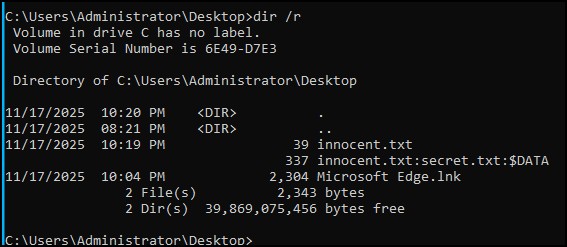
Figure 16 – using the dir command with the r switch - To find hidden files inside of possible steganography items, you can use programs like stegdetect https://github.com/BionicSwash/Stegdetect
- Again, detecting hidden files is more of a forensic matter and is beyond the scope of this book
End of Lab
Deliverables
4 Screenshots are needed to earn credit for this exercise:
- Screenshot of ls -a command showing a hidden file
- Screenshot of file properties window in Windows showing a hidden file
- Screenshot of hide programs and features enabled in Windows
- Screenshot of OpenStego extraction success window
Homework
Assignment 1 – Find the hidden message in this file (link to photo)
- Download the file and find the hidden message inside it
- Take a screenshot of the hidden message
Assignment 2 – Choose an alternative
Research an alternative to OpenStego and use it to create new hidden files. Write a short explanation covering the following:
- Why did you settle on your selection? Was it the features, ease of use, cost, etc.?
- Compare and contrast to using the tool you selected to OpenStego
- What do you believe are the limitations of using steganography in your daily operations?
Assignment 3 – Pair up
There is nothing like trying it live. Find a partner and practice hiding and finding files with each other using at least three different techniques.
RECOMMENDED GRADING CRITERIA
- Screenshot of technique 1
- Screenshot of technique 2
- Screenshot of technique 3

