45 Build the Baseline Environment (Eagle Net)
Dante Rocca and Kyle Wheaton
This section is for building a baseline environment. e.g., Your target. We’ll call it Eagle Network, The Eagle, or just Eagle for reference. It will contain many of the devices of a real network, but it will be abbreviated to save on host machine resources. You will need to create this enterprise network first before starting any of the attack labs.
Learning Objectives
- Create a network to serve as a target for offensive cyber operations
Prerequisites
- Chapter 5 – Installing Tiny Core Linux
- Chapter 7 – Create a Linux Server
- Chapter 12 – Create a Kali Linux VM
- Chapter 13 – Create a Vulnerable Desktop VM
- Chapter 21 – DHCP Relay
Deliverables
- Four (4) Screenshots are required:
- GNS3 lab environment
- Kali box receiving an IP address
- Metasploitable3-Win box receiving an IP address
- Metasploitable3-Linux box receiving an IP address
Resources
- N/A
Contributors and Testers
- Mathew J. Heath Van Horn, PhD
- Jacob M. Christensen, Cybersecurity Student, ERAU-Prescott
Phase I – Setting up the network
- The goal is to create a network like this:
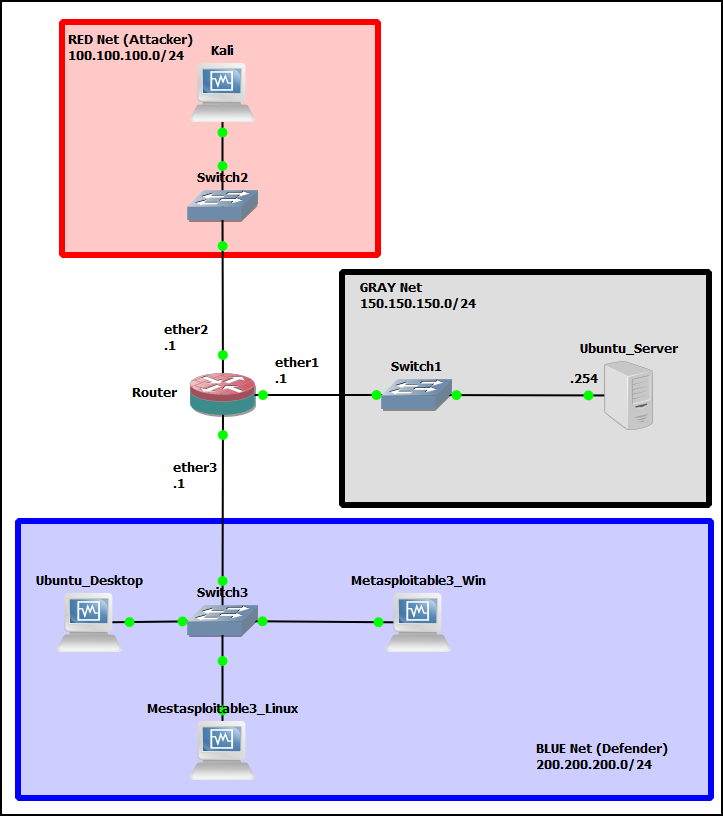
Figure 1 – Expected final result - Create the following virtual machines and add them to the GNS3 environment:
NOTE: Not every virtual machine (VM) is used in every lab. To conserve resources, consider replacing any unused machine with a Tiny Core Linux box. This device swap will still display live targets on scans, but it utilizes only 50 MB of memory instead of 2 GB.
- TinyCore Linux in Chapter 5 – Installing Tiny Core Linux
- Ubuntu Server VM with all add-ons in Chapter 7 – Create a Linux Server
- Ubuntu Desktop in Chapter 11 – Create a Ubuntu Desktop
- Kali VM in Chapter 12 – Create a Kali Linux VM
- Both Metasploitable 3 (Windows and Linux) VMs in Chapter 13 – Create a Vulnerable Desktop VM
- Configure the Ubuntu Server to handle DHCP requests
- Modify the /etc/netplan/*.yaml on the DHCP server
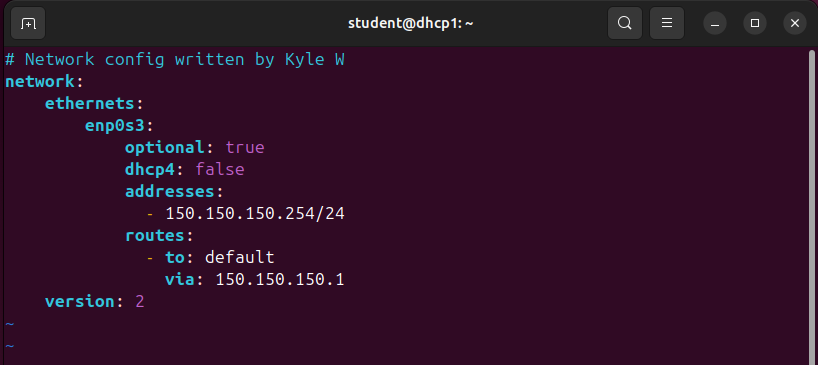
Figure 2 – Ubuntu Server netplan configuration - Modify the /etc/kea/kea-dhcp4.conf file on the DHCP machine

” Figure 3 – Ubuntu Server DHCP configuration - Ensure the daemon is active and running
NOTE: As a reminder to:
1. Start the service:
> sudo systemctl start kea-dhcp4-server.service
2. Restart the service:
> sudo systemctl restart kea-dhcp4-server.service
3. Start the service on system boot:
> sudo systemctl enable kea-dhcp4-server.service
4. Check service status:
> systemctl status key-dhcp4-server.service
5. Check the configuration for errors
> kea-dhcp4 -t /etc/kea/kea-dhcp4.conf
6. Check the system log for additional error messages
> journalctl -xeu kea-dhcp4-server.service
- Modify the /etc/netplan/*.yaml on the DHCP server
- Configure the router
- Assign each interface on the router an IP address according to the following
- ether 1 – 150.150.150.1/24
- ether 2 – 100.100.100.1/24
- ether3 – 200.200.200.1/24
- Disable the ether1 DHCP service
- Configure the router as a DHCP relay for the Red and Blue networks
- Assign each interface on the router an IP address according to the following
- Check to make sure that everything is working properly
- The attacker’s machine should receive an address from the 100.100.100.0/24 pool
- The blue machines should receive addresses from the 200.200.200.0/24 pool
End of Lab
Deliverables
3 Screenshots are needed to earn credit for this exercise:
- Screenshot of Lab Environment
- Screenshot of Kali VM receiving an IP address
- Screenshot of Metasploitable3 VM receiving an IP address

