44 Introduction to Wazuh
Maggie Lindemann
Wazuh is a free, open-source security platform that helps protect data from cyber threats. It combines Security Information and Event Management (SIEM) and Extended Detection and Response (XDR) capabilities. Wazuh can be deployed on-premises or in the cloud. Thousands of organizations worldwide, small and large, use Wazah to enhance their security.
LEARNING OBJECTIVES
- Install the Wazuh VM
- Interact with the Wazuh Dashboard
- Install a Wazuh agent
- Create and view alerts made by Wazuh agents
PREREQUISITES
Deliverables
- Dashboard summary displaying two Wazuh agents operational
- Metasploitable machine vulnerability details
- Expanded metadata for SSH alert
Resources
Contributors and Testers
- Calvin Lindemann, Cybersecurity Student, ERAU-Prescott
- Tyler Jane McClure, Cybersecurity Student, ERAU-Prescott
- Eliana Seitz, Cybersecurity Student, ERAU-Prescott
- Morgan Finch, Cybersecurity Student, ERAU-Prescott
- Sarah Davis, Cybersecurity Student, ERAU-Prescott
Phase I – Setup
While this lab expands upon Network Segmentation (Ch 37), some environmental modifications will be made, namely, replacing some of the VPCS with actual virtual machines. How long the staging takes will depend on your internet connection and how well configured your network segmentation is.

- Clear any firewall rules from all devices you may have implemented earlier
- Install the Wazuh virtual appliance from here
- Import the Wazuh VM to VirtualBox
- Navigate to VirtualBox
- On the file menu, click on import appliance
- Use the folder to navigate to the location of your Wazuh VM download
- Click on next
- By default, Wazuh uses 4 CPU cores and 8192 MB of RAM, which is a bit hefty. Adjust these settings to 2 CPU cores and 4096 MB of ram to economize so that it resembles the following:
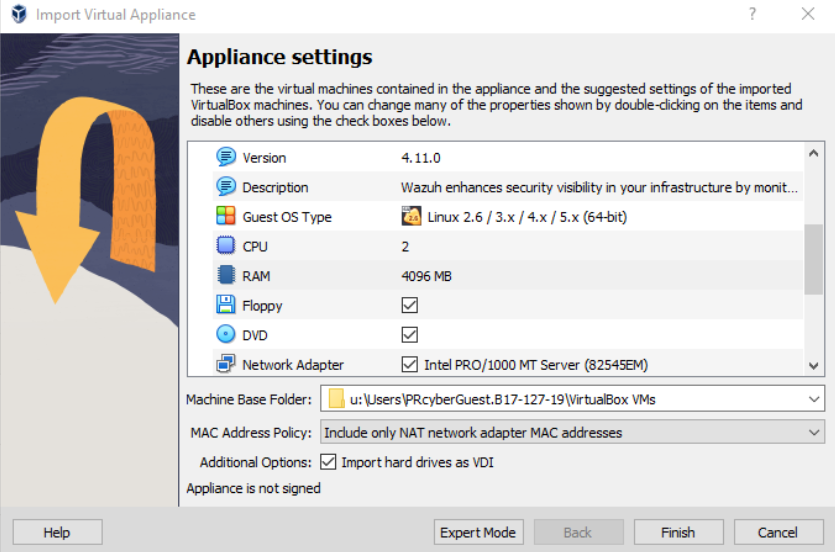
Figure 1 – Importing the Wazuh VM appliance
- Integrate the Wazuh VM into your GNS3 environment in the following convention:
- Import the Wazuh VM into GNS3
- Remove both of the VLAN 10 (Marketing) VPCS machines
- Remove the VLAN 20 (Cyber Shop) VPCS machine that is attached to ether 10
- Add the Wazuh VM to ether 23; it will be in the VLAN 10 (marketing group)
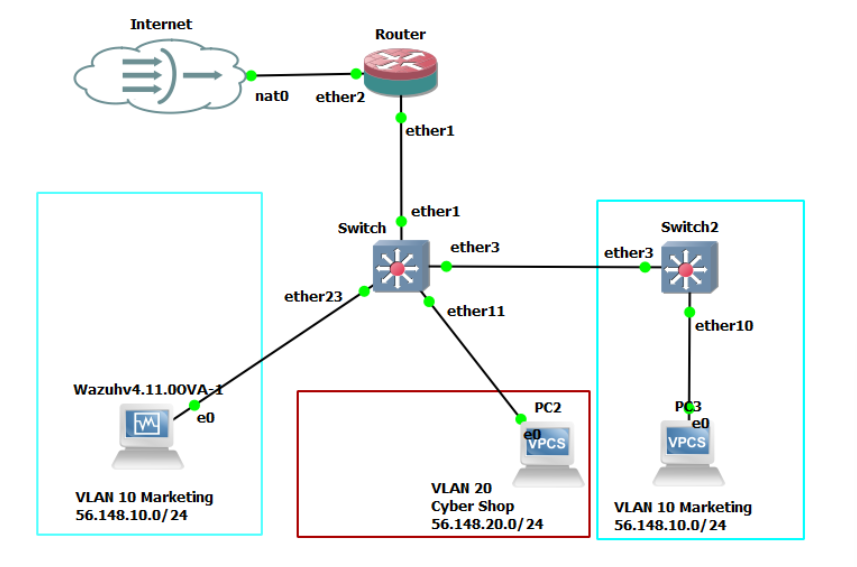
Figure 2 – Our Wazuh network environment
- Launch the Wazuh VM. It might hang up a bit during initialization, where you’ll see something like this for a bit under a minute

Figure 3 Wazuh VM initializing - You’ll be met with a login prompt when it finally boots; the credentials are
USERNAME: wazuh-user
PASSWORD: wazuh - Run “ip a” and verify that the result matches your switch/router configurations
- Note down the IP address as well, as this is where our Wazuh agents will be pointing to (in this case, it’s 56.148.10.249)

Figure 4 – results of running the command “ip a” - Please navigate back to VirtualBox manager so we can configure the Kali (it should not be situated within the GNS3 environment yet)
- Recommend performing a full clone at this time
- Change the new Kali VM network settings to NAT (we need internet access to install some software)
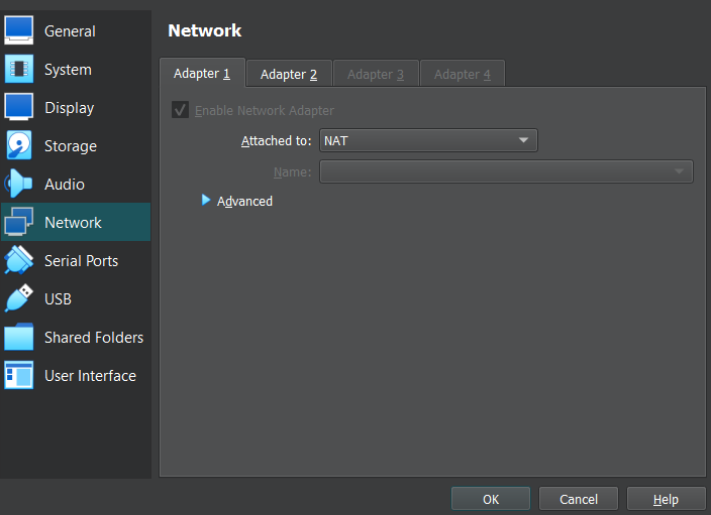
Figure 5 – Change Kali clone VM network settings to NAT - Start the new Kali VM
- Open terminal and open a root shell by typing
sudo su root
- You should now have a root shell, where you’ll run the following:
- Update the file paths
apt update
- Install a Wazuh agent on the Kali VM by typing the following: (This command will probably wrap around)
curl -s https://packages.wazuh.com/key/GPG-KEY-WAZUH | gpg --no-default-keyring --keyring gnupg-ring:/usr/share/keyrings/wazuh.gpg --import && chmod 644 /usr/share/keyrings/wazuh.gpg
Command Meaning curl A tool used to transfer files via URLs -s Silent mode – no progress bar https://packages.wazuh.com/key/GPG-KEY-WAZUH URL that contains the file | The “pipe” used for connecting related but separate commands in Linux gpg GNU Privacy Guard, a free, open-source software suite that encrypts and signs data and messages –no-default-keyring You don’t have any keys in your home directory, so telling gpg not to look there –keyring gnupg-ring:/usr/share/keyrings/wazuh.gpg Use the key ring in this directory –import && chmod 644 /usr/share/keyrings/wazuh.gpg if the previous command executes correctly, then grant 644 file permissions for this key - This line may wrap around
echo deb [signed-by=/usr/share/keyrings/wazuh.gpg] https://packages.wazuh.com/4.x/apt/ stable main | tee -a /etc/apt/sources.list.d/wazuh.list
Command Meaning echo displays a string as an argument deb an installation file format that contains all files needed to install a program “deb [signed-by=/usr/share/keyrings/wazuh.gpg] https://packages.wazuh.com/4.x/apt/ the deb file and arguments stable main use the most stable version from the main distribution locations | the “pipe” used for connecting related but separate commands in Linux tee read from standard input -a append the given file with the following /etc/apt/sources.list.d/wazuh.list a wazuh file containing information - Now that the Wazuh files have been added, type the following to update your Kali VM
apt update --allow-insecure-repositories
- Upgrade the software by typing
apt full-upgrade
NOTE: Sometimes the above command will not update “storngswan” but this can be fixed by running the command
"apt install --only-upgrade strongswan"
immediately after.
- Now download the Wazuh agent using the address you wrote down for the Wazuh VM earlier by typing:
WAZUH_MANAGER=x.x.x.x apt-get install wazuh-agent
NOTE: x.x.x.x is to be replaced with whatever address you jotted down earlier when you ip a’d your Wazuh VM, this is the address to which the agent you’re installing will be relaying logs/info to. The screenshot below may have “10.0.0.2” as a placeholder, but the correct address based on my environment is “56.148.10.249”, yours may be different, so don’t forget to adjust accordingly.
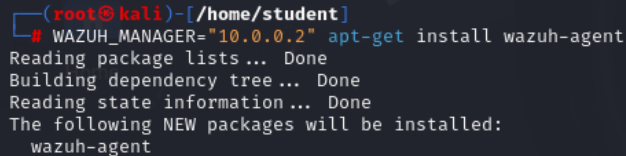
Figure 6 Wazuh manager install - Reload the daemon by typing
systemctl daemon-reload
- Enable the Wazuh agent to start on boot by typing
systemctl enable wazuh-agent
- Start the Wazuh agent by typing
systemctl start wazuh-agent
- Check the status of the daemon by typing
systemctl status wazuh-agent.service
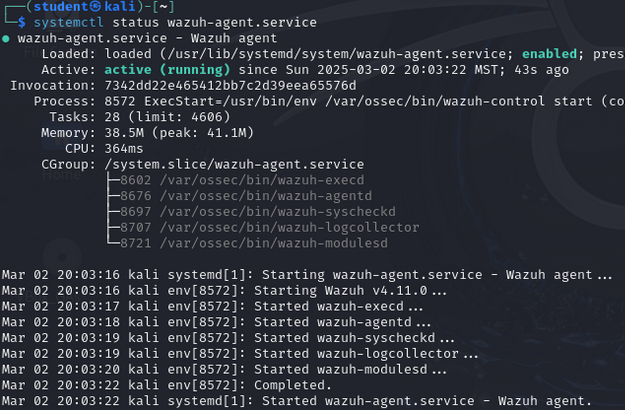
Figure 7 – Shows status of Wazuh agent
- Update the file paths
- Take a snapshot of the machine using Virtualbox
- Click on machine on the top left of the virtual box window, then select take snapshot
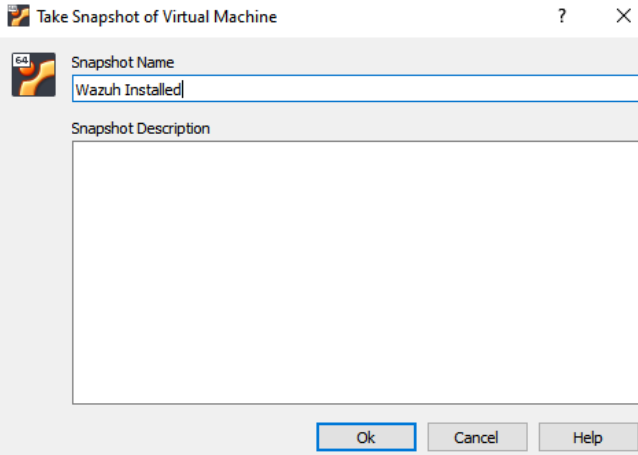
Figure 8 – Snapshot of Kali Linux with Wazuh installed - If you were successful, the snapshot will make itself known at the top left of your virtual machine’s window, where its name will be parenthesized at the title along the machine’s usual name

Figure 9 – Snapshot name appended to VM name - Turn off the Kali VM
- Navigate to VirtualBox and change the network settings back to Generic Driver (UDP Tunnel)
- Click on machine on the top left of the virtual box window, then select take snapshot
- Navigate to the GNS3 workspace and import the Kali VM
- Add the Kali VM to VLAN 10 (Marketing) via port ether24
- Start the Kali VM and check its IP address by typing
ip add
- It should take on an IP address that you set up for VLAN 10 Marketing on the Router
- Launch Kali’s Firefox browser
- Enter the Wazuh Manager’s IP in the address bar (the IP you noted from the Wazuh VM earlier (56.148.10.249 in my case)
- You’ll be met with a warning screen;
- Select advanced
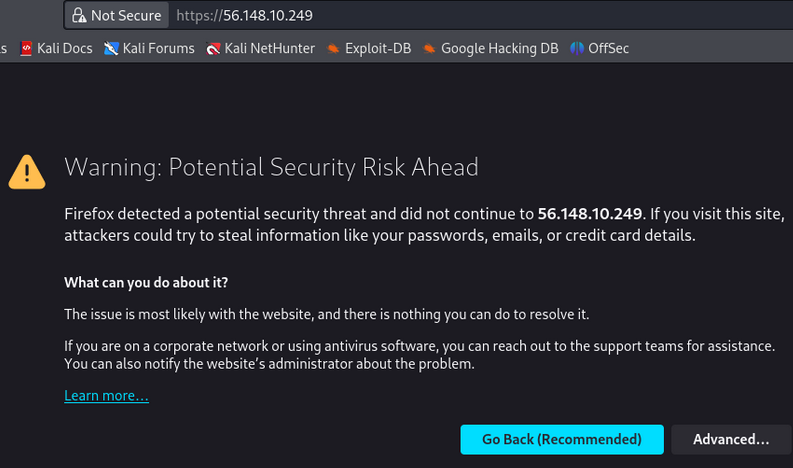
Figure 10 – Potential security threat notice - Scroll down and press the button “Accept the Risk and Continue”
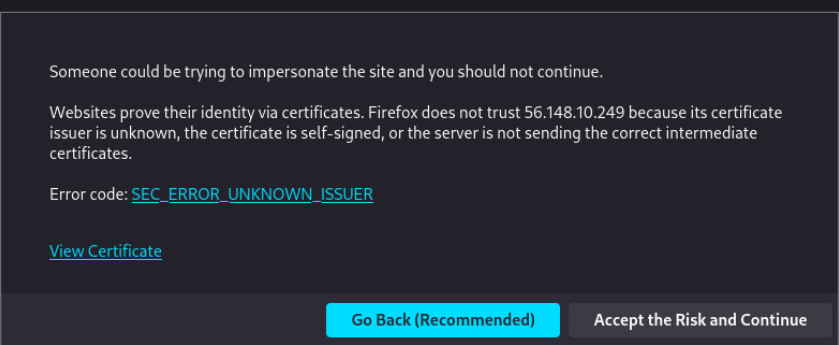
Figure 11 – Accepting the risk
- Select advanced
- You’ll be met with a loading screen that may take a minute or two to load (it should be under a minute)
Figure 12 – Picture of the Wazuh Loading Screen - Eventually you will see a login screen. The credentials are:
USERNAME: admin
PASSWORD: admin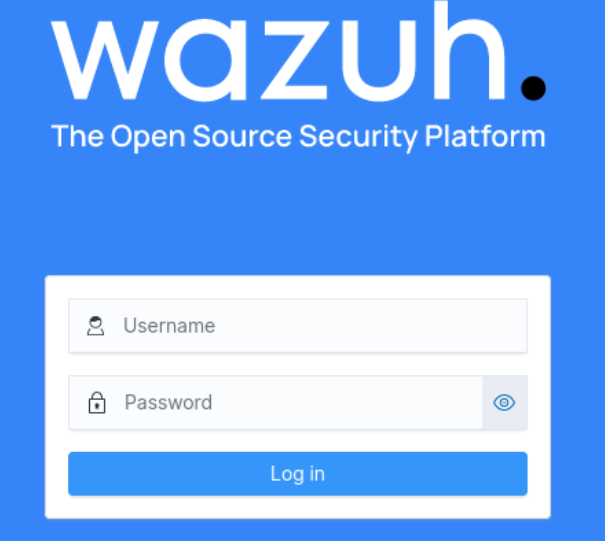
Figure 13 – Wazuh Login Screen - A successful login will greet you with a brief loading screen and a dashboard
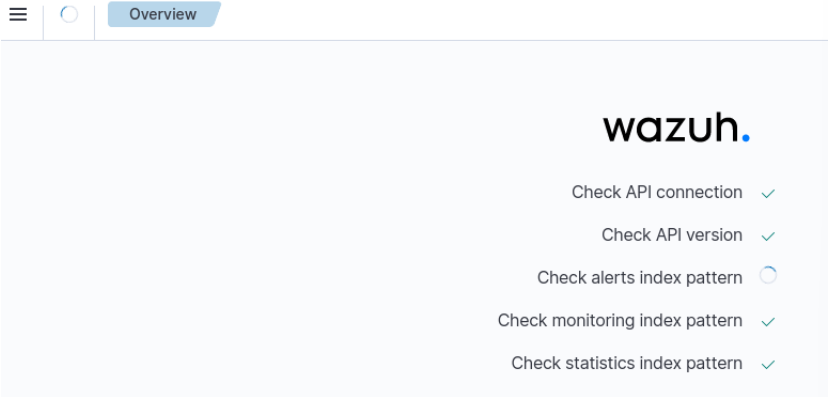
Figure 14 – Login underway 
Figure 15 – Wazuh dashboard
- You’ll be met with a warning screen;
Phase II – Navigating the Dashboard
The Wazuh dashboard is very intuitive. You can click around and see what tools are available. In this phase, we will share a few basic navigation tips to practice.
- On the dashboard, look at the upper left and see the Agents Summary. It should indicate one active agent – our Kali VMkali
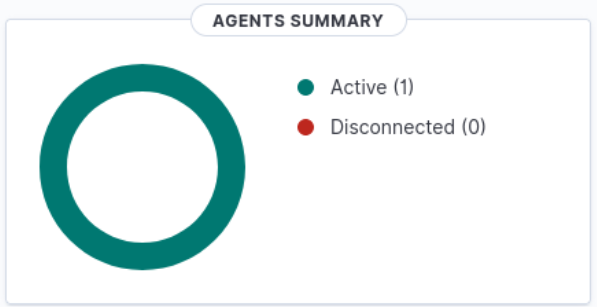
Figure 16 – Agents summary - Clicking on “Active (1)” affords you the following view
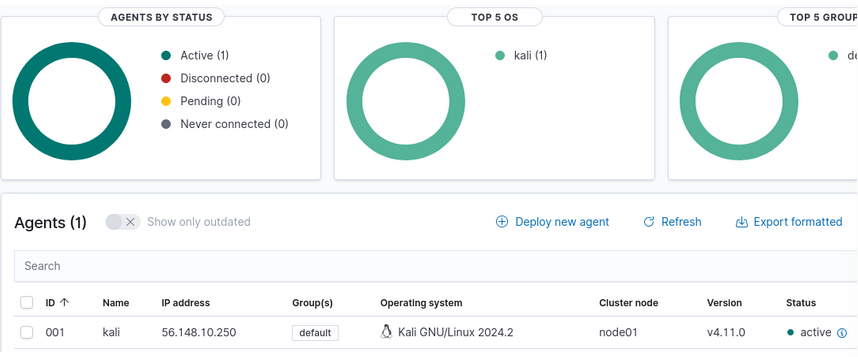
Figure 17 – Agent Stats - Take some time to navigate around the dashboard before moving on to Phase III
Phase III – Adding a deliberately vulnerable machine on our network
We are going to add a deliberately vulnerable machine to our network. Metasploitable 3 Windows edition will give us some interesting results.
- We will use the Wazuh dashboard to create the installation command needed to install the client on a Windows machine
- Navigate back to Endpoints Dashboard screen as we did earlier
- In the middle of the page, there is a horizontal menu. Locate that and click on “Deploy new agent”
- Since we are going to install an Agent on Windows, perform the following steps:
- Select Windows
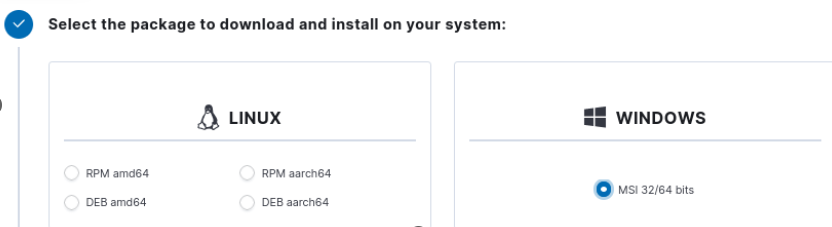
Figure 18 – Showing the selection of Windows - Put in the server address (this is the IP address for the Wazuh VM)
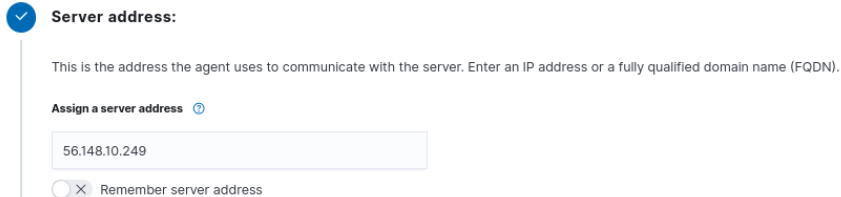
Figure 19 – Inputting the Wazuh VM IP address - Choose a UNIQUE name for this agent and use the default group
- These selections will generate a unique agent installation CLI command. Copy this command or write it down. In our example, the exam generated was:
Invoke-WebRequest -Uri https://packages.wazuh.com/4.x/windows/wazuh-agent-4.11.0-1.msi -OutFile $env:tmp\wazuh-agent; msiexec.exe /i $env:tmp\wazuh-agent /q WAZUH_MANAGER=’56.148.10.249′ WAZUH_AGENT_NAME=’Metasploitable’ ”

Figure 20 – The generated command is produced for us
- Select Windows
- Navigate back to the VirtualBok manager
- Change the network settings on the Windows Metasploitable3 machine to NAT
- Launch your Windows Metasploitable3 VM (it should not be in GNS3) from Virtualbox
- The logon credentials are:
USER: vagrant
PASSWORD: vagrant - Open Windows Powershell
- Wait for the Powershell to start
- Type or Paste the Wazuh Installation Command into Powershell
- If the command was successful, you should be able to see a new program (manage agent) in the Windows start menu
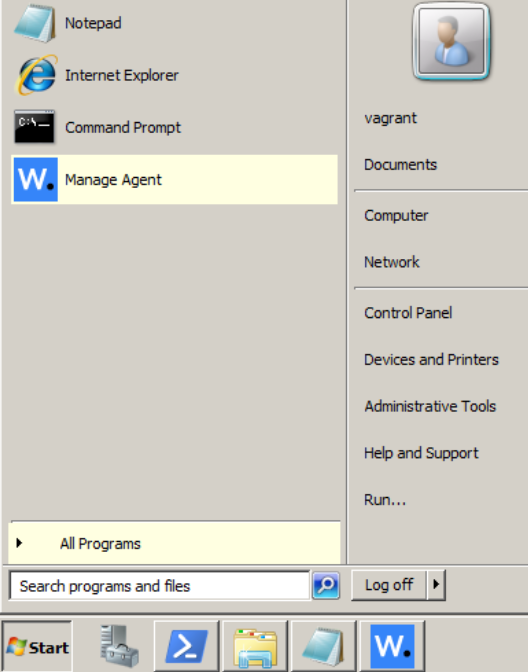
Figure 21 – Windows start menu - Start it to verify that its pointing towards your Wazuh VM’s ip
Figure 22 – Running the Windows agent to verify the IP address - Take a VM snapshot of the Metaspolitable 3 VM

- Turn off the Metasploitable3 VM
- Navigate to VirtualBox manager
- Change the Metasploitable3 VM network settings from NAT to Generic Driver (UDPTunnel)
- Import the Metasploitable3 VM into your GNS3 environment
- Attach it to switch port ether10, it is going to simulate a device in the VLAN20 – Cyber Shop
- Your network should now look similar to this:
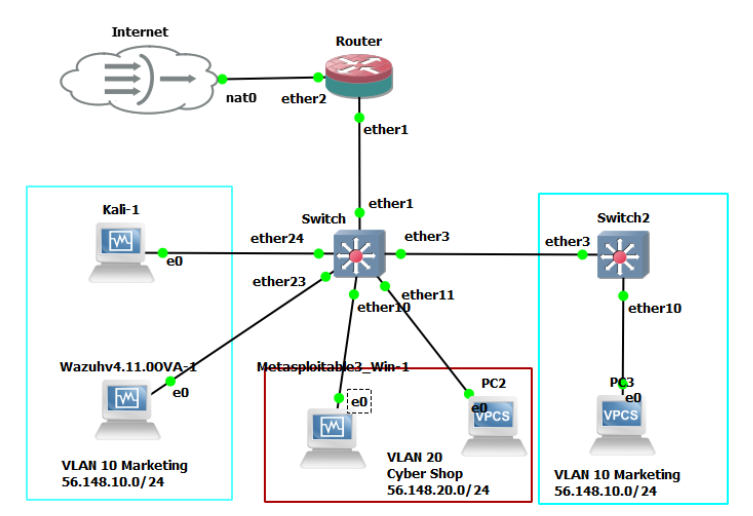
Figure 23 – The GNS3 environment from this example. Yours may be different. - Start your Windows Metasploitable
- Navigate to the Windows Metasploitable3 VM
- Open Powershell and run
NET START WazuhSvc
- You should get a response similar to the figure below indicating that it’s operational

Figure 24 – Powershell command and response from Metasploitable3 Windows
Phase IV – Dashboard Insights
At this point in time, your environment should now be staged and fully operational. We will now explore Wazuh’s vulnerability assessment feature, as well as its reporting capabilities by triggering some alarms.
- Let’s return to Kali to see the Wazuh Dashboard
- The Wazuh Dashboard should now display two active agents
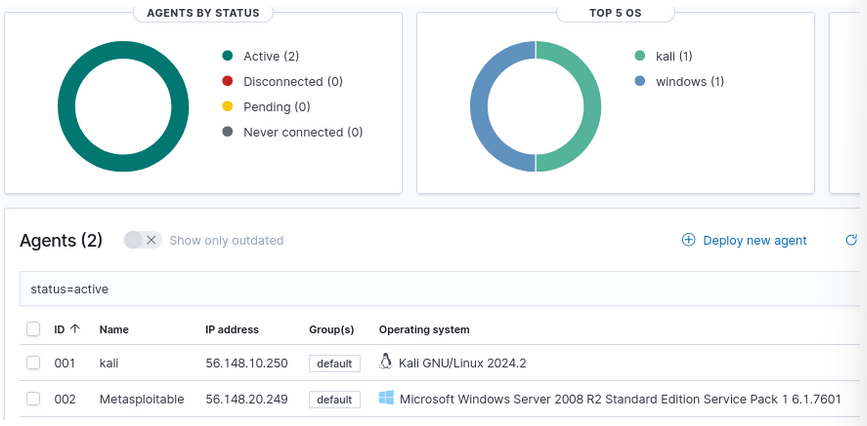
Figure 24 – Wazuh Dashboard showing two active agents - Let’s delve into the Windows Metasploitable3 agent and view the results by clicking on the name
- You should see something similar to this
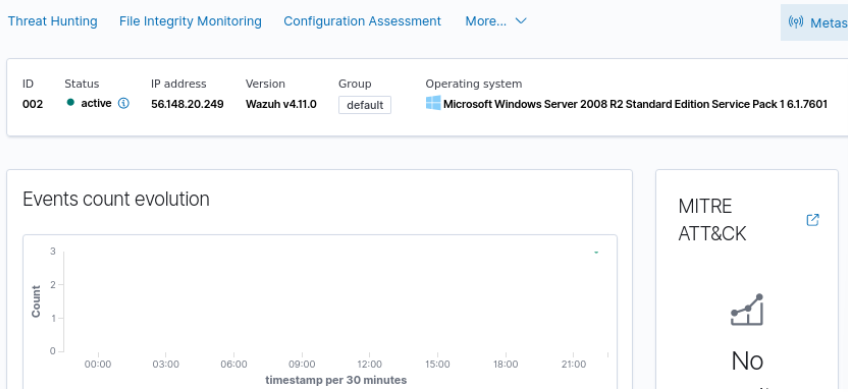
Figure 25 – Wazuh results for Metasploitable3-Windows VM - Scroll down until you get to the vulnerability detection area
- By default, when an agent is deployed, it will automatically conduct a vulnerability assessment within its endpoint and relay findings to the Wazuh dashboard for your inspection. This action facilitates patching (or exploitation, should the dashboard fall into the wrong hands)
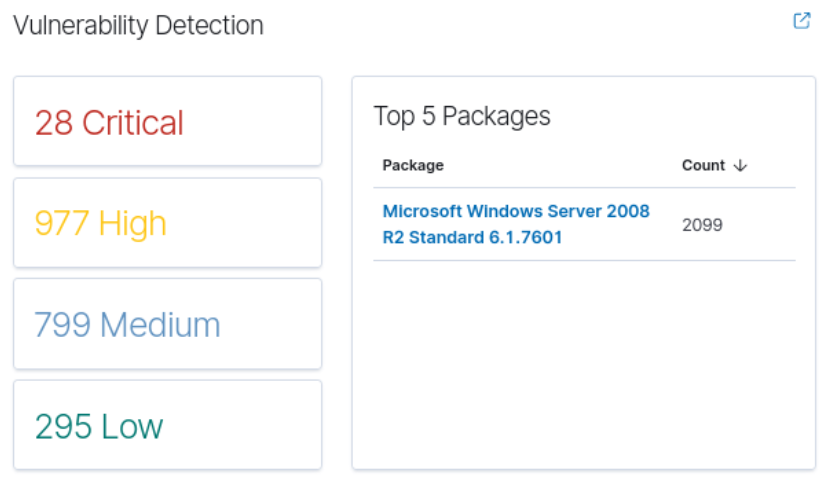
Figure 26 – Vulnerabilities in our target VM by Wazuh agents - Click on CRITICAL, which brings you to the following view
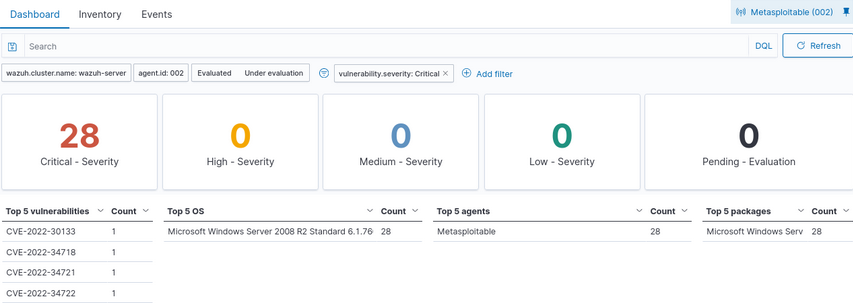
Figure 27 – List of critical vulnerabilities - Select INVENTORY
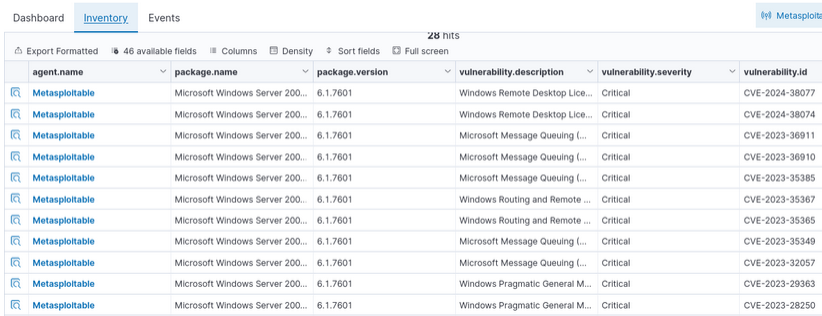
Figure 28 – Inventory of critical vulnerabilities - Click on any of the vulnerability details for a more intimate glance (little magnifying glass to the left of each entry). They should look similar to this
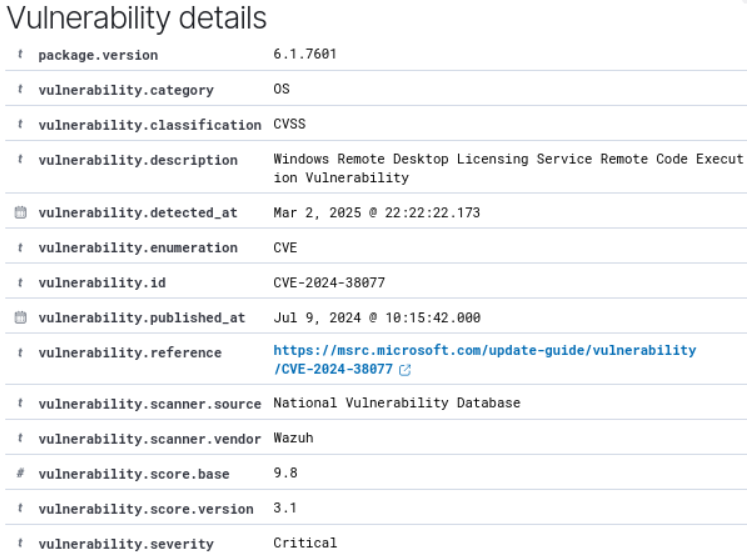
Figure 28 – Details of one of the critical vulnerabilities - Shifting gears, click on the menu icon (top left of the screen, the three lines, click on the EXPLORE menu, then select DISCOVER)

Figure 29 – Discover Menu - The resulting screen from discover should look similar to this
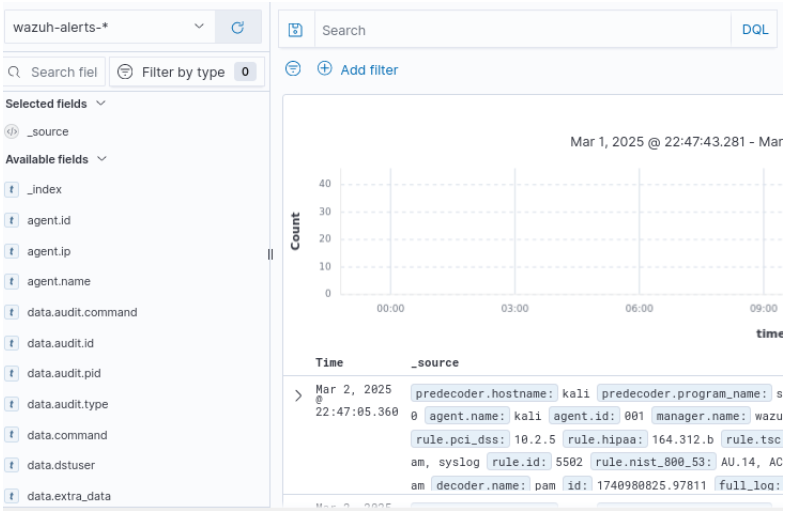
Figure 30 – The results of the Discover menu - Observe that there are a lot of alerts. We will apply a filter so we can focus on what we need
- Click the plus sign (+) next to Add Filter
- You are going to use the mouse and scroll wheel to make the following selections:
FIELD – agent.name
OPERATOR – is
VALUE – metasploitable (or whatever you named your agent) - Click save. This ensures only events related to our metasploitable machine are visible, which is what we’ll be “attacking” to generate log alerts
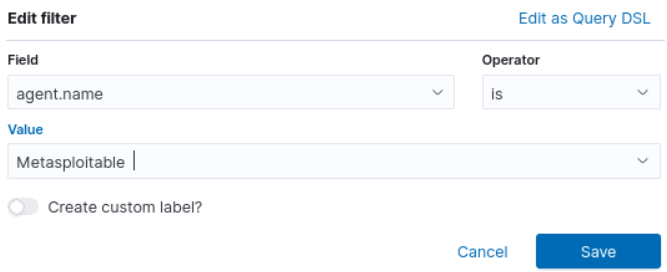
Figure 31 – Create a basic filtering rule
- Open another terminal on the Kali VM
- We are going to try a quick and simple SSH login “attack” against the Windows Metasploitable VM (you can try whatever username/password convo you’d like against it, it doesn’t matter){Editor’s Note- integrate Hydra here instead once we finalize the lab for it) try to ssh a couple times – Homework?)
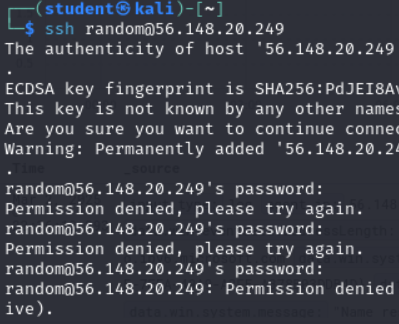
Figure 32 – Showing SSH login attempts - Please return to the Wazuh dashboard where our filter is working
- Hit the refresh button, and you’ll see several events have been noted
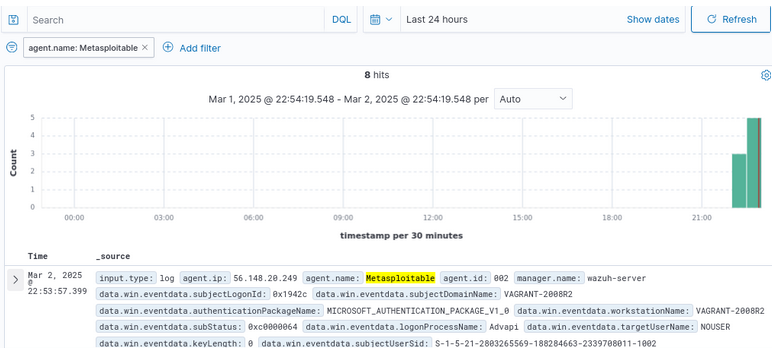
Figure 33 – Showing details about login attempts - Click on the little drop-down arrow on the left-hand side to expand the alert’s context for specifics (expanded document will become visible)

Figure 34 – Expanded alert details shown - Scroll down the now expanded metadata until you find the “data.win.system/message” header, and click on the little drop down arrow that appears when hovering over it. You can see the failed login attempts
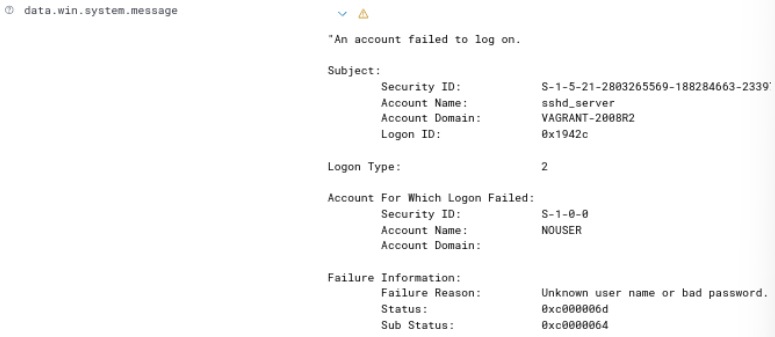
Figure 35 – Showing the details of the failed login attempts
End of Lab
Deliverables
- Dashboard summary displaying two Wazuh agents are operational
- Metasploitable machine vulnerability details
- Expanded metadata for SSH alert
Homeworks
- Replace an existing VPCS with another VM running a Linux or Windows operating system
- Install the Wazuh agent on the new machine and perform a scan
- Allow SSH on the new VM and make sure that failed SSH logins also provide Wazuh alerts like the example above
- Use the website https://wazuh.com/blog/monitoring-network-devices/ as a starting point for researching how to add Mikrotik log information to the Wazuh dashboard
- Run a scan on the dashboard
- Add the MicroTik router SSH alerts to Wazuh
RECOMMENDED GRADING CRITERIA: Same as deliverables

