46 Scanning and Enumeration – Nmap Basics
Dante Rocca and Mathew J. Heath Van Horn, PhD
Network Mapper (Nmap) is a powerful tool that is used by both system administrators and hackers. In network administration, it assists in understanding which machines are online and what services they are running, which is helpful when troubleshooting common connectivity issues. In ethical hacking, Nmap is used for similar purposes but with the added goal of finding any vulnerable services we can exploit as a point of entry into the network.
Learning Objectives
- Use Nmap to scan a host
- Use Nmap to perform a ping scan
Prerequisites
Deliverables
- Screenshot of subnet scan
- Screenshot of ping sweep
- Screenshot of detailed fingerprinting scan
- Screenshot of stealth scan
Resources
- Nmap Documentation – https://nmap.org/book/man-host-discovery.html
- PhoenixNAP – “Nmap Commands – 17 Basic Commands for Linux Network” – https://phoenixnap.com/kb/nmap-commands
- Nathan House – “Nmap Cheat Sheet 2024: All the Commands & Flags” – https://www.stationx.net/nmap-cheat-sheet/
Contributors and Testers
- Bernard Correa, Cybersecurity Student, ERAU-Prescott
- Jacob M. Christensen, Cybersecurity Student, ERAU-Prescott
Phase I – The Very Basics
- Use Eagle Net as the baseline network environment for this lab
- Start all machines
- Ensure that the Kali and Metaspolitable boxes are all able to receive IP addresses
- Write these addresses down for later comparison with the network scan results. In this example, our results are:
Kali 100.100.100.5 Metaploitable3 – Windows 200.200.200.5 Metasploitable3 – Linux 200.200.200.6
- We’re going to begin with a basic Nmap command. Navigate to the Kali box, open a terminal, and execute Nmap against the Metasploitable3-Linux box
> nmap 200.200.200.6
NOTE: Some Nmap commands will require superuser privilege. If you get an error saying you don’t have permission for the command, use sudo before it. Alternatively, use the command “sudo su” before beginning the lab to switch to the substitute user and you will no longer need to type sudo before each command. In a closed environment, this is fine, but using “sudo su” is generally bad practice and insecure since you are unlocking root access for everything.
- Allow the scan to run for a minute or two. The report will display when finished.
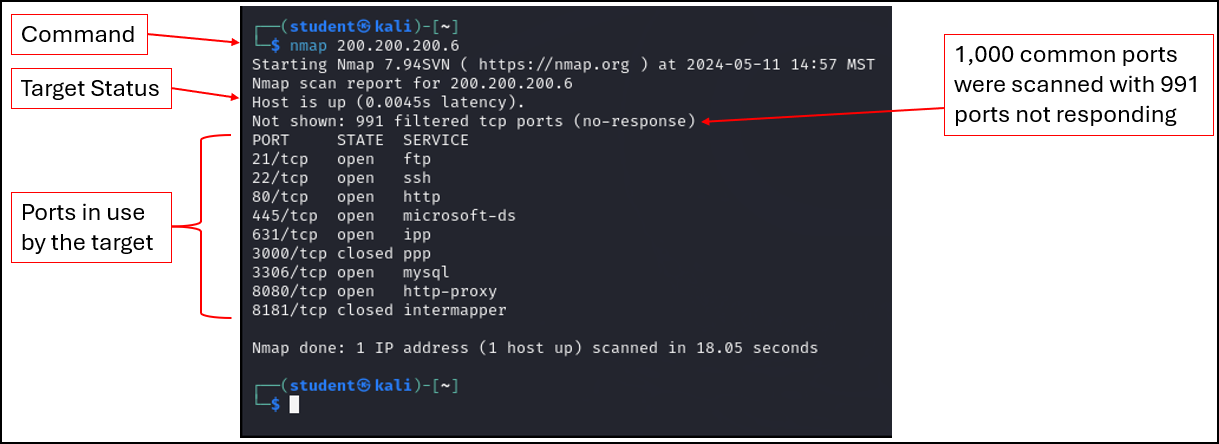
Figure 1 – Results of the Nmap scan of Metasploitable3-Linux machine - Notice that our target machine has a large number of open ports. Each one represents a different service that is listening for new client connections
- Nmap accepts several different ways for specifying IP addresses, including the use of wildcards (*). Use the following command to scan all IP addresses in the range of 200.200.200.0 to 200.200.200.255
> nmap 200.200.200.*
- The result should look similar to this
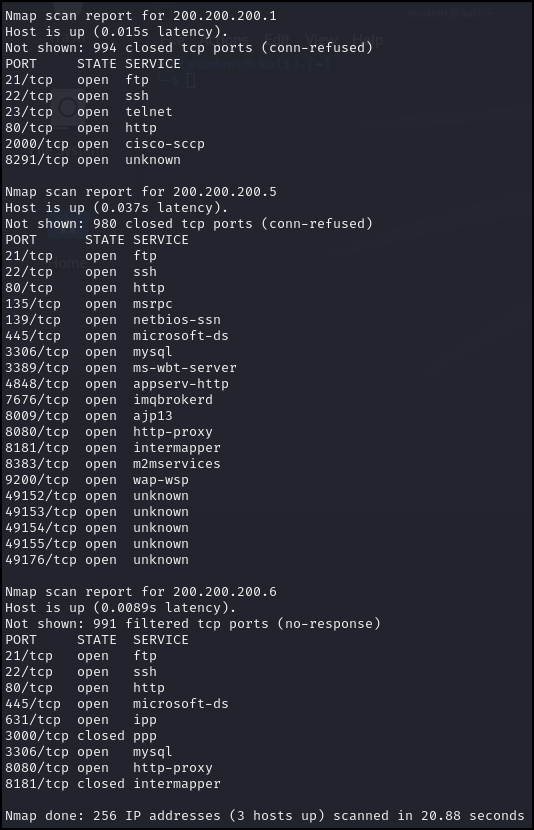
Figure 2 – Nmap scan results of the entire subnet - We can see the Nmap scan results of the entire 200.200.200.0/24 subnet (256 IP addresses). Notice Nmap found three devices (router, Mestapoitable3 – Windows, and Metasploitable3 -Linux) and provided a report of the discovered ports open on those systems
Phase II – Scanning for hosts
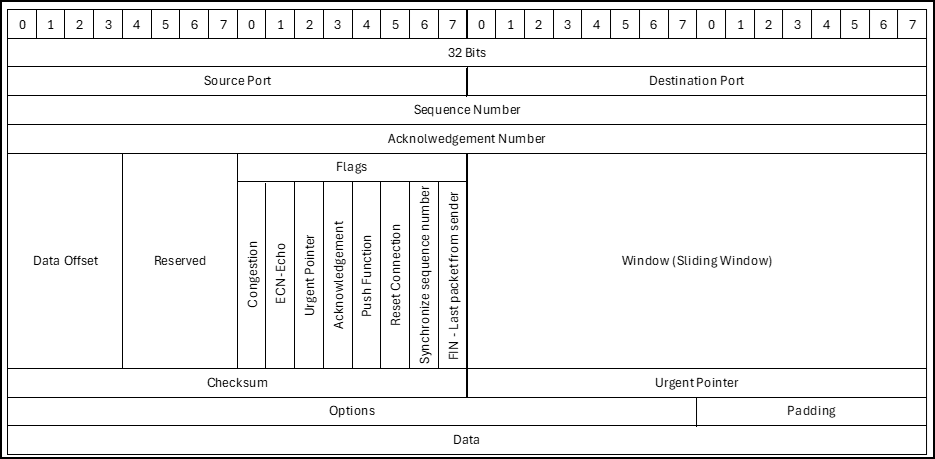
Now that we have the basics down, the first step of any scan is discovering what hosts are up. You should be familiar with basic TCP packet headers. Refer to this abbreviated reference model for this phase.
- The following command disables the default port scan of Nmap and performs a ping sweep (-sn) to quickly discover live hosts on the network. This is useful in identifying targets before executing slower, more intensive scans on them
> nmap -sn 200.200.200.0/24

Figure 4 – Results of the ping scan of the 200.200.200.0/24 network - Again, we see three devices: the router, Metasploitable3-Windows, and Metasploitable3-Linux
NOTE: There could be ‘hidden’ hosts that are not responding to our ICMP echo messages.
- To treat all hosts as online (without performing host discovery first), we use the following command (-Pn = Ping no). Since this will take a while to complete, you can terminate the scan by pressing Ctrl+C
> nmap -Pn 200.200.200.0/24
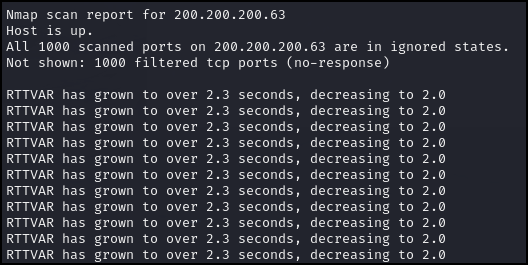
Figure 5 – Partial results of the no-host discovery scan of the 200.200.200.0/24 subnet - This command is useful when you already know a host is active and you want to minimize your network traffic footprint
> nmap -Pn 200.200.200.6
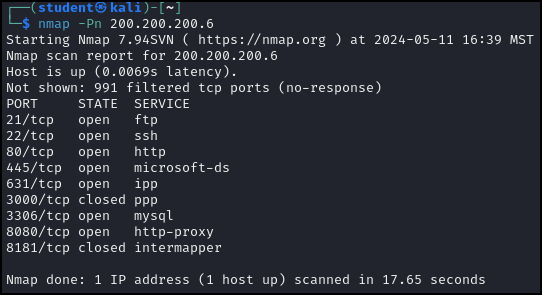
Figure 6 – Result of the Nmap scan without host discovery (no ping) against the target machine 200.200.200.6 - Sometimes, certain services are disabled in an attempt to avoid discovery. Nmap allows for various scanning options to see if targets will reveal information by masking network scans as other types of services. This can be useful for finding those hidden machines blocking our ICMP probes!
- Perform a TCP SYN discovery scan on port 22 (SSH) against 200.200.200.6
> nmap -PS 22 200.200.200.6
- Perform a TCP ACK discovery scan
> nmap -PA 22 200.200.200.6
- Perform a UDP discovery scan
> nmap -PU 22 200.200.200.6
You will see that most of the scans produce the same results. However, the UDP scan tells us that the host is down. This is a good demonstration of the need to expand your scans and produce more accurate information. Future scans using TCP SYN packets may report no active hosts, but then switching to UDP can reveal them to be up.
- Perform a TCP SYN discovery scan on port 22 (SSH) against 200.200.200.6
- Open a Wireshark capture on the Kali box and perform the same three scans above. Observe the number and type of packets sent and received when performing each scan. You can see how ‘noisy’ each scan appears to anyone who is monitoring the network traffic
Phase III – Fingerprinting with Nmap
- Attempt to detect the operating system (-O) of a target
> nmap -O 200.200.200.6
This results in many possible guesses. We may not get the exact version of Linux, but it is clear that our target machine is Linux.

Figure 7 – Nmap discovered our target machine is running Linux - Try an OS detection scan against our Metasploitable3-Windows machine to compare the results
> nmap -O 200.200.200.5
NOTE: You may have to restart the Windows machine due to inactivity
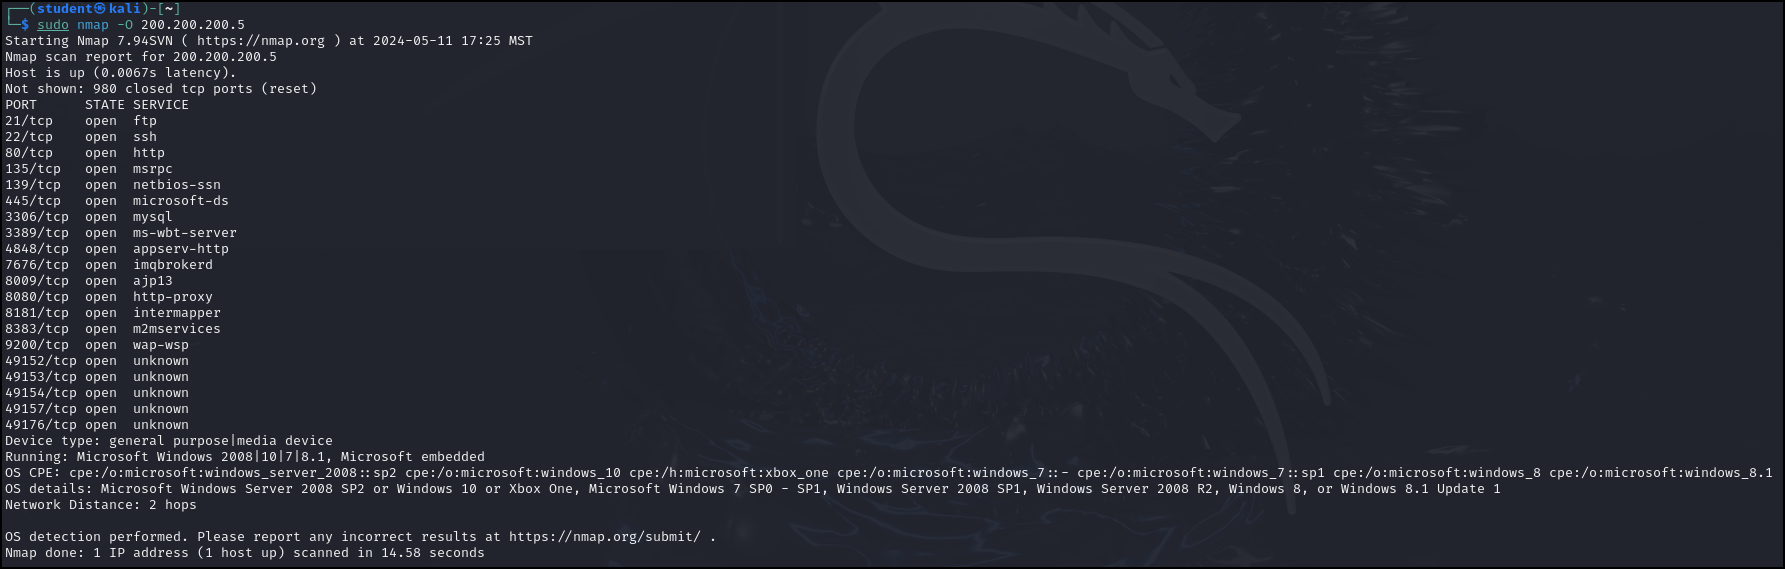
Figure 8 – Nmap scan result for the Windows machine - To find the versions of services running on a host use the command
> nmap -sV 200.200.200.6
The results are pretty interesting. We can use OSINT techniques (such as Google) to research potential vulnerabilities for each of these services.
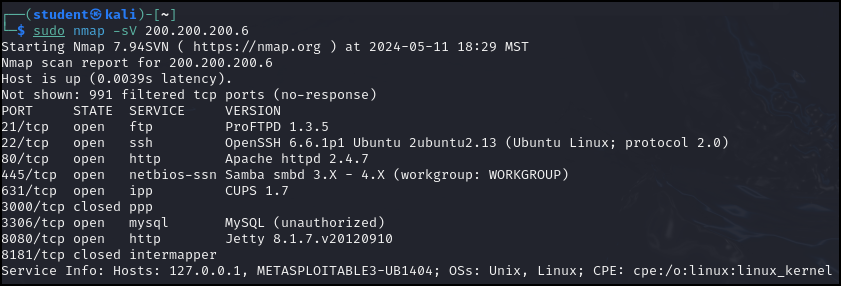
Figure 9 – Software version scan results of our target machine - Alternatively, for more detailed (and very noisy!) scan, use the A switch. This enables OS detection, script scanning, version detection, and traceroute
NOTE: This might take a while.
> nmap -A 200.200.200.6
These results are also very interesting. For example, we obtained the SSH keys used to remote into the system as well as some filenames.
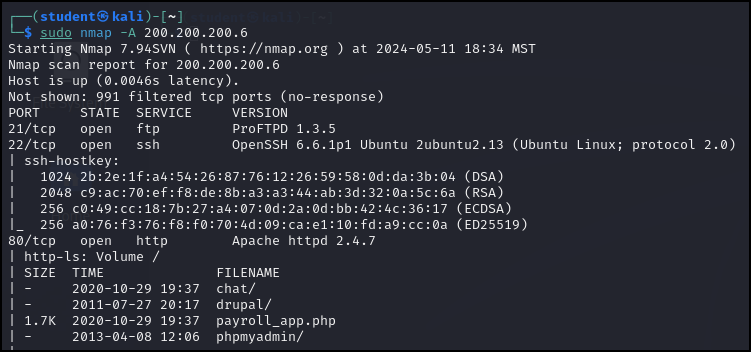
Figure 10 – Scan results of the Metasploitable3-Linux target machine We can also see that there might be a website being hosted and the target is waiting for print commands from other devices.

Figure 11 – Scan results continued
Phase IV – Scanning Techniques
Lastly, there are a few more techniques that we can utilize. Refer to the basic TCP headers again.
- Scans can be done using different TCP header flags and produce different results
- We’ll start with the simple TCP SYN (stealth) scan. Open Wireshark and perform the scan below. It doesn’t look stealthy, but it is considered as such because it never completes the TCP connection. However, firewalls can easily block this scan
> nmap -sS 200.200.200.6
- Execute a TCP ACK scan. Again, watch the scan on Wireshark
> nmap -sA 200.200.200.6
- Execute a UDP scan (this may take a while)
> nmap -sU 200.200.200.6
- Execute an Xmas scan (sets all the flags on a TCP packet header, lighting up the scan like a Christmas tree!)
> nmap -sX 200.200.200.6
- Execute a TCP FIN scan
> nmap -sF 200.200.200.6
- We’ll start with the simple TCP SYN (stealth) scan. Open Wireshark and perform the scan below. It doesn’t look stealthy, but it is considered as such because it never completes the TCP connection. However, firewalls can easily block this scan
- Another technique we can use is to adjust the timing of the scans. Nmap uses a number between 0 and 5 to indicate the aggressiveness of a scan. The lowest value 0 indicates a “paranoid scan” that will take a very long time to complete, but is unlikely to be picked up by IDS. Using setting 5 indicates a very aggressive scan that will be sloppy, but completed at breakneck speed. To use timing, enter the following command where the # is the timer setting. Try both the 0 setting and the 5 setting. The scans should produce the same results, but you can see on Wireshark that the packets are sent at different speeds
> nmap -T# 200.200.200.6
- Finally, you can try to mask yourself by using a decoy IP address. Watch this on Wireshark and you can see that it looks like Google is scanning our target
> nmap -D 8.8.8.8 200.200.200.6
- For added confusion, you can use cloak yourself within many IP addresses, so that the defender doesn’t know which one is yours
> nmap -D RND:20 200.200.200.6
This command executes a Decoy scan using 20 random source IP addresses.
- For added confusion, you can use cloak yourself within many IP addresses, so that the defender doesn’t know which one is yours
- Keep in mind that most of the commands in each section can be mixed and matched together such as in the following example which will fingerprint the operating system while using a decoy
> nmap -O -D 8.8.8.8 200.200.200.6
End of Lab
Deliverables
Four screenshots are needed to earn credit for this exercise:
- Screenshot of subnet scan
- Screenshot of ping sweep
- Screenshot of detailed fingerprinting scan
- Screenshot of stealth scan
Homeworks
Assignment 1 – Scan a website
Scan the vulnerable website scanme.nmap.org and produce the same screenshots as the deliverables. Describe your findings in a paragraph or two.
Assignment 2 – Scan Metasploitable3 – Windows
Start the Metasplitable3-Windows VM and produce the same screenshots as the deliverables. Describe your findings in a paragraph or two.

