38 System Hardening – Introduction to Linux User and Group Management
Jacob Christensen and Dante Rocca
Up to this point, learners used Linux to implement specific functions. This lesson will focus on user, group, and password management within the Linux environment. Learners will see how a hacker can manipulate users and groups to elevate their privileges and install persistence (notional accounts).
Learning Objectives
- Manually be able to create and securely configure new user accounts
- Understand the concept of groups in Linux operating systems
- Define password policies for local systems
Prerequisites
Deliverables
- Screenshot of /etc/passwd file showing new users
- Screenshot of /etc/group file showing the AccountingDep group
Resources
Contributors and Testers
- Evan Paddock, Cybersecurity Student, ERAU-Prescott
Phase I – Introduction to System Users
- Start an Ubuntu virtual machine and login as your primary user
NOTE: In this chapter, my main user account is named rogue. Anytime you see this, remember to adjust as necessary with your own username.
- Ensure that your primary user account has administrative privileges by checking if it is a part of the sudoers group
> groups | grep “sudo”
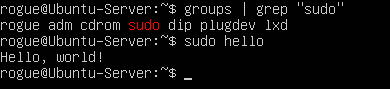
Figure 1 – User “Rogue” part of Sudoers NOTE: If the machine was downloaded through VirtualBox with an unattended installation, the default user typically does not have root privileges. You can test this by executing any command prefixed with sudo.

Figure 2 – No admin privileges The above error message shows that this user is not an administrator. If this is the case for you, continue reading; otherwise, continue to step 3.
Login to the root system account by executing the “substitute user” (su) binary without any arguments.
> su
Add your primary account to Sudoers and reboot the machine.
> adduser rogue sudo
> reboot
Login again to your user account and verify that the command executed successfully!
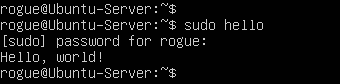
Figure 3 – User with new root privileges - Simulate the admission of someone to the system by creating a new user account
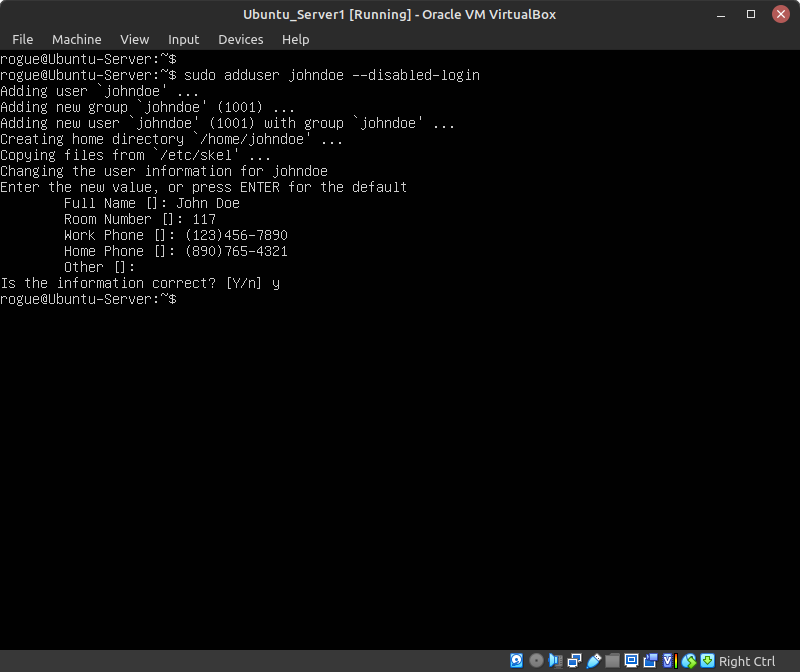
Figure 4 – Adding a new user called johndoe NOTE: Replace the string johndoe with any username of your choice. In this example, we are temporarily disabling the account by not setting the password. Any other information requested, such as full name and phone numbers, can be filled in as needed or left to their defaults by pressing Enter.
> sudo adduser johndoe –disabled-login
- When a new account is created, a new directory is created in /home
- By looking at the directory permissions, we can see that the only accounts that can view its contents are root and the new user themselves
> ls -l /home
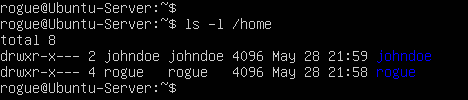
Figure 5 – User’s home directories
- Open the /etc/passwd file to view basic information about all the accounts on the system
> cat /etc/passwd
NOTE: This file is owned by root, meaning that no other user can edit it without sudo permissions. Entries in this file are divided into seven fields, each separated by a semicolon.

Figure 6 – User “johndoe” entry in /etc/passwd Field Value Description johndoe The username string for this account. x Hashed password (relocated to /etc/shadow). 1001 User identification number (UID). This must be unique for every account. 1001 Group identification number (GID). Every user has their own group, which this number represents. This must be unique for every group. John Doe…4321 GECOS fields. This is optional information about the user such as their full name and phone number. /home/johndoe Location of the user’s home directory on the system. /bin/bash The default shell for the user. - Deleting an account is just as trivial as creating one
- To illustrate this, add a new user on the system: Jane Doe
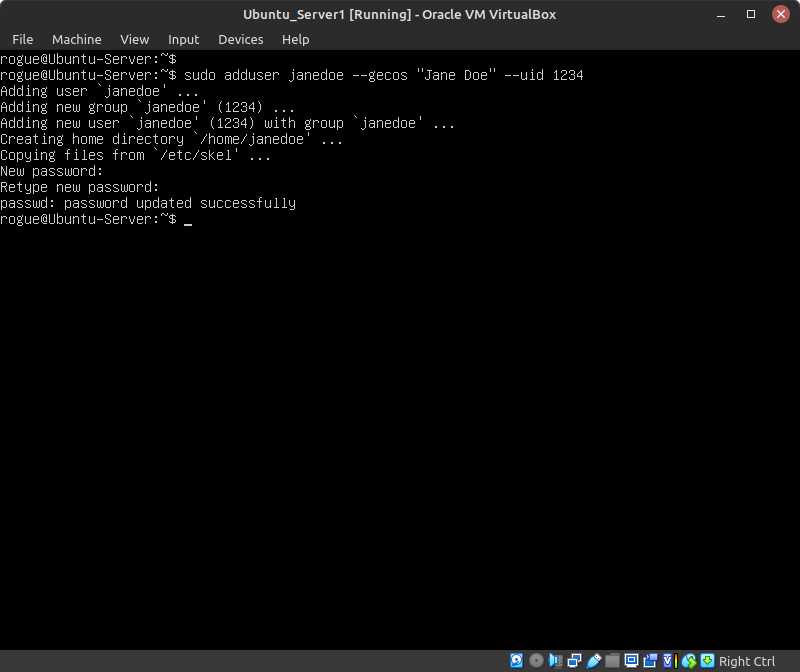
Figure 7 – Adding a new user named janedoe > sudo adduser janedoe –gecos “Jane Doe” –uid 1234
Switch Description –gecos Specify additional user information such as full name and phone numbers. –uid Manually assign a unique UID for the user. - In /etc/passwd, verify that the account was successfully created with the correct UID value that we assigned

Figure 8 – Verifying the custom UID of janedoe - Switch to this account
> su janedoe
- This user’s limited privileges make it impossible to view the contents of John Doe’s home directory
> cd /home/johndoe

Figure 9 – Jane’s limited permissions - Now that we know our home directory is safe from intruders, create a new file containing Jane Doe’s password so she doesn’t forget
> cd ~
> echo “super secret: my password is janedoe123” > do_not_touch.txt
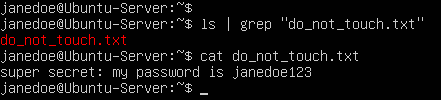
Figure 10 – Creating a secret file - Exit the session
> exit
- This user’s limited privileges make it impossible to view the contents of John Doe’s home directory
- Terminate this user
> sudo deluser janedoe
- To illustrate this, add a new user on the system: Jane Doe
- What happens if another user has the same UID as someone who was previously deleted?
- Add another user on the system – Juan Perez – with the same UID value as Jane Doe (1234)
> sudo adduser juanperez –gecos “Juan Perez” –uid 1234
- Login as Juan and list the contents of the /home directory
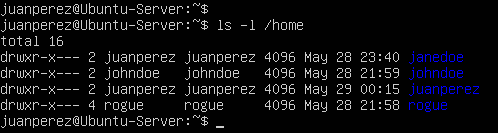
Figure 11 – Listing permissions of /home directory Notice anything interesting? It looks like Jane Doe’s home directory is still there despite her account having been deleted. In addition, the owner of that file is now our new user Juan Perez.
- Change to Jane Doe’s directory and try to open the “super secret” file created earlier

Figure 12 – Juan has access to Jane’s files Oops! Looks like Juan now has access to all of Jane’s files, including her not-so-secure password file. Home folders are persistent, even when the owner’s account is deleted. Therefore, any new user with the same UID/GID as a deleted user will have access to these files. Since this can be an obvious breach in security, system administrators should either delete or relocate the home directories of terminated users, as well as change permissions to solely root.
The following commands can remedy this situation:
Command to delete a user, including their home directory:
> deluser username –remove-home
Command to delete a user and purge all their files:
> deluser username –remove-all-files
- Add another user on the system – Juan Perez – with the same UID value as Jane Doe (1234)
Phase II – Introduction to Password Management
The passwd utility is a powerful tool that can set and modify passwords, lock or unlock accounts, and enforce user management policies such as password expiration dates.
Recall that the second field in each entry of /etc/passwd was set to the placeholder ‘x’. This value used to represent an account’s hashed password, however this information has since been relocated to another file called shadow. In most current distributions of Linux, information concerning user account passwords and password policy information is stored in shadow.
- Switch to the root user
- Open /etc/shadow and search for your personal account
> grep “rogue” /etc/shadow
- . Each row in this file is divided into nine sections, each separated by a colon

Figure 13 – User entry in Shadow Field # Description 1 Account username. 2 Hashed and salted passwords. 3 Time since the account’s password was last changed. 4 Minimum password age. 5 Maximum password age. 6 Warning period before password expires. 7 Period of inactivity since thee user last logged in. 8 Password expiration date. 9 Unused field.
- Open /etc/shadow and search for your personal account
- Since the first account created was initialized with the disabled-login switch, no password was set, and thus it cannot be logged into
- Open the shadow and search for John Doe’s account
> grep “johndoe” /etc/shadow

Figure 14 – John Shadow entry You will notice that there is a bang (!) in place of a password hash in the second field. In Linux, there are four symbols other than a password hash that a system admin may encounter: a single bang (!) represents that the account is locked; a double bang (!!) represents that no password was given during account creation; an asterisk (*) represents that password authentication has been disabled; and finally, a blank field means that no password is required to login to the account.
NOTE: Even if an account has a disabled password, it can still be accessed via other means of authentication, such as SSH keys.
- Enable John Doe’s account by assigning it a password
> passwd johndoe

Figure 15 – John’s updated Shadow entry NOTE: Notice how the bang (!) in John Doe’s Shadow entry was replaced with a hash string.
- Verify this was successful by logging into the account
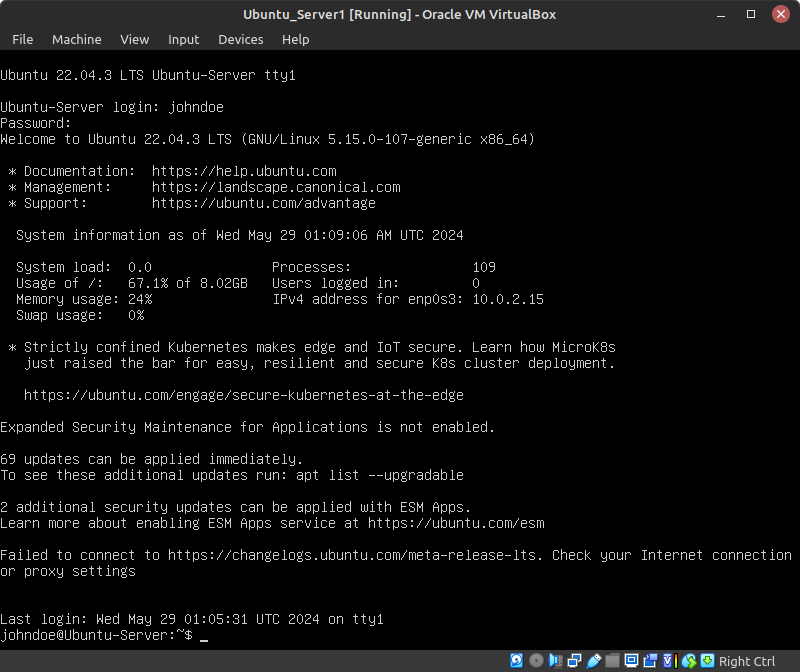
Figure16 – A successful log in for johndoe
- Open the shadow and search for John Doe’s account
How to Lock Down User Accounts
To re-lock an account, the administrator can call upon the lock switch…
> passwd –lock username
… or enable an account via the unlock switch
> passwd –unlock username
Phase III -Introduction to Password Time Management
A good system administrator should keep track of their users, periods of inactivity, disabled or terminated accounts, as well as ensure that passwords are updated regularly as per company policy.
- Still signed into root, check John Doe’s password management status
> passwd -S johndoe
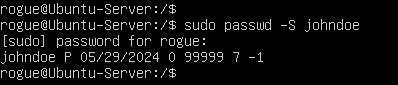
Figure 17 – John’s account status The output of this command is split into seven fields separated by spaces: username, password status, date of last password change, minimum password age, maximum password age, warning period, and inactivity period.
- Make the following adjustments to John Doe’s account
- Change the minimum number of days between password resets
> passwd –mindays 5 johndoe
NOTE: Entering zero (0) indicates that there is no restriction as to when the user may change their password.
- Change the maximum password age before it must be changed again
> passwd –maxdays 30 johndoe
- Change the number of days before password expiration that the user will be notified to reset their password
> passwd –warndays 3 johndoe
- Manually expire John Doe’s password to force them to reset it the next time they login
> passwd –expire johndoe
- If the user is inactive for a predetermined threshold of days, it is good practice to disable the account until they return
> passwd –inactive 7 johndoe
- Change the minimum number of days between password resets
- Re-check the status of John Doe’s account to verify that these specifications went into effect
> passwd -S johndoe
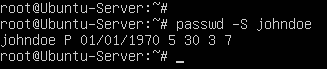
Figure 18 – Updated status to John’s account
Phase IV – Introduction to group management
- Login as root
- Add two new users to the machine – Jerry Jones (jerryjones) and Mary Smith (marysmith)
- Create a new group called AccountingDept
> groupadd AccountingDept
NOTE: You can also delete groups with the following command:
> delgroup <groupname>
However, be aware that the same problem as discussed in Phase I, Step 6 arises when two groups share the same Group ID (GID). Ensure that all files related to the group you are deleting are cleaned up.
- If successfully created, the group name will be added as an entry in the file /etc/group

Figure 19 – AccountingDept group created - Add both newly created users to the group
> usermod -aG AccountingDept jerryjones
> usermod -aG AccountingDept marysmith
- Looking at /etc/group again, we can see that its new members are now listed

Figure 20 – New users in AccountingDept group
- If successfully created, the group name will be added as an entry in the file /etc/group
- Navigate to the /home directory and make a new folder called Accounting_Files
> mkdir /home/Accounting_Files
- View the default permissions of this directory to see that it is owned by the root account and group
> ls -ld /home/Accounting_Files

Figure 21 – New file permissions - Modify the permissions so that it is owned by the AccountingDept group
> chgrp AccountingDept /home/Accounting_Files
- Verify these changes went into effect

Figure 22 – Updated Group ownership
- View the default permissions of this directory to see that it is owned by the root account and group
- Switch to an account that’s a member of AccountingDept (either Jerry or Mary)
- Try to create a file in the Accounting_Files directory
> touch /home/Accounting_Files/important_document.txt

Figure 23 – Failure to create a file The group owns this directory, but users in that group can’t write to the directory. This is where permission management comes in!
- Try to create a file in the Accounting_Files directory
Phase V – Permission Management
To ensure that files are only accessible by those we intend, we must assign permissions to files and directories. In Linux, permissions come in three flavors: read, write, and execute. These permissions can be set for the owner of the file, the group owner of the file, and others.
- Modify the Accounting_File to grant the AccountingDept group write permissions
> chmod g=rwx /home/Accounting_Files
NOTE: The chmod command has two different ways to edit permissions. One is symbolic, which is used above. In symbolic, u represents the user owner of the file, g represents the group owner of the file, and o represents others. Similarly, r is read, w is write, and x is execute. A + will add the permissions, a – will take away the permissions, and a = will set the permissions to whatever you specified. The other way of editing permissions with chmod is using numbers. In the numbered mode, a 1 is execute, a 2 is write, and a 4 is read. Adding them up will signal different permissions. For example, 5 would be execute and read permission. When using chmod in numbered mode, the first number is the file owner, the second number is the group owner, and the last number is other users. So, using chmod 750 would give the owner all permissions, the group read and execute permissions, and other users no permissions.
- Verify that the permissions were updated

Figure 24 – Updated directory permissions
- Verify that the permissions were updated
- Again, switch to an account that’s a member of AccountingDept (either Jerry or Mary)
- Try to create a file in the Accounting_Files directory
> touch /home/Accounting_Files/important_document.txt
- Verify that it was successfully created

Figure 25 – Improper file permissions Notice how, although it was successfully created, the file permissions still default to the account that created it: Jerry Jones. Because of this, other AccountingDept users will be unable to write to this file. In order to facilitate cooperation, we need files in the directory to be assigned to the same group.
- Try to create a file in the Accounting_Files directory
- As root, set the special SGID permission on the directory
> chmod g+s /home/Accounting_Files
NOTE: To check if the permission was set properly, you should see an s instead of an x in the group segment of the file permissions.
- Now login in as the other user that’s part of the group and create a new file
> touch /home/Accounting_Files/marys_file.txt
- Check the owner and group of the two files

Figure 26 – File ownership comparison NOTE: Notice how after we applied the SGID permission, the file created inherited the group of the directory.
- Check the owner and group of the two files
End of Lab
Deliverables
2 Screenshots are needed to earn credit for this exercise:
- Screenshot of /etc/passwd file
- Screenshot of /etc/group file
Homeworks
You work for ABC Company as a system administrator. The company policy states that passwords cannot be reset within a day they are changed, and that all users must reset their passwords once every three months. Finally, users should be notified five days prior to their passwords expiring. The naming convention for users is last name, first initial, followed by two random digits (ex. marshalc12 for Chris Marshal).
Assignment 1: Five new employees have recently been hired and need to be admitted into the system:
- Wyatt Dawson
- Cassidy Monroe
- Grant Colton
- Sierra McAllister
- Clayton Westwood
Assignment 2: Two employees have recently quit and their accounts need to be dealt with appropriately:
- Jesse Rawlings
- Emma Sinclair
One employee will be going on an extended vacation for three months, so their account will be to be disabled:
- Jesse Callahan
SUGGESTED GRADING CRITERIA:
- Screenshot(s) proving each employee has an account that was created to include the password status of each account.
- Screenshot(s) that the home directories of the terminated accounts have had their permissions reallocated to root.
- Screenshot(s) that Jesse Callahan account has been disabled.

