26 Domain Name System Part 2 – Forwarding DNS
Jacob Christensen and Kyle Wheaton
In the last lab, we configured our network so our devices could communicate via human-readable names rather than IP addresses. However, we did not build the ability to interact with Internet domains. In this chapter, we will reconfigure our DNS server to forward non-authoritative domain queries (such as www.google.com) to a public resolver and further extend our network’s capabilities.
Estimated time for completion: 25 minutes
Learning Objectives
- Demonstrate how to configure and implement a forwarding DNS server for Internet communications
- Learn how to implement a network address translation (NAT) rule between a LAN and WAN
Prerequisites
Deliverables
- Screenshot of RED1
- Successful nslookup of Google
- Successful ping of Google
- Screenshot of BLUE1
- Successful nslookup of Google
- Successful ping of Google
- Screenshot of the dig trace of Google
- Screenshot of GNS3 environment
Resources
- BIND9 Administrator Reference Manual – https://bind9.readthedocs.io/en/v9.18.16/
- MikroTik RouterOS Documentation – https://help.mikrotik.com/docs/display/ROS/RouterOS
Contributors and Testers
- Mathew J. Heath Van Horn, PhD, ERAU-Prescott
- Kyle Wheaton, Cybersecurity Student, ERAU-Prescott
DNS Hierarchy Explained
When you look up a website for the first time, you may notice it will load considerably slower when compared to subsequent revisits. This is because your computer does not yet know the web server’s IP address, and must ask around first before it can start making HTTP requests. However, once the domain-to-IP translation is known, various entities such as your browser, computer, router, and ISP servers all have local storage reserved for caching this information, which speeds up query resolutions. This is a feature for end-user convenience and saving bandwidth, but how does your DNS server know where to look when it receives an unknown domain?
Reference the diagram below while you follow these steps to understand the process.
1. The client device makes a DNS query to the LAN’s server for the domain <erau.edu.>
2. The domain is neither cached nor listed under any of its zones, so it forwards the request to a DNS resolver
3. The Resolver has a built-in list of all of the root DNS servers
- There are 13 root <.> servers in the world. They are named sequentially from <a.root-servers.net> to <m.root-servers.net>
- Each one knows the location of the Top Level Domain (TLD) servers
4. One of the root servers will provide the address of the <edu> TLD server, which is sent back to the Resolver
5. The Resolver will query the <edu> TLD server for the <erau> subdomain
6. The subdomain DNS identifies the webserver for <erau.edu.> and sends this information back to the end user

Now that we understand how a Forwarding DNS server works, let’s build one for our network.
Phase I – Building Network Topology
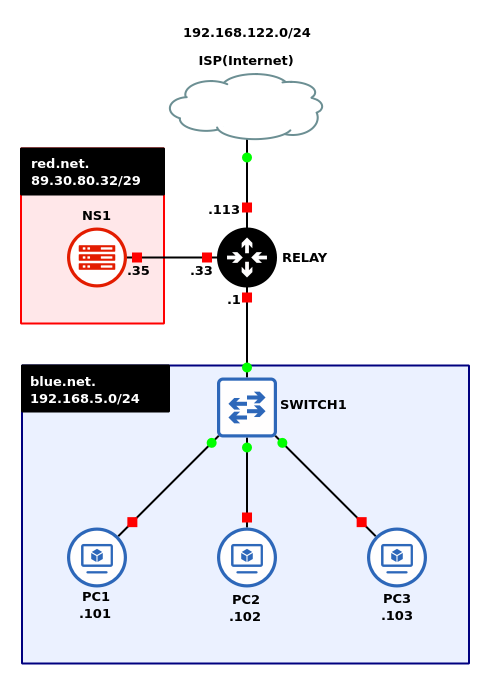
This lab is an extension of Chapter 25. If you have not completed it yet, it is recommended that you do so first before continuing. You will be building a topology that looks like this:
- Start GNS3
- Open the Chapter 25 Lab
- Save lab as a new project: LAB_10
- Add a NAT node to the workspace and connect it to the router
- Select browse all devices
- Drag the NAT cloud to the GNS3 Workspace
- Connect the NAT Cloud to the router (in this case, we are using ether1 on the router, but you can use any available interface, just make sure to adjust your commands accordingly)
- Start the router and open the console
- Configure the interface connected to the NAT cloud for DHCP by typing
> ip dhcp-client add interface=ether1 disabled=no
- Verify that an IP address has successfully been assigned to the router

Figure 2 – Configuring ether1 for DHCP > ip address print
- Start the remaining devices in GNS3
- Ensure that the Authoritative DNS server is working properly and troubleshoot network connectivity as necessary
NOTE: If nslookup doesn’t immediately work from the individual PCs, give the environment a few minutes to populate tables and share information. We’ve seen several students jump in and modify files erroneously when there was nothing wrong with the GNS3 environment. All that was needed was some time.
Phase II – Configuring the Forwarding DNS Server
Here we will make some changes to our name server’s configuration. It will still have authority over the LAN’s zones (RED, BLUE, and GRAY), but now it will forward all other requests to an outside resolver.
- Navigate to NS1 and log in
- Open the DNS daemon configuration file using any text editor you prefer
> sudo vi /etc/bind/named.conf.options
- Modify the file to allow recursion and allow the labnets ACL access cache and recursion services
recursion yes;
allow-query-cache { labnets; };
allow-recursion { labnets; };
- Add the forwarders directive inside options to allow our network to use Google’s server as our DNS resolvers
forwarders {
8.8.8.8;
8.8.4.4;
}; - Use the following image for configuration reference
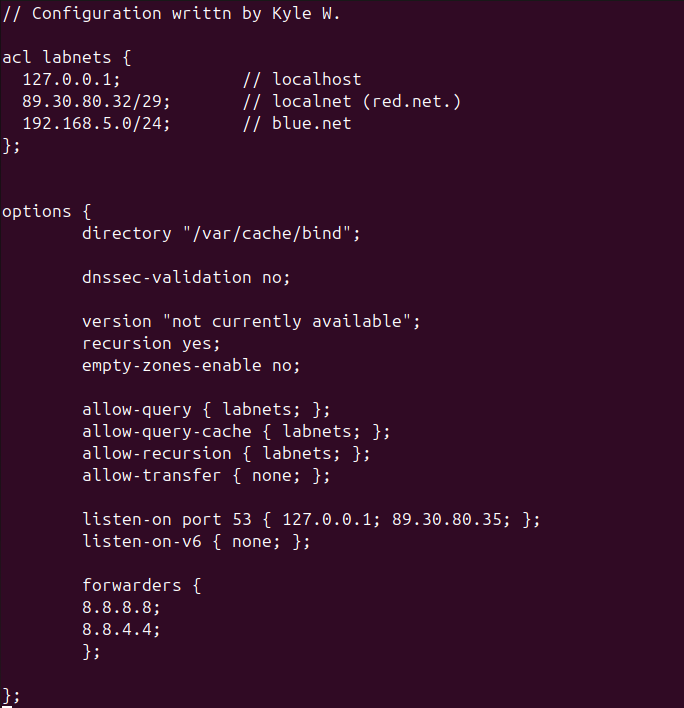
Figure 3 – Modified NS1 settings - Save and exit the editor
- Modify the file to allow recursion and allow the labnets ACL access cache and recursion services
- Check the configuration file for syntax errors
> named-checkconf /etc/bind/named.conf.options
- Restart the BIND9 service and check its status to ensure it is active and that all zones were loaded properly
> systemctl restart named
> systemctl status named
Phase III – Configuring the MikroTik Router with NAT
- Open the router console
- Configure the router with NAT to allow both subnets to access the Internet
- Create a firewall group called labnets which includes both subnets
> ip firewall address-list add list=labnets address=89.30.80.32/29
> ip firewall address-list add list=labnets address=192.168.5.0/24
- Add a NAT rule to the router’s forward-facing interface (in our example, it is ether1). Since it has a dynamic address, its action will be set to masquerade (masq). Otherwise, this value should be set to “src-nat” with its associated static destination address
> ip firewall nat add chain=srcnat action=masq src-address-list=labnets out-interface=ether1 disabled=no
Command Description ip firewall nat Needed to access the control menu for configuring internet protocol firewall network address translation (NAT) add add the following commands to the configuration chain=srcnat Mikrotik calls the grouping of firewall rules “chains”. In this case, we are telling the router to use the srcnat chain – because the source (src) NAT for our packets that originate from outside the network are from our NAT cloud. action=masq For all packets, the router will make a masquerade (masq) action and replace the source port of the IP packet with one provided by the router. This is done because our NAT cloud is using non-static IPs. src-address-list=labnets the source (src) addresses the firewall should be looking for are the ones in the list named ‘labnets’. In step 2.1 above we added two IP addresses to this list: 89.30.80.32/27 and 192.168.5.0/24 out-interface=ether1 the outbound packet interface will be ether1 disabled = no keep this rule in
- Create a firewall group called labnets which includes both subnets
- Test the name resolution service by looking up any public website of your choice from all devices within the LAN
> nslookup www.google.com
> ping www.google.com
View Figure 4 for an example of the results

Figure 4 – nslookup for google.com - Open the NS1 server for a more detailed examination of the DNS hierarchy with the following Domain Information Groper (dig) utility command
> dig +trace www.google.com +nodnssec
View Figure 5 for an example of the results

End of Lab
Deliverables
To receive credit for completing this lab, submit the following 4 screenshots
- Screenshot of RED1
- Successful nslookup of Google
- Successful ping of Google
- Screenshot of BLUE1
- Successful nslookup of Google
- Successful ping of Google
- Screenshot of the dig trace of Google
- Screenshot of GNS3 environment
Homeworks
NOTE: – some websites block DIG requests, so if you get no response, try another site
DIG is short for a tool named “Domain Information Groper”. It is used to interrogate DNS name servers. We use DIG to perform DNS lookups and evaluate the returned responses. It is flexible to use and can be used as a command line or batch function. Visit the man pages in a Linux machine to view all the options available.
- Use the dig manual in the NS1 server (man dig) to explore various ways of using the dig tool. This is very helpful when assessing how much information your web pages reveal or performing reconnaissance on a target.
Assignment 2 – Use DIG in batch mode
- Use dig’s batch mode to conduct the same 4 inquiries as Assignment 1 on three different websites. You will need to create a file to contain the website names. Submit 4 screenshots as evidence:
RECOMMENDED GRADING CRITERIA FOR BOTH ASSIGNMENTS – 4 screenshots
- Demonstrated using Dig to perform a DNS lookup
- Retrieved all DNS records along with the IP addresses using Dig
- Utilized advanced Dig commands to retrieve only the IP address associated with the target domain name
- Used Dig to look up the target domain by its IP address

