50 Scanning and Enumeration – Banner Grabbing
Dante Rocca; Mathew J. Heath Van Horn, PhD; and Jacob Christensen
Banner grabbing is a technique to view services running on a network or device. This is an important tactic for hackers as it narrows the potential ways into the network and may even reveal vulnerable services that can be exploited.
Think of banner-grabbing as blindly knocking on doors in a neighborhood. Any response, including, no response, provides us with information. A knock on one door might be greeted with a dog barking, a man shouting at us to ‘go away’, or we might get lucky and someone will open the door and invite us in for tea and biscuits.
Estimated time for completion: 30 minutes
Learning Objectives
- Learn the value of banner grabbing by performing this act on a target machine in various ways
- Telnet
- netcat
- cURL
- Nmap
Prerequisites
Deliverables
- 4 screenshots are needed to earn credit for this exercise:
- Banner grab on port 21 using Telnet
- Banner grab on port 21 using netcat
- HTTP header grab on port 80 using cURL
- Banner grab of all ports using Nmap
Resources
- Kennedy Muthii – “6 Banner Grabbing Tools with Examples” – https://www.golinuxcloud.com/banner-grabbing/
- Steven Vona – “Banner Grabbing – Penetration Testing Basics” – https://www.putorius.net/banner-grabbing.html
- DRD_ – “Use Banner Grabbing to Aid in Reconnaissance & See What Services Are Running on a System” – https://null-byte.wonderhowto.com/how-to/use-banner-grabbing-aid-reconnaissance-see-what-services-are-running-system-0203486/
Contributors and Testers
- Bernard Correa, Cybersecurity Student, ERAU-Prescott
Phase I – Scanning with Telnet
The first tool we’ll look at is Telnet. Telnet (teletype network) is an application layer protocol for 8-bit bidirectional communications using a client-host configuration. Telnet was not an official protocol until 1973. We will use Telnet to ‘knock’ on a remote target and record the responses. It is recommended to open a text editor of your choice; you will collect a lot of information and need a place to document it.
However, before we can grab any banners, we first need to find our target.
- Using Eagle Net, start the following machines:
- DHCP Server
- Router
- Kali VM
- Metasploitable3-Linux
- From Kali, scan the Metasploitable3-Linux VM for potential points of entry
- Host Discovery – perform a Ping Scan (-sn) to find the target’s IP address (e.g. 200.200.200.6 as shown below)
> nmap -sn 200.200.200.0/24
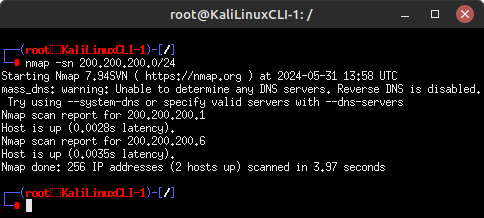
Figure 1 – Ping sweep on target network - Port Discovery – perform a port scan on Fast Mode (-F) to see what services the target is running
> nmap -F 200.200.200.6
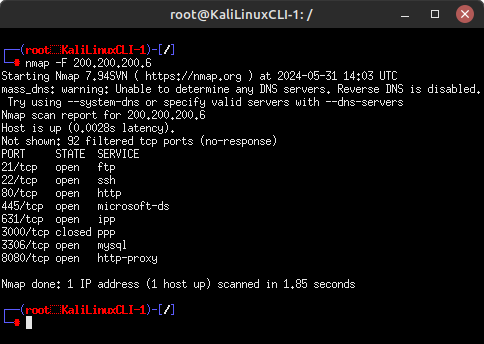
Figure 2 – List of open ports on the target machine
- Host Discovery – perform a Ping Scan (-sn) to find the target’s IP address (e.g. 200.200.200.6 as shown below)
- Once you have a list of the open ports on the target, we can start knocking on those doors and grab the banners of those services
- Start a new telnet session
> telnet
- Connect to the target over port 21 to view their FTP server banner
> open 200.200.200.6 21
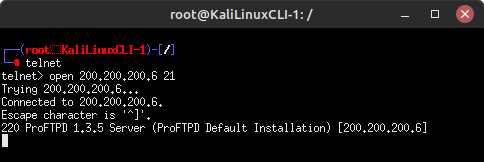
Figure 3 – Target’s FTP banner From this output, we now know two critical pieces of information: our target is using ProFTPD to host this service, and it is running version 1.3.5. Lets do some quick research on this. On your host machine, open any browser and search for “nvd cve proftpd 1.3.5 vulnerabilities”:
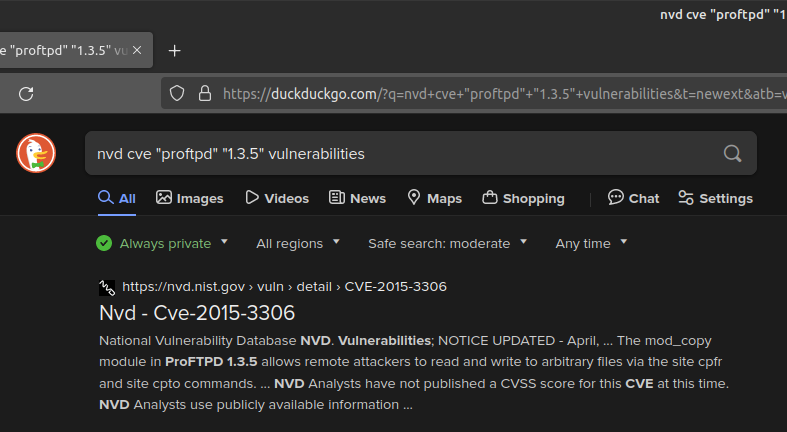
Figure 4 – Vulnerability research We got a hit! It appears that ProFTPD version 1.3.5 may be vulnerable to CVE-2015-3306, which allows for remote file modification attacks. We could look into this further to learn how to exploit this (or find other CVEs), but for now, this is good enough. Keep in mind that NIST’s National Vulnerability Database (NVD) is a great resource for looking up known exploits in services and applications.
- Press Ctrl+] and type quit to exit telnet
- Start a new telnet session
- Repeat this process with the other open ports you find. If you want to go over and beyond, try to find at least one CVE for each one!
Port Service Banner/Header Potential Vulnerability
21 ftp ProFTPD 1.3.5 Server (ProFTP Default Installation) CVE-2015-3306 22 ssh SSH-2.0-OpenSSH_6.6.1p1 Ubuntu-2Ubuntu2.13 CVE-2016-6515 80 http* Date: Fri, 31 May 2024 15:20:25 GMT
Server: Apache/2.4.7 (Ubuntu)
Connection: close
Content-Type: text/html;charset=UTF-8CVE-2022-22720 445 microsoft-ds Connects – no info Not enough information 631 ipp Connects – no info Not enough information 3306 mysql Connection refused Not enough information 8080 http-proxy* Date: Fri, 31 May 2024 15:38:13 GMT
Cache-Control: must-revalidate,no-cache,no-store
Content-Type: text/html;charset=ISO-8859-1
Content-Length: 1267
Server: Jetty(8.1.7.v20120910)CVE-2017-7657 NOTE: If you struggled with ports 80 and 8080, this is because the server is waiting for you (the client) to request the data that you want to see. Luckily, this is easy to do! After connecting to either port, type the following command to request the website’s header information:
HEAD / HTTP/1.0
If done correctly (you may have to press Enter a couple of times), you should successfully retrieve the banner. This same technique can be repeated on port 8080 as well.

Figure 5 – Target’s HTTP header information - Banner grabbing is an iterative process that results in many dead ends. You will switch between Nmap and the various Banner Grabbing tools quite often. Our initial scan only covered 100 of the most commonly used TCP ports. If you are having difficulties getting into a system, use various Nmap options to find more points of entry. Some examples include:
-
- UDP, TCP Null, FIN, and Xmas scans
- Idle and bounce scans
- Scan all ports
Phase II – Banner Grabbing with Netcat
Netcat (nc) is another tool used for banner grabbing in a similar vein to telnet. It has not been supported since 1996, but it is still very useful. Many derivatives of netcat exist, but most people still use the original netcat.
- To use netcat to grab the target’s FTP banner over port 21
> nc 200.200.200.6 21
- Like telnet, the resulting output should display the FTP service and version number
- Exit netcat using Ctrl+C
- For more practice with netcat, you should repeat the banner grabbing exercise in Phase I
Are your results the same? Which command do you prefer?
Phase III – Banner Grabbing with cURL
cURL (client URL) uses URL syntax to transfer data using various network protocols.
- Using cURL, retrieve the HTTP webpage hosted on our target
curl http://200.200.200.6
- The result should be a complicated mess of the site’s raw HTML code
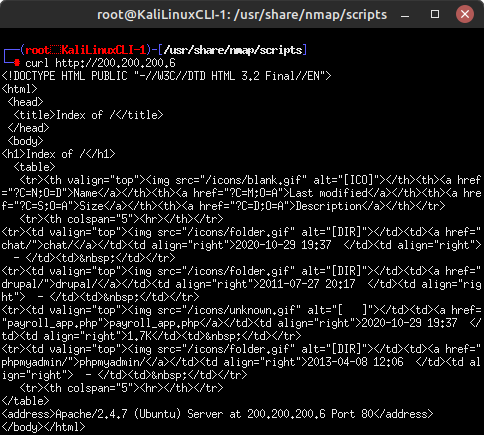
Figure 6 – Retrieving HTML code with curl - As discussed earlier, a web server’s header may be of more interest to us. You can display header information using the include (-i) switch
> curl -i http://200.200.200.6
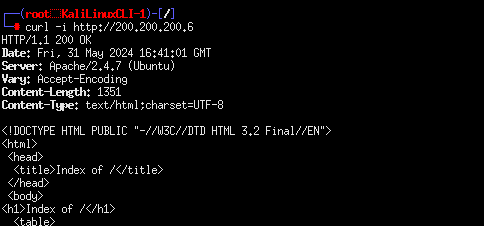
Figure 7 – Retrieving the header with curl
- The result should be a complicated mess of the site’s raw HTML code
Phase IV – Banner Grabbing with Nmap
Nmap is much more than just a port scanner! We can also write scripts to conduct more advanced enumeration techniques once an open connection is found. By default, several pre-written scripts are provided with the base installation of Nmap in the /usr/share/nmap/scripts directory. There are numerous options available for you to utilize, explore, and enhance your penetration testing knowledge.
- Conduct another fast port scan on the target and use the banner.nse script to display any banners it finds
> nmap –script banner.nse -F 200.200.200.6
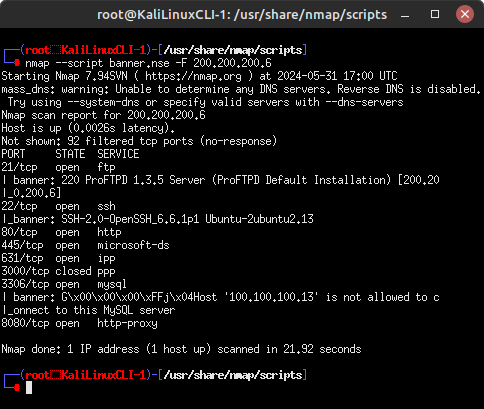
Figure 8 – Nmap banner grabber NOTE: This provides us with additional information beyond our initial Nmap scans, but be aware that running scripts generates more network traffic and is therefore inherently less stealthy.
- Retrieve the HTTP headers on ports 80 and 8080 using the http-headers.nse script
> nmap –script http-headers.nse -p 80,8080 200.200.200.6
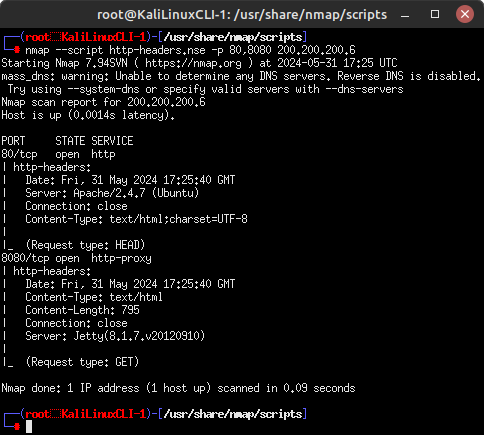
Figure 9 – HTTP headers
Phase V – Viewing Banner Grabs in Wireshark
Banner grabbing is a great tool for stealthily gathering information about a target system, but how does it appear over the wire? In this section, we will retrieve the target’s FTP server banner and watch the packets in Wireshark.
- Start a Wireshark packet capture session on the Kali-Router link
- Perform a banner grab on port 21 (FTP) using your favorite method covered so far! – telnet / netcat / nmap
In this example, I used the following Nmap command:
> nmap –script banner.nse -p 21 -Pn 200.200.200.6
- In Wireshark I can see that my Nmap scan produced about 8 packets of noise to learn that the target is using ProFTPD 1.3.5
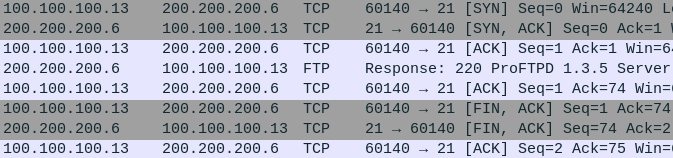
Figure 10 – Nmap banner grap network footprint - In contrast, using telnet only produced 5 packets of noise to get the same information!

Figure 11 – Telnet banner grab network footprint Your results may vary depending on the tools and techniques that you use. Examine your own packet capture… how does your network footprint compare? More packets? Less? Play with the various techniques we learned throughout this chapter and take note of any differences you find. Remember, the fewer packets generated, the more difficult it is to detect us!
End of Lab
Deliverables
4 screenshots are needed to earn credit for this exercise:
- Banner Grab on port 21 using Telnet
- Banner Grab on port 21 using netcat
- Banner Grab on port 80 using cURL
- Banner Grab of all parts using Nmap
Homeworks
Assignment 1 – Expand your banner grabbing
Utilize the website for Nmap and the manual pages (man nmap) using various settings to discover at least 2 ports not revealed in the walk-through. Perform banner grabs on both ports using telnet, netcat, and cURL. Compare and contrast the different results in a short paragraph.
RECOMMENDED GRADING CRITERIA
- A document containing the following information
- The identification of at least two ports that were not revealed in the walk-through
- Screenshots from telnet, netcat, and cURL for unknown port#1
- Screenshots from telnet, netcat, and cURL for unknown port#2
- A brief description comparing the results of the different banner grabs
Assignment 2 – Metasploitable 3 – Windows
Start the Metasploitable 3 – Windows VM. Discover all of the ports and use the various banner grab techniques to get as much information about the machine. Create a document to contain the recommended grading criteria. (HINT: There are more than 30 ports to find)
RECOMMENDED GRADING CRITERIA
- A document containing the following information
- A list of all the available ports along with their description (e.g. Phase 1, Step 7 chart)
- A screenshot from telnet, netcat, or cURL for one of the ports
- A screenshot from telnet, netcat, or cURL for one of the ports
- A brief description comparing the results of the different banner grabs

