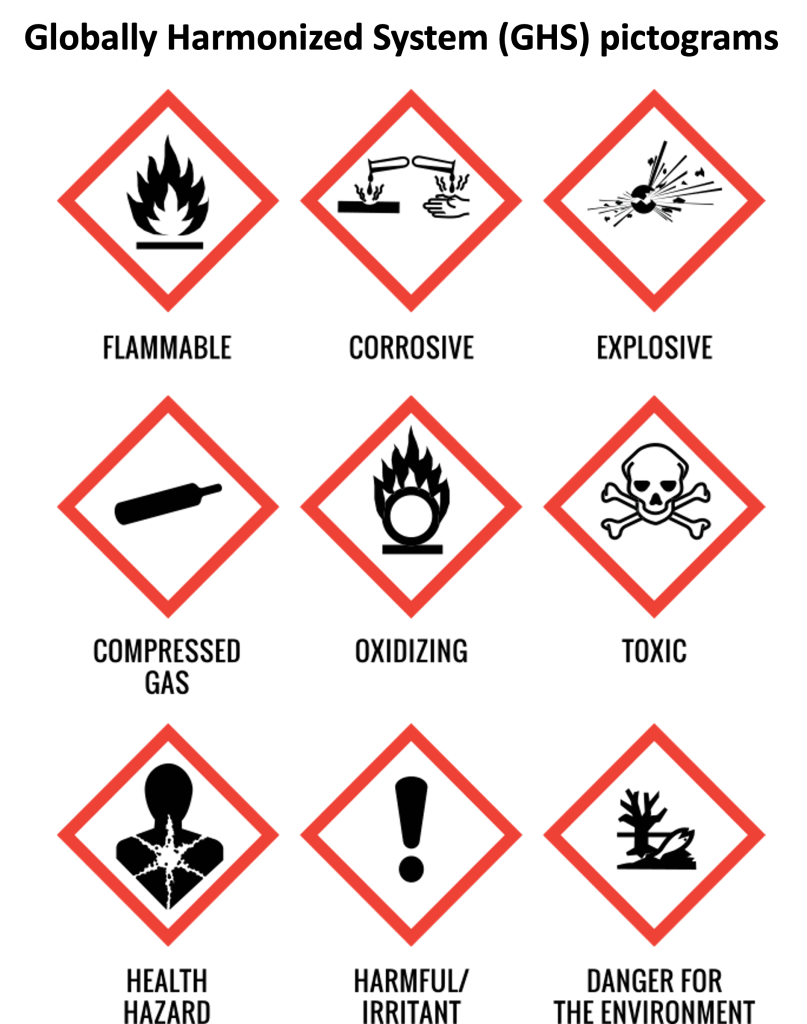
3 Safety guidelines, laboratory equipment and volume conversions
Safety guidelines
Don’ts
🚫 Do not eat, drink, or chew gum in the lab.
🚫 Do not wear shorts or open-toe shoes.
🚫 Do not use your phone during lab (unless is allowed by the instructor).
Do’s
🧴 Clean your workspace with 70% ethanol or Simple Green D before and after each session.
🥼 Wear your lab coat at all times while you are in the lab, even if you are not doing experiments.
👖 Dress safely: Long pants, closed-toe shoes, and tie back long hair.
📘 Prepare ahead: Read the corresponding materials for the lab before class and arrive on time for pre-lab quizzes.
🔬 Disinfect pipettes and equipment with 70% ethanol before leaving.
🎒 Keep your backpack/purse in the designated area of the lab.
Throughout these lab exercises you will encounter hazardous chemicals and conditions. Their proper handling is essential for your safety and the safety of others.
Hazards present in the lab
🦠 Biological Hazards
-
You will handle viable bacteria cultures. Although they are BSL-1, treat them as potentially pathogenic.
-
Always wear gloves and handle tubes with care. Put the gloves on right before starting the experiment.
-
If you spill bacteria cultures or reagents on the bench, disinfect/clean immediately with 70% ethanol.
-
If you spill bacteria cultures or reagents on yourself, remove your lab coat right away and notify the instructor.
🔥 Thermal Hazards
-
Boiling agarose can cause severe burns. Prepare agarose solutions exclusively in the location indicated by the instructor and wear the appropriate gloves to handle the agarose container.
-
Use a beaker or flask bigger than 100 mL, unopened, to dissolve the agarose in the microwave oven. Heat the solution for up to 2 min, in 30 sec intervals, until it looks clear.
-
Pour the agarose gels only in the designated prep area.
-
Do not bring boiling, melted agarose to your workstation.
⚡ Electrical Hazards
-
The electrophoresis boxes use dangerous electric currents.
-
Never touch buffers or remove the lid from the box while the power is on.
-
Before running a gel, ensure the work surface is completely dry.
🧪 Chemical Hazards
-
SYBR Green is a mutagen that binds DNA. Always wear gloves when handling stained gels or buffers.
-
UV light used for DNA visualization is dangerous. Do not leave the transilluminator door open before using it.
-
The buffer solutions may not be highly toxic or flammable, but treat them with caution and handle responsibly. When the gel is done, dispose of the buffer following the directions given by the instructor.
Remember: Safe lab practices protect you, your colleagues, and the integrity of your work.
Guidelines for Proper Use of Micropipettes
General handling
-
Always hold micropipettes vertically when aspirating liquids.
-
Avoid laying them down on the bench with liquid in the tip, to prevent contamination and liquid from entering the shaft.
-
Never use micropipettes without a disposable tip attached.
Setting the volume
- Some pipettes have a lock mechanism. Make sure the lock is off before you turn the volume dial.
-
Turn the volume dial gently and only within the pipette’s range (e.g., P20 = 2–20 µL).
Aspirating and dispensing
First stop: Depress plunger to the first stop, immerse tip just below the liquid surface. To aspirate the liquid, release the plunger slowly. Do not “snap” the plunger, as it can cause bubbles and will give you an inaccurate volume.
Second stop: When dispensing, press to the first stop to deliver volume, then to the second stop to expel any remaining liquid. Always hold the tip against the wall of the receiving tube when dispensing or right at the surface of the liquid, if there is any on the tube.
It is important that you do not release the plunger before you take the tip out of the liquid.
Also, select the smallest size pipet that will handle the volume you need to transfer to get the greatest accuracy. Accuracy decreases as you use unnecessarily large pipets for small volumes.
Changing Tips
-
Always use a fresh sterile tip for each new sample to avoid cross-contamination.
-
Eject the tips using the tip ejector button, never pull them off by hand.
-
Dispose of used tips in the designated waste container.
Care and Maintenance
-
Never immerse the shaft in liquid, only the disposable tip should contact any solution.
-
If liquid accidentally enters the shaft, clean immediately and notify your instructor.
-
Store pipettes upright on a stand when not in use.
Best Practices for Accuracy
-
Pre-wet the tip by aspirating and dispensing liquid once before actual use.
-
Keep the pipette and liquid at room temperature for consistent results.
-
Use the right size pipette for the volume you need (e.g., don’t use a P1000 for 10 µL).
-
Pipette slowly and steadily, rushing creates bubbles and reduces accuracy.
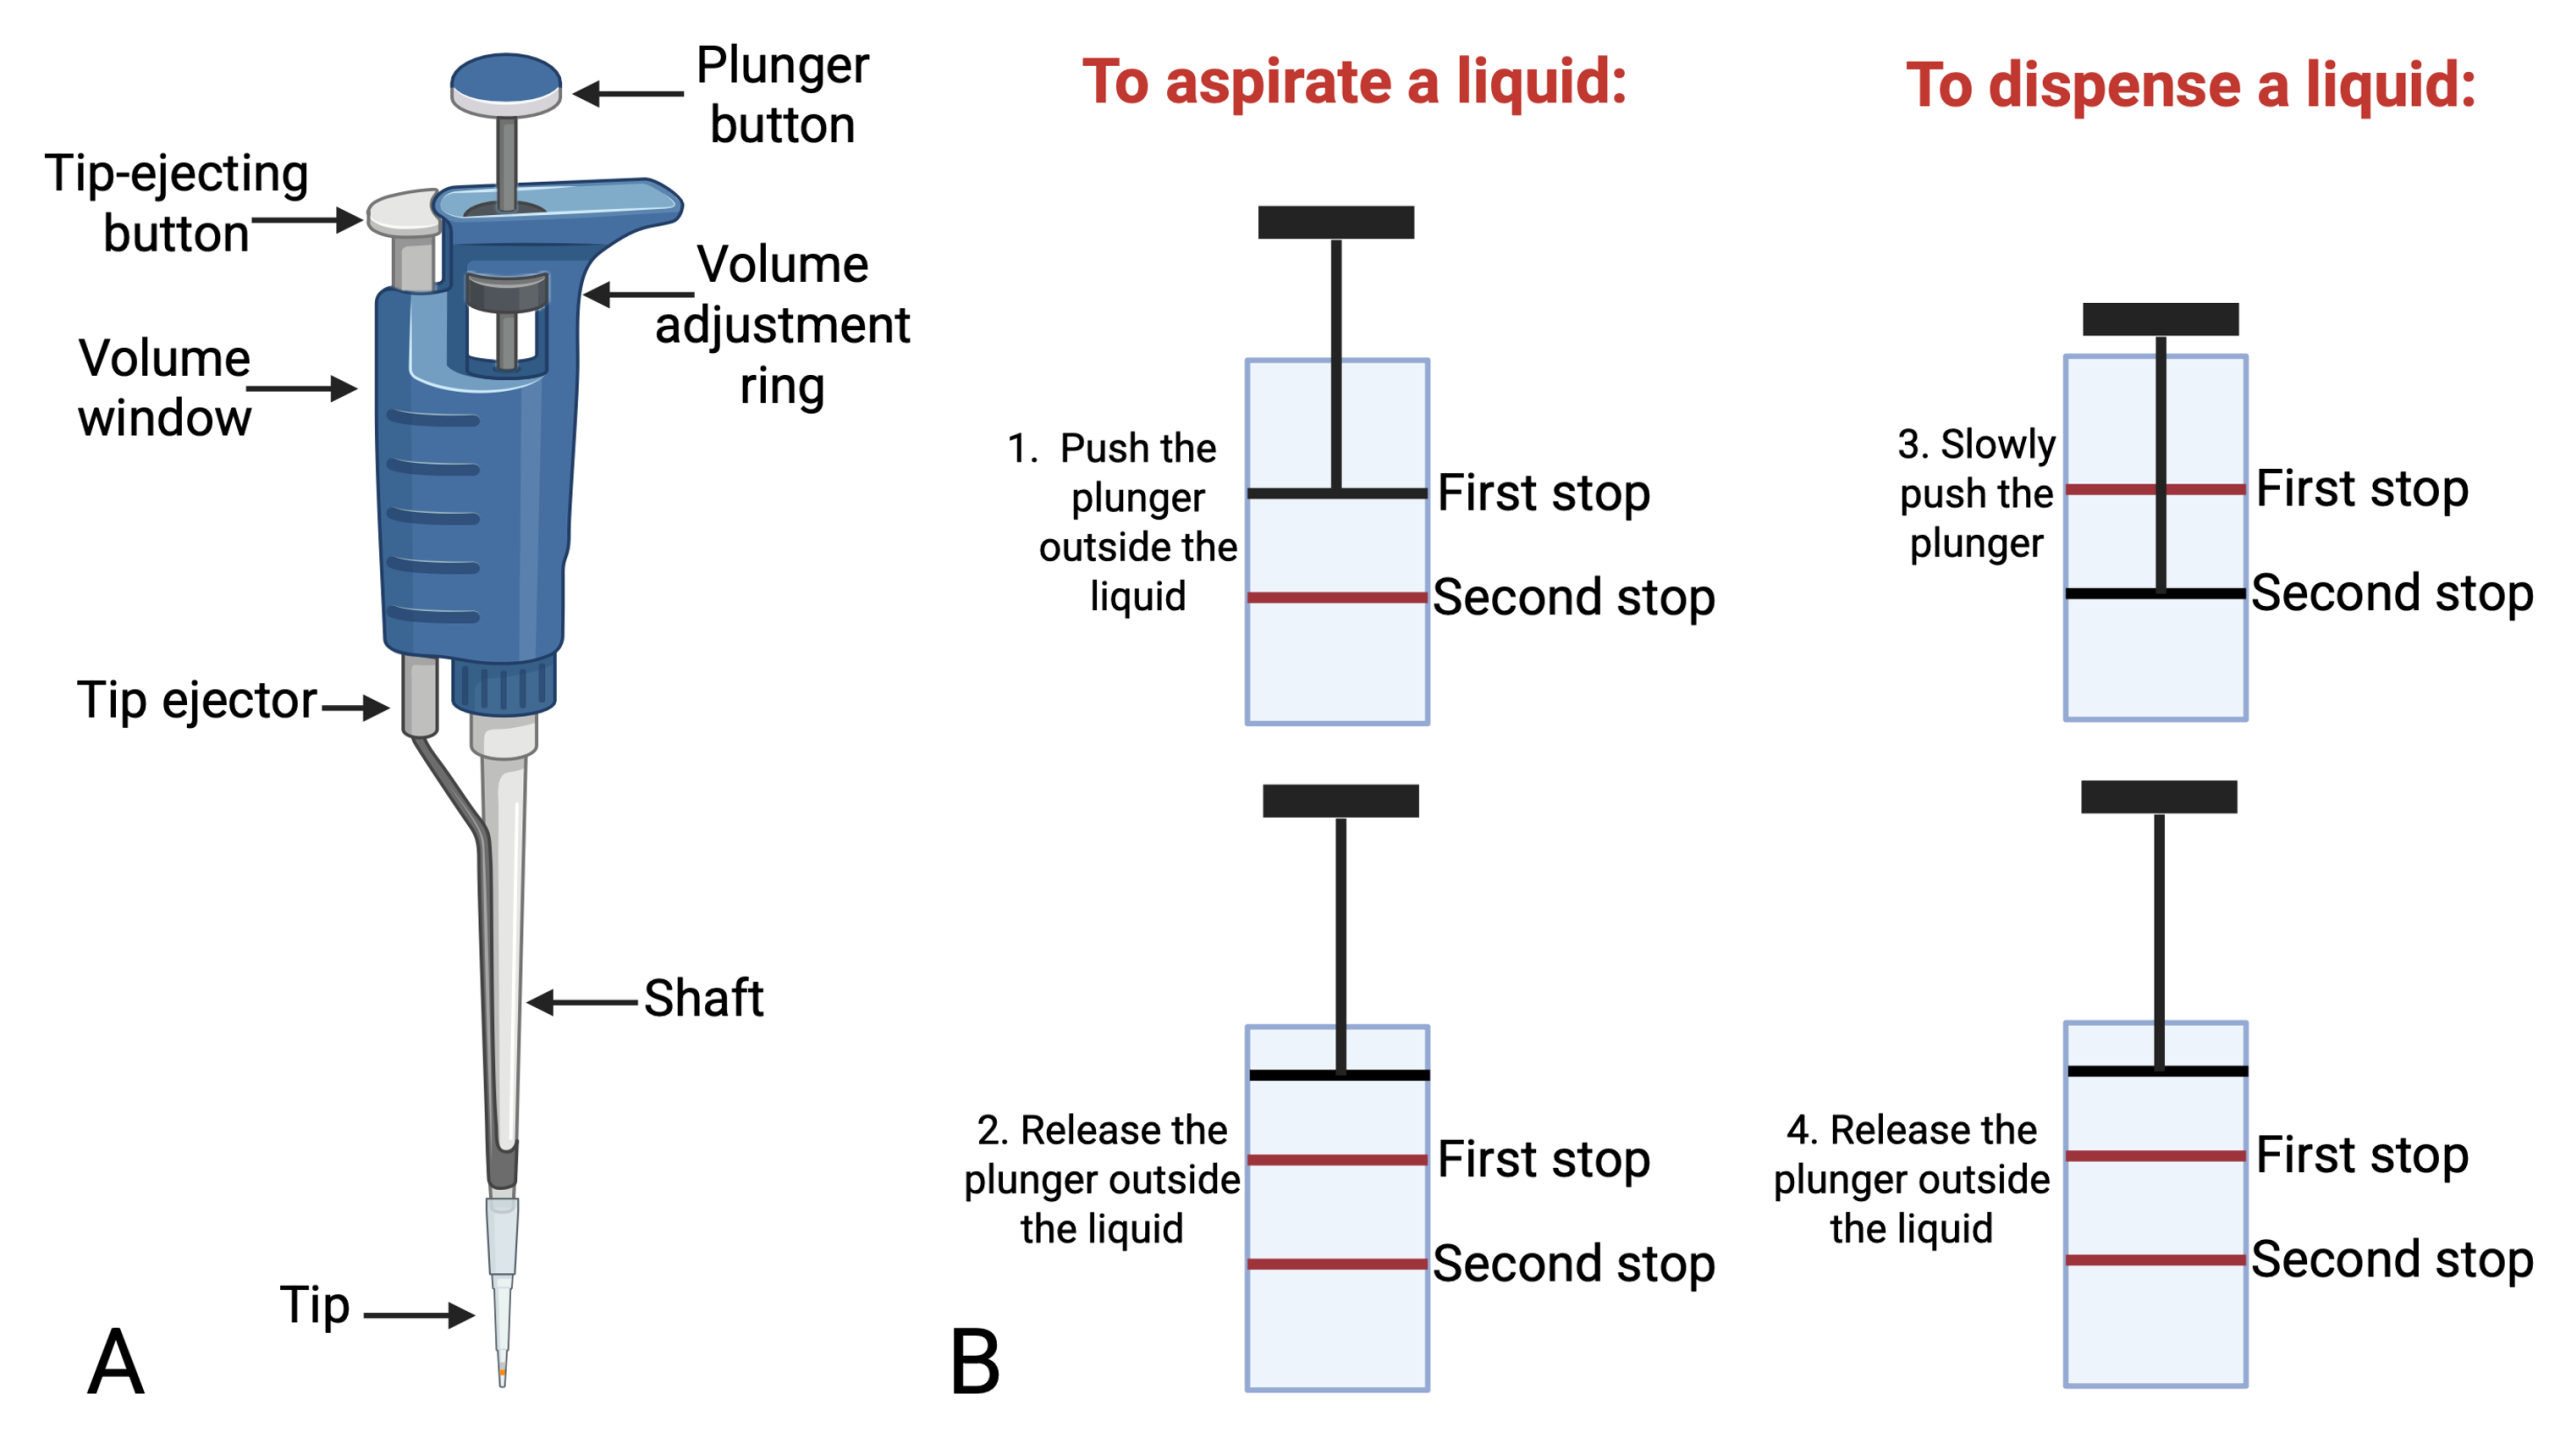
Figure 1.
Guidelines for Proper Use of Microcentrifuges
General Safety
-
Always keep the lid closed and locked while the centrifuge is running.
-
Never open the lid until the rotor has completely stopped.
-
Do not use a centrifuge that is unbalanced, vibrating, or making unusual noises. Stop it immediately and report it to the instructor.
-
Only use tubes and adapters compatible with your centrifuge model.
Loading the Rotor
-
Balance tubes carefully: Place tubes opposite each other with equal volumes (±0.01 mL) and use balance tubes with water if you have an odd number of samples.
-
Ensure all tubes are securely capped before spinning.
-
Check that tubes are placed symmetrically in the rotor.
Operation
- A microcentrifuge has a rotor lid; make sure it is on before you close the external lid.
-
Close the lid firmly and make sure it is locked before starting.
-
Set the correct speed (rpm) and time needed for your protocol.
-
Stay near the centrifuge when it first begins spinning to make sure it runs smoothly.
-
When the time is up, wait until the rotor has stopped completely before opening the lid.
-
Remove tubes carefully and check for cracks or leaks.
-
If a spill occurs inside, clean immediately with 70% ethanol (wear gloves).
-
Leave the lid open after use to allow the chamber to dry.
Volume conversions
Metric Prefixes
-
1 Liter (L) = base unit.
-
Milli (m) =10−3, or 1 mL = 0.001 L.
-
Micro (µ) =10-6, or 1 µL = 0.000001 L.
Key Relationships
-
1 L = 1,000 mL
-
1 mL = 1,000 µL
-
1 L = 1,000,000 µL
Examples of Conversions
Convert 2.5 L to mL
Convert 500 mL to L
Convert 200 µL to mL
Convert 1.5 mL to µL
Convert 0.005 L to µL
Key Takeaways
-
Always wear PPE: Lab coat, gloves, pants and closed shoes.
-
No food, drinks, or phones: Keep distractions and contamination out of the lab. Minimize the chance of exposing yourself from biological or chemical agents.
-
Keep your bench topclean: Disinfect your work area before and after use.
-
Use equipment safely: Pipettes, centrifuges, and electrophoresis devices must be handled with care.
-
Dispose of waste properly: Biological, chemical, and sharps each go in the right container.