7 Bacteria growth and biofilm development on the EagleStat, a 2D microgravity analog
Hugo Castillo
Who has not wondered what it must feel like to experience microgravity, that free-floating condition that astronauts and objects experience when they escape the pull of gravity on Earth and fly into space? This fascination has grown in the last decade with the increasing presence of images or videos of experiments at the International Space Station on television and social media and it has become a topic of interest for research and education laboratories around the globe (1). Granted, experimentation with real microgravity is available almost exclusively for research purposes and so its simulation on different biological models has become a valuable alternative.
To explore the phenomenon of microgravity, analogs (such as 2D clinostats) are well-studied systems that simulate microgravity effects on cells and bacteria (2-4) and are an opportunity for hands-on experimentation in undergraduate microbiology laboratories. The objective of this paper is to facilitate the understanding of the biological effects of microgravity on bacteria by measuring the differential development of biofilms on Escherichia coli K12 cultures grown under simulated microgravity conditions for 24 h. For this purpose, we propose a set of experiments that use a 2D clinostat (5) along with widely used techniques to count bacteria and measure biofilm biomass (6, 7). Moreover, this experiment relates undergraduate students in space-related majors to palpable effects of reduced gravity conditions on microorganisms and support the development of microbiology skills and scientific analysis by engaging scientific curricula with modern and appealing concepts of space science into traditional microbiology laboratories.
This experiment uses the EagleStat (5), a 2D clinostat designed for bacterial cultures that runs both treatment (microgravity) and control (gravity) samples simultaneously using regular sterile 2 mL screw-cap plastic tubes as growth vessels. The validation of this instrument, developed by the ERAU Space Microbiology Laboratory, was published the journal Life Sciences for Space Technologies (https://pubmed.ncbi.nlm.nih.gov/35940684/).
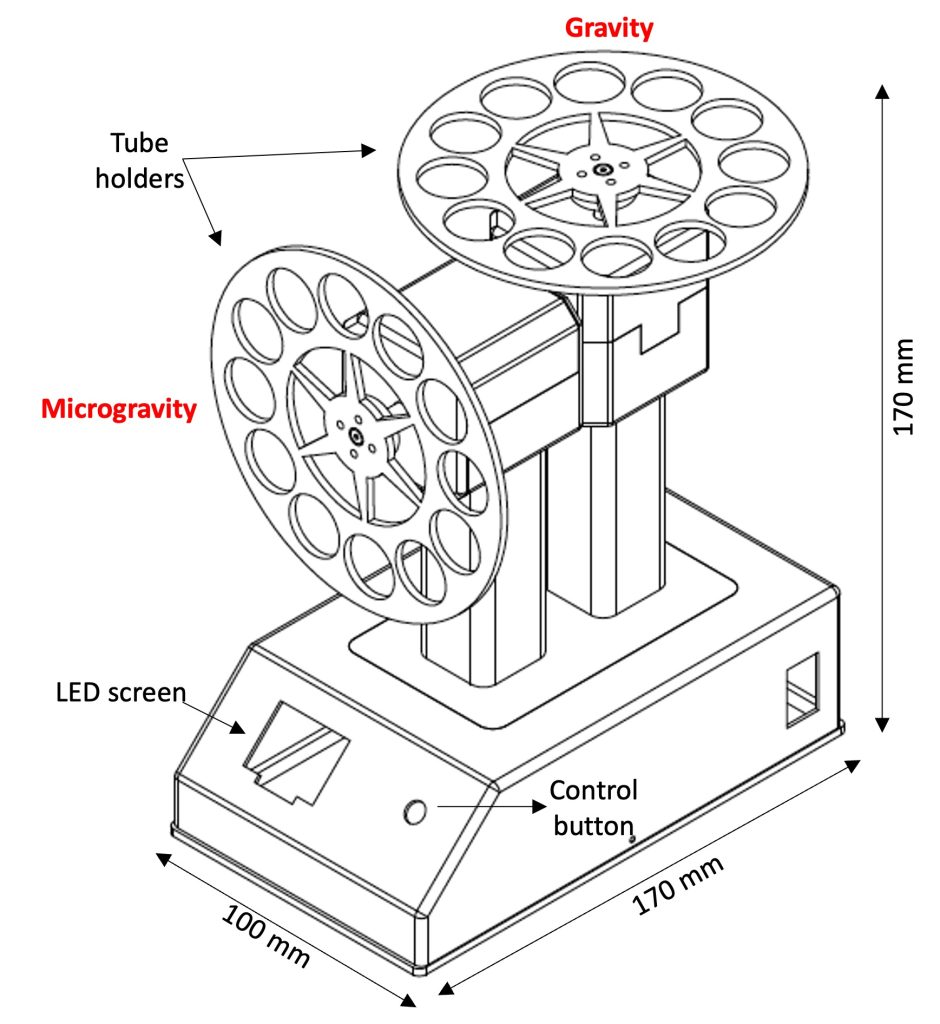
The Eaglestat, a 2D clinostat to simulate microgravity conditions in bacteria liquid cultures. Microgravity and gravity conditions are employed simultaneously with independent motors.
Preparation of the overnight culture
- Add 2 mL of nutrient broth (NB) to a 15 mL conical tube.
- Use an inoculating loop to pick up a colony from the E .coli plate and place the loop into the 15 mL conical tube containing the media, to release the cells into the media.
- Discard the inoculating loop.
- Place the 15 mL conical tube on an orbital shaker inside of a microbiological incubator set at 30°C.
- Set the shaker to a speed of approximately 200 rpm or high enough for vigorous shaking and incubate for 15 hours.
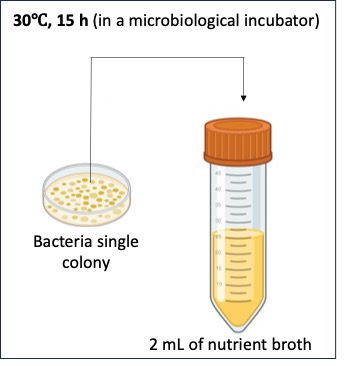
Overnight bacteria culture preparation in a microbiological media. The selection of media depends of the specie used for the experiment (e.g. Escherichia coli is grown in nutrient or Luria-Bertani broth).
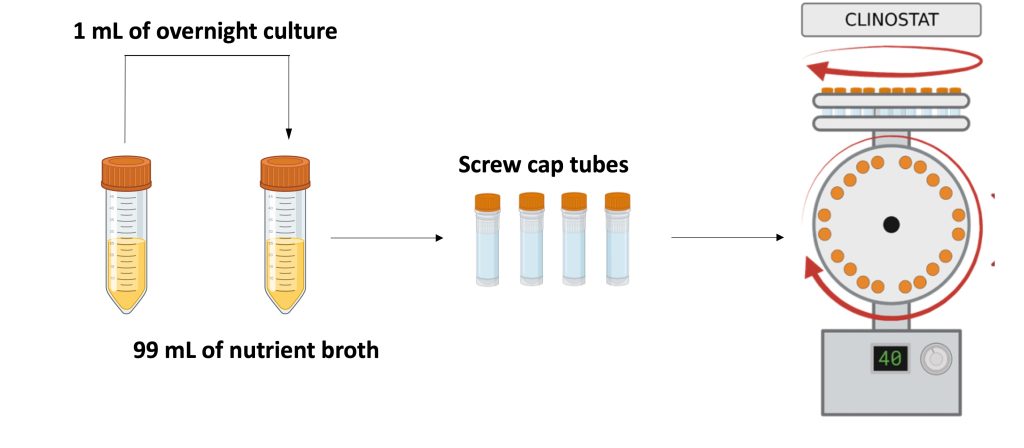
Overnight culture dilution preparation and clinostat loading
- Calculate the volume of media needed for the number of samples that will be run by multiplying the number of samples by 2.3 mL and rounding to the nearest whole number. For example, if you need to prepare six samples you will need approximately 14 mL of media with cells.
- Estimate the volume of overnight culture needed to make a 1:100 dilution. For example, if 14 mL are needed, mix 140 mL of cells with 13.86 mL of NB and vortex vigorously to homogenize.
- Place the screw cap tubes on a tube rack. Place the rack on top of a 70% ethanol-saturated paper towel and fill the tubes with approximately 2 mL of the cell suspension using a sterile pipette. In order to ensure the complete removal of visible bubbles from the tubes, transfer approximately an additional 300µL of the cell suspension to each microtube to form a tension bubble that rises above the tip of the tube.
- Before capping each tube, carefully inspect that there are no bubbles stuck on the sides. If there are bubbles, aspirate an approximate volume of 200 mL of the cell suspension in the tube and use it to dislodge them. Make sure you dispense the liquid back into the tube to reform the tension bubble.
- While capping the tube, liquid will spill out slightly. The ethanol-soaked paper towel will catch the expelled liquid and can be used to clean the outside of the tubes.
- Once all tubes have been capped, place them on the clinostat rotating wheel (top wheel is gravity, front-facing wheel is microgravity).
- Ensure all tubes fit snugly onto the wheels before starting the clinostat. Place the clinostat inside a microbiological incubator set at 30°C.
- Turn on the clinostat by flipping the on/off switch on the back of the clinostat base. The screen should read 8 rpm.
- Record the time the clinostat was started.
- Incubate the samples for 24 h.
- After the incubation, place the tubes on a rack and process immediately or place them in the refrigerator for up to 8 h.
Cells density and colony forming units (CFU) measurement
Optical Density:
Clinostat: Vortex the tubes for 10 seconds to break up cell aggregates and dislodge biofilms. HARVs: Using two syringes as previously described, mix the content of the HARVs thoroughly.
- Transfer triplicate 100 µL aliquots to separate wells on a 96-well plate.
- Once all samples have been added to the 96-well plate, place the plate into a plate reader and measure absorbance at 630 nm.
Colony forming units:
This process involves a serial dilution up to 10-7, therefore 7 sterile Eppendorf tubes will be needed per sample.
- Calculate the number of Eppendorf tubes needed by multiplying the number of samples that will be used for CFU measurement by 7. For example, if you are working with six samples, you will need 42 Eppendorf tubes.
- Fill each Eppendorf tube with 900µL of 1X sterile PBS or saline solution.
- For each tube set, label each tube 1 to 7.
- Starting with the first sample, add 100 µL of the cell culture to the tube # 1.
- Vortex the tube at maximum speed for 5 seconds, then transfer 100µL of the mixture into tube # 2.
- Repeat step 5 until the last tube.
- Using a permanent marker, divide the back of a NB agar plate into four sectors and label as follows:
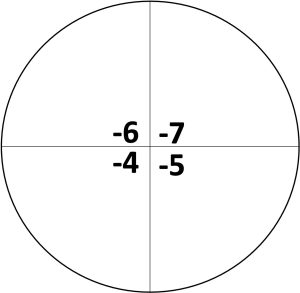
- Starting with the tube # 4, transfer 10 µL aliquots of the cell’s dilution onto the corresponding quadrant. Your instructor will provide specific directions on the dilutions needed for your experiment.
- Repeat twice more for a total of three drops in the same quadrant.
- Repeat steps 8 and 9 with tubes # 5, # 6, and # 7.
- Let the plate sit at room temperature until the liquid has completely absorbed into the agar. Handle the plates with care to prevent the liquid drops from mixing and/or spreading on the plate.
- Incubate the plates at 30°C for a minimum of 12 hours, but not more than 15. If the plates are incubated for too long, the colonies will overgrow.
- Repeat steps 4-12 with the remaining samples.
- After incubation, identify the quadrant that has a countable number of colonies, this is, that where each drop grew between 10 and 30 individual colonies. If none of the quadrants have enough colonies, incubate the plates 2 to 4 more hours. If all of the quadrants have to many colonies to count, the plate was left in for too long.
- Once a quadrant has been selected, count and record the number of colonies in each drop. Calculate the average number of colonies on the quadrant and use the following equation to calculate CFU:
where the # of colonies is the average that was calculated, the volume of the drop is the amount of mixture added from the tube onto the plate (10µL or 0.01 mL), and the quadrant dilution is 10 to the power of the quadrant number (quadrant -5 would be ). The value calculated corresponds to the number of colony- forming units per mL.
- Repeat steps 14 to 16 for the remaining plates.
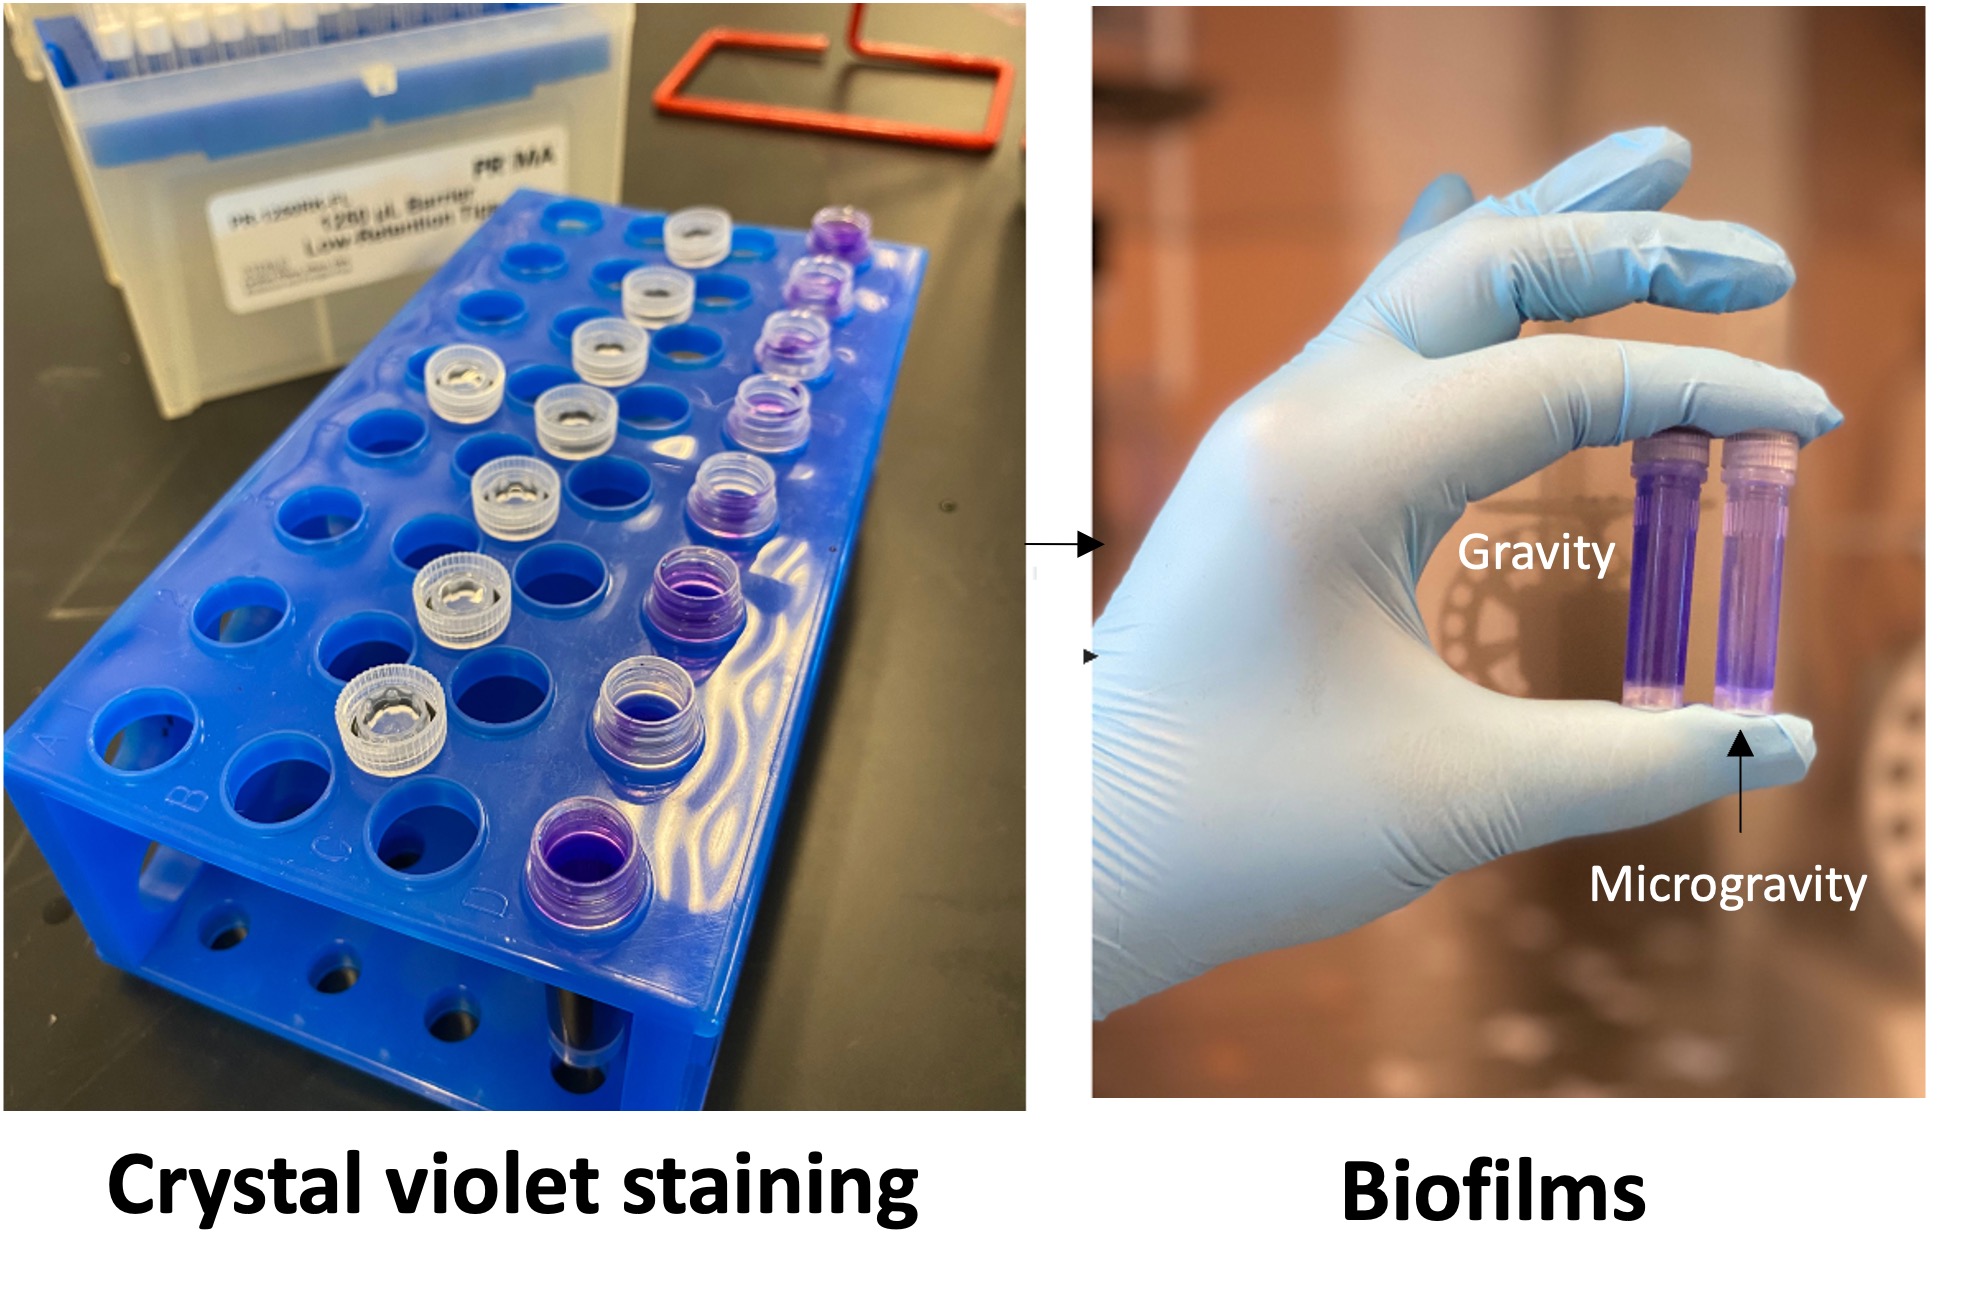
Biofilm biomass (crystal violet assay)
Note: This assay is performed on tubes different from the ones used for CFU and OD.
- Remove the planktonic cells (free swimming cells) from the tubes by carefully pouring the liquid into a beaker containing 10 mL of bleach or using any other biosafety protocol for cells disposal in place in your lab.
- Carefully add 2 mL of 1X PBS or saline solution to each tube. Do not mix the tube.
- Remove the 1X PBS or saline solution by carefully pouring out the liquid into the same container used in step 1. Repeat for a total of three times.
- Carefully add 2 mL of 0.1% crystal violet stain to each tube and let sit for 30 minutes. Note: If you are working with multiple samples at the same time, its best to start a 20-minute timer once the first tube has been filled to avoid over staining.
- After 30 minutes, remove the crystal violet from all tubes by carefully pouring out the liquid into a container designated for chemical waste.
- Carefully rinse the tube with 1X PBS or saline solution for a total of 5 times.
- Following the washes, fill each tube with 1.9 mL of 91% isopropyl alcohol to dissolve the stained biofilms.
- Once dissolved, transfer 100 µL aliquots, in triplicate, into separate wells of a 96-wells plate and measure absorbance 550 nm using a spectrophotometer or a plate reader. The absorbance value is directly related to the biomass of the biofilm developed in the tubes.
Lab report: