6 DNA amplification: Polymerase Chain Reaction
Learning Objectives
-
To describe the fundamental principles of PCR, including the roles of DNA template, primers, DNA polymerase, and nucleotides.
-
To explain the three main steps of the PCR cycle—denaturation, annealing, and extension—and their respective temperatures and durations.
-
To learn to set up a PCR reaction, including the preparation of a master mix and the correct pipetting of reagents.
-
To interpret PCR results using gel electrophoresis, including identifying successful amplification, nonspecific bands, or primer dimers.
-
To evaluate potential sources of error or contamination in a PCR experiment and propose troubleshooting strategies.
What is PCR and what are its components?
The Polymerase Chain Reaction (PCR) is a molecular biology technique used to amplify specific DNA fragments from complex mixtures, such as genomic DNAA, or from small amounts of genetic material, similar to searching for a needle in a haystack, then creating billions of copies of that needle. This amplification occurs through repeated temperature-controlled cycles, which drives the synthesis of DNA by alternating between high and low temperatures. A typical PCR reaction requires the following components, known collectively as mastermix:
- DNA Template: A sample containing the target DNA region, typically a specific gene or gene fragment.
- DNA Polymerase: A thermostable enzyme, such as Taq or Pfu polymerase, that synthesizes new DNA strands and remains active despite repeated high-temperature denaturation steps.
- Primers: Short sequences of DNA (15-20 base pairs) that are complementary to the target DNA’s sense and antisense strands, serving as starting points for DNA synthesis. These are known as the forward and reverse primers.
- Deoxynucleoside Triphosphates (dNTPs): The building blocks of DNA, including adenine (A), thymine (T), guanine (G), and cytosine (C), which are necessary for the synthesis of new DNA strands.
- Buffer Solution: Salt mixture that provides the optimal pH and ionic environment, containing essential cations (mainly magnesium (Mg²⁺) and potassium (K⁺)) required for DNA polymerase activity.
Generally, PCR reactions are prepared in volumes ranging from 10-50 uL, depending on the type and application using a thermal cycler (a.k.a. “PCR machine” or “thermocycler”). A thermal cycler is a machine that heats and cools the PCR components in a plastic tube in order to attain the temperature required for each step and hold it for the desired time.
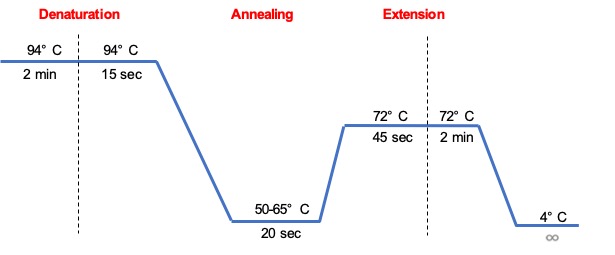
What are the steps of a PCR program?
A PCR program consists of 3 main temperatures repeated 20-40 times. Each set of three is known as a cycle.
Denaturation (the step where a DNA double helix molecule splits up into two single strands)
The first step consists of heating the reaction chamber to 94–98 °C for 20–30 seconds to cause the separation of the double strand of DNA by breaking the hydrogen bonds between complementary bases. This denaturation yields two single-stranded DNA molecules, also known as templates, needed for the synthesis of two new double-stranded DNA molecules. In some instances, there is a need for an initiation step for DNA polymerases that require heat activation (hot start) and it consists of heating the reaction at 94–98 °C then hold for 1–10 minutes.
Annealing (the step where short pieces of synthetic DNA define the DNA region to be amplified)
During this step the reaction temperature is lowered to 50–65 °C for 20–40 seconds to allow the primers to anneal to each of the single-stranded DNA templates. Two different primers (forward and reverse) are required in the reaction mixture, one for each of the two single-stranded complements containing the target region.
Each primer is 15-20 bases long and has a unique melting temperature (Tm) . This temperature must be low enough to allow the hybridization of the primer to the template, but high enough for the hybridization to be specific, i.e., the primer should bind only to a perfectly complementary part of the strand, and nowhere else. If the temperature is too low, the primer may bind in random positions and if it is too high, the primer may not bind at all. Suboptimal annealing temperatures lead to non-specific or random amplification. We typically calculate the annealing temperature at about 3–5 °C below the melting temperature of the primers. Once the primers anneal, the polymerase binds to the primer-template hybrid and begins the synthesis of DNA.
Extension/elongation (the step where two new double helix DNA molecules are synthesized)
The temperature at this step depends on the DNA polymerase used; the optimum activity temperature for Taq polymerase (originally isolated from the thermophilic bacterium Thermus aquaticus) is approximately 75–80 °C, though a temperature of 72 °C is commonly used with this enzyme. Another common polymerase used is Pfu from Pyrococcus furiosus. In this step, the DNA polymerase synthesizes a new DNA strand complementary to the DNA template strand by adding free dNTPs from mastermix that are complementary to the template in the 5′-to-3′ direction. The time required for elongation depends both on the DNA polymerase used and on the length of the DNA target region to amplify (generally, DNA polymerases polymerize a thousand bases per minute). Under optimal conditions (no limiting substrates or reagents), at each extension/elongation step, the number of DNA target sequences is doubled, this is, the concentration of the target DNA increases exponentially.
Some reactions include a final elongation step 70–74 °C for 5–15 minutes after the last PCR cycle to ensure that any remaining single-stranded DNA is fully elongated. After the PCR program is completed, we generally cool down the reaction block to 4–15 °C for an indefinite time for an optimal short-term storage of the PCR products.
In order to verify if the PCR successfully amplified the target DNA target region (known as amplicon), we use agarose gel electrophoresis to separate the DNA fragments by size. The size(s) of PCR products can be calculated using the position of the forward and reverse primers within the reference genome and it is determined by comparison with a DNA ladder, a molecular weight marker which contains DNA fragments of known size run on the gel alongside the PCR products as shown on the following figure:
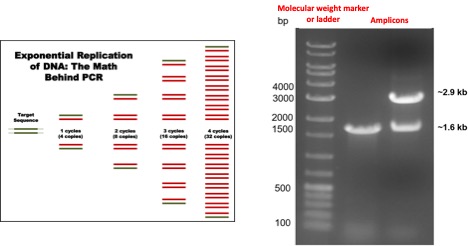
The number of PCR products or amplicons increases exponentially with each PCR cycle. B) An agarose gel shows the result of a PCR reaction: The first lane contains a molecular weight marker or DNA ladder formed by DNA fragments of known size; the second and third lanes show amplicons of a specific size. In some instances, the third lane could be considered as a reaction with non-specific amplification as it contains two bands of a different size.
Materials
Micropipette set
Micropipette tips
Microcentrifuge
Microcentrifuge tubes
PCR tubes
Electrophoresis chamber
Power supply
Thermocycler
Agarose
1X TBE buffer
SYBR green
DNA loading buffer
Molecular weight marker
DNA template (from your last experiment)
PCR mastermix reagents
Safety concerns
This PCR experiment uses chemicals, biological materials, and equipment that pose some potential risks:
- Handle the reagents with gloves, at all times.
- Use biosafety protocols to handle the DNA samples to prevent accidental exposure, and dispose of all the waste in a biohazard container.
- Make sure you balance the microcentrifuges correctly before you use them.
- Avoid eating or drinking, and manage spills and emergencies following the directions of the instructor.
Protocol
- Make sure all your reagents are thawed and kept on ice when not in use.
- Using the DNA sample you extracted in this lab, prepare 20 uL of a DNA dilution at 5 ng/uL. Follow the directions provided by the instructor.
- Spin down the reagents before you open the tubes.
- On two separate PCR tubes set two reactions with the reagents and volumes indicated by your instructor.
- Close the tubes and mix the contents by gently flicking the bottom of the tubes. Tap the tubes gently against the table to get all their content to the bottom.
- Place the tubes in the thermocycler and start the PCR program indicated by the instructor. When the run has been completed (approximately 1.5 h), place all the samples on a freezer box and freeze at -20°C until the next session.
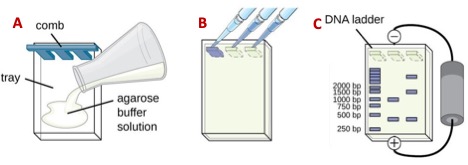
Pouring and running an agarose gel
- Prepare a 1% agarose gel. Weight either 0.4 or 1 g of agarose (for a small and large gel, respectively) and transfer it into a 200 mL beaker with either 40 or 100 mL of 1X TBE buffer. Heat the mixture in the microwave in 15 s increments, hand stirring the content gently with a circular motion until the agarose dissolves completely. Add either 4 or 10 uL of SYBR green, dissolve it and pour the mix into the gel bed and insert the comb on the negative side of the chamber. Let it solidify (~20 mim) or until it turns opaque.
- Once the gel solidifies, place it in the electrophoresis chamber and pour 1X TBE buffer on both sides of the tank until the gel is covered with a ~2 mm thick buffer layer. Pull out the comb gently without breaking the walls of the wells.
- Take the PCR samples out of the freezer and thaw at room temperature. Mix 10 uL of the PCR products with 5 uL of loading buffer on a 2 X 2 cm piece of parafilm paper, pipetting the liquids up and down twice. Skipping the first and last lanes of the gel, pipet the mix (~15 uL) into separate wells of the gel (Figure 3B). Save the first and last lanes of each gel for the DNA molecular weight marker or DNA ladder)
- Connect the electrodes of the chamber to the power supply (make sure the DNA samples are on the negative side!) and run at 100-120 mV for 40-60 m or until the blue dye in the loading buffer reaches ¾ of the length of the gel (Figure 3C).
Key Takeaways
-
PCR is a powerful technique for amplifying specific DNA sequences, enabling the detection and analysis of even trace amounts of genetic material.
-
Precision in reagent preparation and pipetting is critical, as small errors can lead to failed amplification, nonspecific products, or contamination.
-
Thermal cycling parameters must be optimized, especially annealing temperature, to ensure specificity and yield of the desired DNA product.
-
Post-PCR analysis (e.g., gel electrophoresis) is essential for confirming successful amplification and troubleshooting unexpected results.
Lecture slides
Download the slides to follow the pre-lab lecture. PCRLab_2025
Escherichia coli 16S rRNA gene sequence. 16S rRNA sequence
Lab report
Download the PCRreport file and submit on Canvas, following the directions of your instructor.
It refers to all the DNA contained in the chromosome and plasmids.
Thermostable enzyme originally isolated from the bacterium Thermus aquaticus
Thermostable enzyme isolated from the bacterium Pyrococcus furiousus